
Installation Instructions

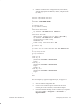
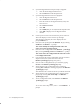
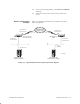
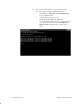

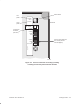
Table Of Contents
- Title page
- Contents
- About this manual
- Safety information
- Ch 1 - Introduction
- Ch 2 - Adding cards to the Controller
- Unpacking the System Controller
- Unpacking the picocells
- System Controller card configuration
- Adding cards to the System Controller (first steps)
- Jumper and DIP switch settings
- Attaching bus cables
- Adding cards to the System Controller (final steps)
- Configuring Controller cards
- Verifying the card configuration
- Ch 3 - Installing the Controller
- Ch 4 - Verifying the Controller configuration
- Ch 5 - Configuring the router
- Ch 6 - Testing picocells
- Ch 7 - Installing picocells
- Ch 8 - Connecting to external equipment
- Ch 9 - System testing
- Ch 10 - Installation inspection
- Ch 11 - Provisioning
- Ch 12 - Remote Client
- Ch 13 - Troubleshooting
- Ch 14 - Maintaining Quad T1 cards
- App A - Specifications
- App B - Standards compliance information
- App C - Part numbers
- App D - Updates and backups
- Index
1026209–0001 Revision B
Configuring the router 5–3
4. Edit the renamed router configuration file, listed below,
with the appropriate IP addresses, masks, and passwords
(if used):
service udp–small–servers
service tcp–small–servers
!
hostname <CUSTOMER NAME>
!
ip subnet–zero
no ip domain–lookup
!
interface Ethernet0
ip address <IP Address X> <Mask X>
!
interface Serial0
description Leased Line to AT&T (<A>–><B>)
ip address <IP Address Y> <Mask Y>
encapsulation frame–relay
bandwidth 56
frame–relay interface–dlci <
B
>
!
no router rip
!
ip route Z.Z.Z.0 255.255.255.224 <IP Address Z>
!
no ip http server
no ip classless
!
line con 0
line vty 0
password <customer determined>
login
line vty 1
password <customer determined>
login
length 0
line vty 2 4
password <customer determined>
login
!
end
For an example of a typical configuration file, see page 5–6.
5. Save the edited configuration file.
6. Connect an 8–conductor phone cable from the router
console port to the Controller, via the DB–9 adapter.
7. From the Windows desktop on the Controller (or a separate
PC), select Start → Programs → Accessories →
HyperTerminal.