
Installation Instructions
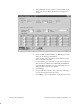
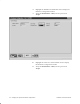
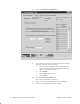
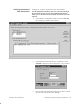

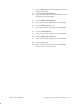
Table Of Contents
- Title page
- Contents
- About this manual
- Safety information
- Ch 1 - Introduction
- Ch 2 - Adding cards to the Controller
- Unpacking the System Controller
- Unpacking the picocells
- System Controller card configuration
- Adding cards to the System Controller (first steps)
- Jumper and DIP switch settings
- Attaching bus cables
- Adding cards to the System Controller (final steps)
- Configuring Controller cards
- Verifying the card configuration
- Ch 3 - Installing the Controller
- Ch 4 - Verifying the Controller configuration
- Ch 5 - Configuring the router
- Ch 6 - Testing picocells
- Ch 7 - Installing picocells
- Ch 8 - Connecting to external equipment
- Ch 9 - System testing
- Ch 10 - Installation inspection
- Ch 11 - Provisioning
- Ch 12 - Remote Client
- Ch 13 - Troubleshooting
- Ch 14 - Maintaining Quad T1 cards
- App A - Specifications
- App B - Standards compliance information
- App C - Part numbers
- App D - Updates and backups
- Index

1026209–0001 Revision B 4–10 Verifying the System Controller configuration
4. If the PSID (public system identification) is not displayed
for the cluster, click Add P/RSID.
Make sure all AIReach Office clusters are assigned the
same PSID value.
5. Enter the specified PSID information for each cluster and
click Accept.
6. Click Close to return the AROSC Configuration window.
7. Click the Frequency/DVCC tab; then click the tab for the
specified band (800–A in the example below) to display the
window illustrated below:
8. Verify that all Frequency values (channels) are enabled (box
checked).
If the Frequency values are not enabled:
a. Enter the start channel value in the left Frequency
window and the end channel value in the right
Frequency window.
b. Click Enabled.
Note
In the PCS bands (1900 MHz), channels 1000 and
above are not available and must be disabled.