
Installation Instructions
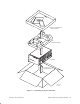
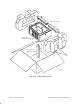
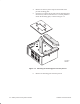
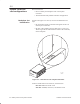
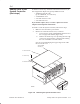
Table Of Contents
- Title page
- Contents
- About this manual
- Safety information
- Ch 1 - Introduction
- Ch 2 - Adding cards to the Controller
- Unpacking the System Controller
- Unpacking the picocells
- System Controller card configuration
- Adding cards to the System Controller (first steps)
- Jumper and DIP switch settings
- Attaching bus cables
- Adding cards to the System Controller (final steps)
- Configuring Controller cards
- Verifying the card configuration
- Ch 3 - Installing the Controller
- Ch 4 - Verifying the Controller configuration
- Ch 5 - Configuring the router
- Ch 6 - Testing picocells
- Ch 7 - Installing picocells
- Ch 8 - Connecting to external equipment
- Ch 9 - System testing
- Ch 10 - Installation inspection
- Ch 11 - Provisioning
- Ch 12 - Remote Client
- Ch 13 - Troubleshooting
- Ch 14 - Maintaining Quad T1 cards
- App A - Specifications
- App B - Standards compliance information
- App C - Part numbers
- App D - Updates and backups
- Index

1026209–0001 Revision B 2–2 Adding cards to the System Controller
The System Controller is delivered in three boxes containing:
• System Controller (chassis)
• Monitor
• Keyboard
The optional rack, if ordered, is shipped in a separate container.
Rack mounting the System Controller is recommended, but table
mounting is acceptable.
Unpack the Controller as follows:
1. Remove the System Controller and accessory packages
from the packing container as shown in Figure 2-1.
Also refer to the unpacking instructions shipped with the
Controller.
2. Remove the monitor and keyboard from their respective
boxes.
3. Verify all parts against the enclosed packing lists. Visually
inspect the components for damage.
2.1
Unpacking the
System Controller