
Installation Instructions
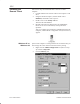
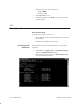
Table Of Contents
- Title page
- Contents
- About this manual
- Safety information
- Ch 1 - Introduction
- Ch 2 - Adding cards to the Controller
- Unpacking the System Controller
- Unpacking the picocells
- System Controller card configuration
- Adding cards to the System Controller (first steps)
- Jumper and DIP switch settings
- Attaching bus cables
- Adding cards to the System Controller (final steps)
- Configuring Controller cards
- Verifying the card configuration
- Ch 3 - Installing the Controller
- Ch 4 - Verifying the Controller configuration
- Ch 5 - Configuring the router
- Ch 6 - Testing picocells
- Ch 7 - Installing picocells
- Ch 8 - Connecting to external equipment
- Ch 9 - System testing
- Ch 10 - Installation inspection
- Ch 11 - Provisioning
- Ch 12 - Remote Client
- Ch 13 - Troubleshooting
- Ch 14 - Maintaining Quad T1 cards
- App A - Specifications
- App B - Standards compliance information
- App C - Part numbers
- App D - Updates and backups
- Index
1026209–0001 Revision B
Troubleshooting 13–3
3. In the “Ethernet adapter TXn0002” section of the
configuration screen, make sure the correct IP addresses are
displayed for the picocells to be installed in the system.
An IP address must be listed for each picocell, in sequential
order, as illustrated below:
Picocell IP Address
1 69.1.1.254
2 69.1.2.254
3 69.1.3.254
4 69.1.4.254
..
..
Notes
When a picocell boots up, it is assigned the next available IP
address. Only picocell IP addresses are assigned to the
TX2000 IP card.
You will need to add picocell IP addresses (as explained in
the next section) if:
• The number of picocell IP addresses is less than
the number of picocells to be installed in the system
• The picocell IP addresses do not correspond in
sequence to the picocells installed
Notes
The number of addresses configured can exceed the number
of picocells; this will not cause a problem.
Up to eight addresses can be configured.
4. At the DOS prompt (C:\>), enter exit to return to the
Windows desktop.