
Installation Instructions
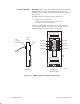
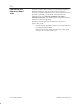
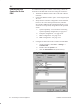
Table Of Contents
- Title page
- Contents
- About this manual
- Safety information
- Ch 1 - Introduction
- Ch 2 - Adding cards to the Controller
- Unpacking the System Controller
- Unpacking the picocells
- System Controller card configuration
- Adding cards to the System Controller (first steps)
- Jumper and DIP switch settings
- Attaching bus cables
- Adding cards to the System Controller (final steps)
- Configuring Controller cards
- Verifying the card configuration
- Ch 3 - Installing the Controller
- Ch 4 - Verifying the Controller configuration
- Ch 5 - Configuring the router
- Ch 6 - Testing picocells
- Ch 7 - Installing picocells
- Ch 8 - Connecting to external equipment
- Ch 9 - System testing
- Ch 10 - Installation inspection
- Ch 11 - Provisioning
- Ch 12 - Remote Client
- Ch 13 - Troubleshooting
- Ch 14 - Maintaining Quad T1 cards
- App A - Specifications
- App B - Standards compliance information
- App C - Part numbers
- App D - Updates and backups
- Index

1026209–0001 Revision B 7–18 Installing picocell
Section 6.3 explains how to initiate a test (6–minute) frequency
band scan (starting on page 6–10). Now that the system is
installed, you perform a band scan to set up the system for normal
operation—specifically, to determine what frequencies the
AIReach OS can use. The post–installation scan takes a
minimum of 24 hours. The AIReach Office Configuration Report
states the actual time requirement.
Initiate the 24–hour band scan as explained in Section 6.3
(page 6–10), except:
In the Band Scan Parameters window, set Critical RSSI bin
to 3 (Uplink and Downlink).
Otherwise, follow the directions in Section 6.3 (but ignore
references to a 6–minute band scan).
7.4
Performing the
frequency band
scan