
Installation Instructions
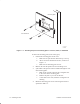
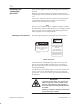
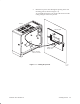
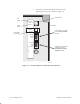
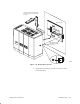
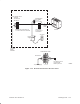
Table Of Contents
- Title page
- Contents
- About this manual
- Safety information
- Ch 1 - Introduction
- Ch 2 - Adding cards to the Controller
- Unpacking the System Controller
- Unpacking the picocells
- System Controller card configuration
- Adding cards to the System Controller (first steps)
- Jumper and DIP switch settings
- Attaching bus cables
- Adding cards to the System Controller (final steps)
- Configuring Controller cards
- Verifying the card configuration
- Ch 3 - Installing the Controller
- Ch 4 - Verifying the Controller configuration
- Ch 5 - Configuring the router
- Ch 6 - Testing picocells
- Ch 7 - Installing picocells
- Ch 8 - Connecting to external equipment
- Ch 9 - System testing
- Ch 10 - Installation inspection
- Ch 11 - Provisioning
- Ch 12 - Remote Client
- Ch 13 - Troubleshooting
- Ch 14 - Maintaining Quad T1 cards
- App A - Specifications
- App B - Standards compliance information
- App C - Part numbers
- App D - Updates and backups
- Index

1026209–0001 Revision B 7–12 Installing picocell
Mount the picocell as follows:
1. Power on the picocell by pressing the power switch to the
LINE position.
2. Mount the picocell to the mounting plate by aligning the
lock on the picocell housing with the positioning tab on the
mounting plate, as shown in Figure 7-8.
WARNING
When installing the picocell on the mounting
plate, use care to avoid falling and injuring
yourself.
3. Push the picocell into the mounting plate, and then slide it
down and to the right to the locking position.
4. Turn the lock key to the horizontal position to lock the unit
after it is mounted.
If the key is difficult or impossible to turn, the picocell may
not be properly mounted. If this is the case, reinstall the
picocell on the mounting plate.
Mounting the picocell