
Installation Instructions
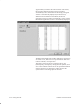
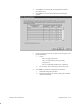
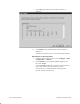
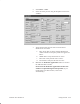
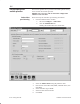
Table Of Contents
- Title page
- Contents
- About this manual
- Safety information
- Ch 1 - Introduction
- Ch 2 - Adding cards to the Controller
- Unpacking the System Controller
- Unpacking the picocells
- System Controller card configuration
- Adding cards to the System Controller (first steps)
- Jumper and DIP switch settings
- Attaching bus cables
- Adding cards to the System Controller (final steps)
- Configuring Controller cards
- Verifying the card configuration
- Ch 3 - Installing the Controller
- Ch 4 - Verifying the Controller configuration
- Ch 5 - Configuring the router
- Ch 6 - Testing picocells
- Ch 7 - Installing picocells
- Ch 8 - Connecting to external equipment
- Ch 9 - System testing
- Ch 10 - Installation inspection
- Ch 11 - Provisioning
- Ch 12 - Remote Client
- Ch 13 - Troubleshooting
- Ch 14 - Maintaining Quad T1 cards
- App A - Specifications
- App B - Standards compliance information
- App C - Part numbers
- App D - Updates and backups
- Index

1026209–0001 Revision B 6–16 Testing picocells
7. Click Next again and the Setup Complete window is
displayed.
8. Click Finish and the AIReach Office banner window is
displayed.
The POFs and cluster pool are now automatically assigned.
Returning to normal operation
1. From the AIReach Office banner, select Configure → BSC
Configuration → AROSC.
2. Select Normal from the Operating Mode dropdown list,
then click Accept.
Clicking Accept disables the Controller T1 lines; therefore,
wait (a few minutes) until the Controller T1 line
connectivity is re–established before checking traffic
picocell operation (Section 6.5).