
Installation Instructions
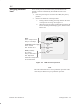
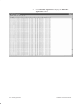
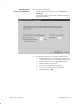
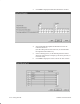
Table Of Contents
- Title page
- Contents
- About this manual
- Safety information
- Ch 1 - Introduction
- Ch 2 - Adding cards to the Controller
- Unpacking the System Controller
- Unpacking the picocells
- System Controller card configuration
- Adding cards to the System Controller (first steps)
- Jumper and DIP switch settings
- Attaching bus cables
- Adding cards to the System Controller (final steps)
- Configuring Controller cards
- Verifying the card configuration
- Ch 3 - Installing the Controller
- Ch 4 - Verifying the Controller configuration
- Ch 5 - Configuring the router
- Ch 6 - Testing picocells
- Ch 7 - Installing picocells
- Ch 8 - Connecting to external equipment
- Ch 9 - System testing
- Ch 10 - Installation inspection
- Ch 11 - Provisioning
- Ch 12 - Remote Client
- Ch 13 - Troubleshooting
- Ch 14 - Maintaining Quad T1 cards
- App A - Specifications
- App B - Standards compliance information
- App C - Part numbers
- App D - Updates and backups
- Index

1026209–0001 Revision B
Testing picocells 6–11
Set up the band scan as follows:
1. From the AIReach Office banner, select Installation →
Auto Setup.
The software displays the Welcome to AROSC Band Scan
Setup Wizard window:
2. Enter the following entries in the Setup Wizard window:
a. Perform Band Scan to Discover Usable Frequencies:
Check (Click the box so a check mark is displayed.)
b. Perform DCCH Scan to Configure PSPs: Check
c. Number of Reports required: 1.
d. Time interval between Scan Reports: 1.
e. Continue Previous Scan Test: Not checked.
f. RSSI Threshold: –105.
Setting up the
frequency band scan