
User's Manual

Thuraya IP+ Satellite Modem User Guide 25
3500799-0001 rev A
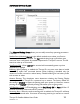
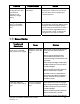
Pointing Screen
The Antenna Pointing Screen step can be enabled using the Antenna Pointing option
on advanced settings screen described above. When this option is enabled, the
Thuraya IP+
will stop in a pointing mode prior to accessing the network after
powering up. This can be useful when optimal pointing is important, such as with fixed
installations using an external antenna.
The pointing screen has a signal strength bar graph and numeric value to assist in
accurate antenna pointing. The green bar identifies the signal strength measured during
antenna pointing and will help you optimise the pointing direction. Note that obtaining
the highest signal strength possible will ensure that you have an optimum connection
to the network.
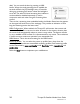
GPS Receiver
: On/Off
GPS Satellites
: The number of satellites visible to the unit
GPS Validity
: Invalid, Stored or Valid. See the Global Positioning System Operation
section for more details on GPS.
Point Antenna to These Settings
: Compass Direction and Antenna Angle to help
orient Thuraya IP+
toward the satellite. Once this rough pointing is accomplished, use
the Signal Strength meter described below to optimise the pointing direction.
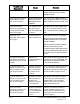
Signal Strength
: This segmented bar moves to the right as the signal received from the
satellite gets stronger. The numeric display to the right of the bar is simply a digital
representation of the bar. Use this display when fine tuning Thuraya IP+’s orientation
to the satellite. Signal strength is only a relative measure of the satellite signal strength
and may vary from location to location.
Exit Pointing
: Select this button to leave the screen after optimum signal strength has
been achieved. This action will take you to the Home screen on the wMMI.
Status
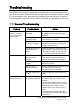
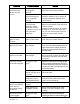
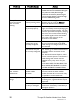
: Status codes (see end of guide for a list).