
User's Manual
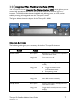

Thuraya IP+ Satellite Modem User Guide 3
3500799-0001 rev A
STEP 2: POWER CONNECTION AND BATTERY CHARGING
1. The Thuraya IP+ will charge the battery automatically
when power is connected.
2. Plug in Power cable and charge the battery for at least
three hours.
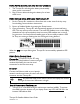
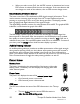
STEP 3: OBTAIN INITIAL GPS USING THE THURAYA IP+
1. Put the Thuraya IP+ outside on a flat surface with a clear view of the sky away
from building, trees and other obstructions.
2. Power up Satellite Modem by pressing the Power button.
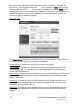
3. Once powered up, Thuraya IP+
will automatically attempt to locate itself using
GPS. This may take up to five minutes. The small GPS satellite icons on the display
(shaded area in the picture below) show how many GPS satellites are in view at
any given time. You need all three satellite icons to be on solidly to obtain a GPS
fix. If any are missing or flashing then the GPS signal is being blocked.
When the GPS icon stops flashing then Thuraya IP+
has successfully updated its GPS
position.
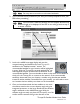
STEP 4: DATA CONNECTIONS
Connect the Thuraya IP+ to your PC using
Ethernet. It is also possible to connect using the
wireless LAN facility, but use the wired
connection for the first time setup.
ETHERNET
Connect the Ethernet cable to your laptop’s
network interface and insert the other end of the
connector into the Thuraya IP+.
Note: Any Ethernet cable can be used to connect the laptop and modem
as long as it is less than 100 meters in length.
STEP 5: POINTING TO THE SATELLITE
1. Thuraya IP+
is controlled through a web browser interface (wMMI). To activate
the wMMI, open the browser on your laptop. Enter http://192.168.128.100
in the
browser URL address field.