
User's Manual


2
Thuraya IP+ Satellite Modem User Guide
3500799-0001 rev A
Software Installation and Configuration
Your PC must support an Ethernet or Wireless LAN interface to operate with the
Thuraya IP+.
Note: You must verify that the proxy server settings in your browser
are disabled. For Microsoft Internet Explorer, select Tools / Internet
Options / Connections / LAN Settings and uncheck the box labelled ‘Use
a proxy server for your LAN’. For Firefox, go to Advanced Preferences
and select ‘Direct connection to the Internet’. When complete please
close your browser.
DO NOT FORGET THAT YOU MAY NEED TO RECHECK THIS BOX
ON RETURN TO YOUR OTHER INTERNET CONNECTION.
Setting Up the Modem
There are five basic steps to getting your Modem up and running:
Step 1: SIM insertion
Step 2: Power Connection and Battery Charging
Step 3: Obtain Initial GPS Fix using the Thuraya IP+
Step 4: Data Connections
Step 5: Pointing to the Satellite
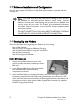
STEP 1: SIM INSERTION
1. Unpack the modem and accessories. Your
service provider will have provided you with a
SIM card.
2. Insert SIM provided by your Service Provider
into the SIM holder inside the battery
compartment as shown.
3. Now install the battery by hooking the battery tab in the rectangular opening in
the battery compartment and firmly pressing the battery onto the latch on the
other side. The seal around the battery should snugly fit between the battery and
the enclosure with no pinch points visible. A good seal is necessary to maintain
the IP55 rating of the terminal.