
User's Manual
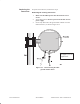
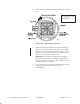
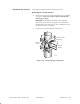
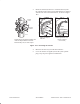
Table Of Contents

1027144–0001 Draft – Revision D.01 Maintenance 10–9RT installation
Installing the replacement antenna
6. Install a temporary installation collar below the antenna
mount, as explained in section 6.4 (page 6–6).
You need the temporary installation collar so you can point
the replacement antenna.
7. Attach the replacement antenna to the mount, as explained
in section 6.6 (page 6–12).
8. Point the replacement antenna by adjusting the azimuth and
elevation as detailed in chapter 6.
9. Attach the transceiver to the antenna, as explained in
section 6.11 (page 6–21).
Important: If a mechanical attenuator was previously
installed in the antenna waveguide, make sure it is still in
place in the waveguide before you attach the transceiver to
the antenna.
10. Connect the IFL cable to the IFL connector on the
transceiver.
11. Ground the ODU, as explained in section 6.12 (page 6–23).
12. Apply power to the IDU chassis power supply (section 3.3,
page 3–8).
13. Use the CCM LCD to check the ODU status. (For details,
see section 7.7).
14. Re–commission the RT as detailed in chapter 7.
15. Notify the EMS operator that the RT is ready to resume
service.