
User's Manual
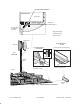
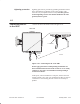
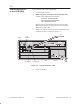
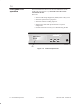
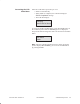
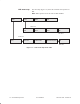
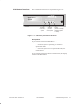
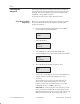
Table Of Contents
- Title page
- Contents
- About this manual
- Safety information
- Ch 1 - Installation summary
- Ch 2 - Prerequisites
- Ch 3 - Indoor equipment
- Ch 4 - Installing IFL cables
- Ch. 5 - Installing mast mounts
- Ch 6 - Installing ODUs
- Ch 7 - Commissioning the RT
- Ch 8 - Final steps
- Ch 9 - Troubleshooting
- Ch 10 - Maintenance
- App A - Acronyms
- App B - Standards compliance
- App C - Terminating the IFL cable
- Index

1027144–0001 Revision D 7–8 Commissioning the RT
RT installation
Following the RT antenna installation instructions in chapter 6,
you pointed the antenna approximately toward the HT, using the
boresight. This section explains how to fine tune the pointing
adjustments, using a digital voltmeter.
To point the antenna, follow steps 1 through 12 below.
Before you can point the antenna using the voltmeter, you must
first put the IDU into Install mode and select the (RT) ODU
frequency, as follows:
1. From the IDU (CCM) LCD Main Menu, select Install
mode, and press the ENTER button.
Main Menu
Install
The LCD displays:
Install
RT at HT
2. Press ENTER, select No, and press ENTER again.
3. Select Frequency (frequency function) and press ENTER.
Install
Frequency
4. The LCD displays Freq and a frequency value:
Freq
8B4
5. Scroll to the correct ODU frequency. Scroll up (NEXT) for
a higher frequency; scroll down (PREV) for a lower
frequency.
The frequencies you can select on the bottom line are
preset, based on the installed ODU. The correct RT
frequency is the same as the HT frequency, except “B”
(indicating remote), as in 8B4, replaces “A”.
Important: If you do not see the correct frequency on the
LCD, you may have installed the wrong ODU for the site
(high band instead of low band, or vice versa). If the wrong
ODU is installed, the LCD will not display the correct
7.4
Pointing the
antenna
Selecting the ODU
frequency