
User Manual


24
Operation
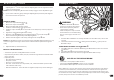
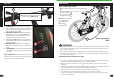
Rear Derailleur Adjustments
The rear derailleur has two adjusting screws. The “low” adjusting screw, sometimes marked
L
, limits how far the rear derailleur and chain can move toward the wheel. The “high” ad-
justing screw, sometimes marked
H
, limits how far the rear derailleur and chain can move
away from the wheel.
1
2
3
4
5
6
B
g 05
A
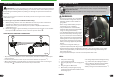
Put the “high” adjusting screw in the correct position as follows:
• Shift the chain onto the smallest rear sprocket. Loosen Nut
C
of the cable clamp.
• Turn the lever Barrel Adjuster
A
and rear Derailleur Adjustor
B
all the way IN ( g 05).
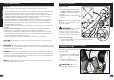
• Turn the “high” adjusting Screw
H
so the Jockey Roller
D
is in line with the outside
edge of the smallest rear Sprocket
E
( g 06)
• Remove the slack from the cable wire and tighten the Nut of the cable clamp.
D
E
F
C
L H
g 06
continued >>
17
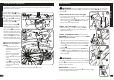
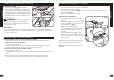
Pedal Installation
CAUTION: There is a RIGHT pedal marked
R
and
a LEFT pedal marked
L
.
NOTE: A Pedal Wrench is preferred for attaching Pedals.
A thin open-end
wrench can also be used.
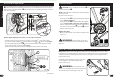
• The pedal marked
R
has right-hand threads. Tighten
it in a clockwise direction.
• The pedal marked
L
has left-hand threads. Tighten
it in a counterclockwise direction (anti-clockwise).
• Turn the right pedal marked
R
into the right side of
the crank arm, and the left pedal marked
L
into the
left side of the crank arm.
Tighten the pedals:
• Make sure the threads of each pedal are fully into the
crank arm.
WARNING: Ensure pedals are secure in
crank arms so they will not loosen. Periodically check
tightness.
L
R
LR
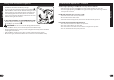
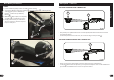
Three-Piece Cranks (various models)
Maintenance: Both Crank Arms
A
were tightened to the spindle
B
at the factory. After
riding the bicycle the rst few times, make sure the crank arms have not loosened. If either
crank arm has loosened during this “break-in” period, re-tighten or have it tightened by a
bicycle service shop.
Frequently check the tightness of the crank arms.
If loose, tighten or have them tightened by a
bicycle service shop.
WARNING: If you ride the bicycle
with a loose crank arm, the crank arm may fall o .
The spindle may also damage the crank arm.
A
B
Assembly