
User Manual


30
Disc Brake System - continued
PAD REPLACEMENT:
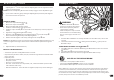
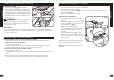
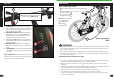
1. Remove the Caliper Mounting Bolts
F
.
2. Remove the Caliper assembly
E
.
3. Remove the Brake Pads from the Caliper.
4. Install the new Pads using same type and size.
5. Install the Caliper assembly
E
to the mounts on the fork (front), or frame (rear) (front
shown).
6. Tighten the caliper Mounting Bolts
F
securely.
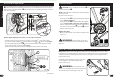
7. Route the Cable
D
through the lower Adjusting Barrel
C
and Cable Clamp
A
.
• Ensure Cable Housing
G
is fully inside Adjusting Barrel
C
.
8. Pull the Cable through the Cable Clamp, and tighten the Clamp
A
Bolt.
NOTE: Brake adjustment involves loosening the Cable Clamp Bolt. During installation, it only
needs to be tightened enough to make sure the Cable End doesn’t pull back through the
Camp.
9. Adjust the Brake (as described above).
BRAKE SYSTEM MAINTENANCE:
• Check brake operation and adjustment before each ride.
• Keep the brake system free of dirt, mud, oil, and other foreign substances that will inhibit
proper operation.
• Frequently check:
• All components for damage.
• The pads - for wear.
• The lever - for smooth operation.
• The cable - ensure there are no frayed ends, cuts, or kinks that inhibit operation. Add
cable lube if the cable is dry.
• All bolts and fasteners - ensure the bolts are tightened, replace any that are damaged.
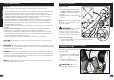
Adjusting Barrel
C
on the Caliper. Turn the Adjusting Barrel OUT to tighten the brakes
or IN to loosen the brakes.
NOTE: Make sure the Adjusting Barrel threads are fully engaged. Check adjustment again.
8. If you cannot reduce the gap by turning the Adjusting Barrel, the brake pads might be
worn out and need to be replaced.
Maintenance
11
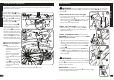
Assembly
Installing the Front Wheel
WARNING:
• Do NOT use Axle Nuts
A
without
serrations to attach the front wheel.
• Ensure wheel spins freely without
contacting fork or fender.
• Failure to obey these steps can allow
the front wheel to loosen while riding.
This can cause injury to the rider or to
others.
1. If the Axle Nuts and Washers are already attached to the front wheel axle, remove and
set aside.
2. Set the wheel into the Front Fork
B
making sure the Disc Brake
C
ts up into the
Disc Brake Caliper.
TABBED WHEEL RETAINERS OR FLAT WASHERS
D
:
3. Install Wheel Retainers or Washers
D
making sure Wheel Retainer tabs are in the fork
E
tab holes.
4. Install Axle Nuts
A
with serrated surface facing IN.
5. With the wheel in the center of the fork, tighten both Axle Nuts securely.
E
B
C
A
D
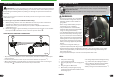
INFLATE ALL TIRES BEFORE RIDING!
• Use a hand or a foot pump to in ate the tires.
• Service station meter-regulated air hoses are also acceptable.
• The maximum in ation pressure is shown on the tire sidewall.
Before adding air to any tire, make sure the edge of the tire (the bead) is the same distance
from the rim, all around the rim, on both sides of the tire. If the tire does not appear to be
seated correctly, release air from the inner tube until you can push the bead of the tire into
the rim where necessary. Add air slowly and stop frequently to check the tire seating and the
pressure, until you reach the correct in ation pressure.