
User Manual


18
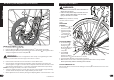
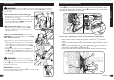
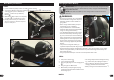
Drive Battery Installation
A
C
E
D
B
STEPS:
1. Insert and turn Key fully Counter Clockwise before starting.
2. On bottom of Battery, align Slot and Plug
A
with Tab and Pins
B
on Battery Mount
and swing into place so that Battery
Notch
C
slides into top of Battery
Mount
D
.
3. With Battery fully in place, turn Key fully
Clockwise
E
to lock Battery in place.
4. Gently pull on battery to make sure it
does not come lose. Remove key and
keep in a safe place.
Assembly
19
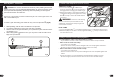
Charging the Drive Battery:
WARNINGS:
• All large Li-Ion batteries are a potential re
risk and should be charged in a safe place,
preferably outside or in the middle of a
garage oor.
• Never charge a lithium battery unsuper-
vised inside a house or building.
• Only an adult who has read and under-
stands the safety warnings should handle,
charge or recharge of the battery.
• See other Battery Warnings in this manual.
• Check the drive battery and charger (sup-
ply cord, connector) for wear and damage
before charging. Do not charge the battery
if damage has occurred. Only replace with
the same type and voltage rechargeable
battery and charger supplied by the manu-
facturer.
• Only use the rechargeable battery (or
equivalent replacement) and charger supplied with your vehicle.
• The drive battery should be charged when depleted, or if not used regularly, once a month.
Failure to charge the battery as directed will cause permanent damage to the battery and
will void the warranty.
• Charge only when battery has cooled to room temperature after a ride.
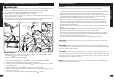
STEPS:
IMPORTANT!
Before using the unit for the rst time fully charge the Battery.
Battery Charger will shut o when Battery is fully charged, but never charge
longer than 12 hours.
NOTE: Your e-Bike Li-Ion Battery can be charged either installed in the bike or
removed.
1. Turn power switch OFF.
2. Open Charging Port
A
.
3. Plug Charger plug into unit Charging Port
B
.
4. Plug Charger into Wall outlet.
5. When battery is fully charged, un-plug
charger from the wall outlet and disconnect
from charger port.
NOTES:
• The charger may feel warm during the charg-
ing. If excessively hot, unplug and replace.
• This product has charging protection: When
charging, all functions are turned OFF.
• Battery Charge Level and ON/OFF Switch
C
.
B
C
A
Operation