
User Manual


16
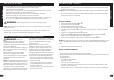
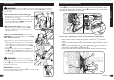
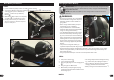
Pedal Installation
CAUTION: There is a RIGHT pedal marked
R
and
a LEFT pedal marked
L
.
NOTE: A Pedal Wrench is preferred for attaching Pedals.
A thin open-end
wrench can also be used.
• The pedal marked
R
has right-hand threads. Tighten
it in a clockwise direction.
• The pedal marked
L
has left-hand threads. Tighten
it in a counterclockwise direction (anti-clockwise).
• Turn the right pedal marked
R
into the right side of
the crank arm, and the left pedal marked
L
into the
left side of the crank arm.
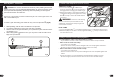
Tighten the pedals:
• Make sure the threads of each pedal are fully into the
crank arm.
WARNING: Ensure pedals are secure in
crank arms so they will not loosen. Periodically check
tightness.
L
R
LR
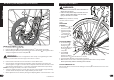
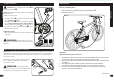
Three-Piece Cranks (various models)
Maintenance: Both Crank Arms
A
were tightened to the spindle
B
at the factory. After
riding the bicycle the rst few times, make sure the crank arms have not loosened. If either
crank arm has loosened during this “break-in” period, re-tighten or have it tightened by a
bicycle service shop.
Frequently check the tightness of the crank arms.
If loose, tighten or have them tightened by a
bicycle service shop.
WARNING: If you ride the bicycle
with a loose crank arm, the crank arm may fall o .
The spindle may also damage the crank arm.
A
B
Assembly
21
Operation
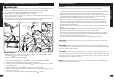
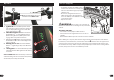
Shift System
Parts of the Shift System:
• Right-hand Shift Lever
A
operates the Rear Derailleur
B
.
• Rear Sprocket Set
C
.
g A
C
A
B
Operation:
Operate the shift system as follows:
1. The rider turns the rear shift control around the handlebar (for twist shift models)
or moves the shift lever (thumb shift models) to an index position
2. When the rear shift control moves into each position with a “click” sound, the shift
is complete
3. The shift control pulls a cable wire that is attached to the rear derailleur.
4. The derailleur moves and guides the chain from one sprocket to another.
5. If there is some chain noise after the shift, turn the rear shift control a small
amount to “trim” the rear derailleur.
continued >>