
Instructions/Assembly Guide

27
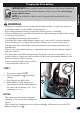
e-Bikes Maintenance:
GENERAL:
The vehicle should be checked for damage, missing or badly worn parts before
each use. If any part of the product does not operate properly – discontinue use.
• Check the tightness of the fasteners before each use. Replace any fasteners that are damaged.
• Inspect the product frequently. Failure to inspect the product and to make repairs or adjust-
ments, as necessary, can result in injury to the rider or to others. Make sure all parts are cor-
rectly assembled and adjusted as written in this manual and any “Special Instructions.”
• Immediately replace any damaged, missing, or badly worn parts.
• Make sure all fasteners are correctly tightened as written in this manual and any “Special In-
structions.” Parts that are not tight enough can be lost or operate poorly. Over tightened parts
can be damaged. Make sure any replacement fasteners are the correct size and type.
• Check the tightness of the wheels.
• Keep the product clean and free of dirt, dust and water. This will prolong the useful life of the
product.
• Always remove the battery when replacing a component or performing maintenance.
• Periodically check your e-Bike’s wiring and motor condition and mounting.
• Always store your e-Bike indoors. Bike’s left outside in weather can deteriorate very quickly.
Store your e-Bike in a clean dry environment. Do not cover with plastic which will hold mois-
ture inside and a ect your bike’s electrical system.
• Store your battery indoors during cold weather to optimize battery performance.
CAUTION: Self-locking nuts and other self-locking devices may lose their e ectiveness
when re-used.
CLEANING:
Do not submerge the drive unit in water or wash with a pressurized hose. Keep
all components clean, especially the battery pack contact points. Clean carefully with soft, damp
cloth using only mild soap and water.
STORAGE: Always store the battery pack in a cool dry place.
Keep it away from sources of
heat, such as stoves and heaters.
During periods of prolonged storage, battery pack should be
charged at leased once every 6 months at a minimum of 60% or every 3 months at 40%. Do
not charge higher than 60% when storing.
NOTE: If the instructions in this manual or any “Special Instructions” are not suffi cient for
you, please contact customer service.
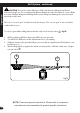
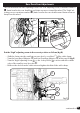
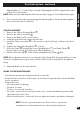
Rear Derailleur Adjustments - continued
g E
1
2
3
4
5
6
A
B
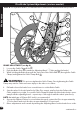
Put the “low” adjusting Screw in the correct position as follows ( g E):
• Shift the chain onto the largest rear Sprocket
F
.
• Loosen Nut of the cable clamp.
• Turn the “low” adjusting Screw
H
so the Jockey Roller is exactly below the largest
rear sprocket.
• Tighten the Nut of the cable clamp.
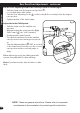
Adjust the Index Shift System:
• Shift the chain onto the smallest rear
sprocket.
• Without turning the crank, turn the Right
Shift Control
A
one “click” rearward.
• Slowly turn the crank forward.
• The chain should move from the smallest
rear sprocket to the next larger rear sprock-
et.
• Turn the Adjusting Barrel
B
OUT as needed
so the chain moves exactly on to the second
rear sprocket and does not rub, jump, or
delay.
When adjusted properly, the shift system will
operate smoothly with no chain rubbing.
Note: If you have trouble, take the bike to a bike
shop.
NOTE: These are general instructions. Please refer to component
manufacturer’s documentation for product specifi c instructions.
Maintenance