SoftLinx V Protocol Builder User Manual V 5.0.
SoftLinx V Protocol Builder - Introduction ........................................................................ 3 Main Menu .......................................................................................................................... 4 Instrument Manager ............................................................................................................ 5 Adding Interfaces ...............................................................................................................
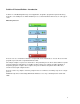
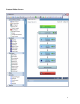
SoftLinx V Protocol Builder - Introduction SoftLinx V is a multitasking laboratory control application, designed to program and operate laboratory workcells. Users build protocols which will define processes that instruments will execute, in some type of order. What is a protocol? Protocols are sets of instructions which the computer will send to instruments to execute. Protocols in this program are presented in a sequential flowchart format. One simple example of a protocol is shown above.
Main Menu Upon starting SoftLinx, or whenever no protocols are open, the main window will display the screen above. Users may do one of the following: New Protocol - Creates a new protocol. Opens a new tab with an empty protocol. Open Protocol - Opens a previously-saved protocol. Loads the protocol into a new tab. Manage Instruments - Opens the Instrument Manager.
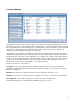
Instrument Manager The instrument manager hosts a variety of options to set up the user's workcell in preparation for protocol development. The above list shows all instruments available to the user. Each instrument will list its unique name, an identification icon, its instrument type, its current interface status, and whether or not SoftLinx will open it up to be available in protocols.
In addition to the list of instruments, the following commands are available on this screen: Add New Instrument - Installs instrument interfaces and identifies instruments which can be used in protocols. See the Adding Interfaces section. Remove Selected Instrument - Remove the selected instrument from the list. In addition, if the instrument to be removed is the last instance of its instrument class within the list, the user also has the option to uninstall its associated interface.
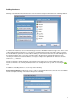
Adding Interfaces Clicking on the Add New Instrument button on the Instrument Setup list will activate the following window: To add a new instrument, select an instrument type from the "Available Instrument Types" list. This is a list of all installed instrument interfaces, as well as pre-loaded SoftLinx Interface Packages (SIP), located in the Installed Directory\Interfaces folder. When clicking on an instrument in the list, its name will appear in the Instrument Name box.
Users name the interface by instrument type - not by instance name. Templates are also available to use as starting points for interface development. Once named, the newly created interface will immediately open and be available for development. In addition, the new interface is installed onto the machine, so users may access the instrument they are creating immediately. The interface is then added to the list.
Protocol Editor Screen 9
The protocol editor window is the main SoftLinx V window. Protocols can be viewed, modified, and executed here. Multiple protocols can be opened and run simultaneously. All available protocol steps are found in the toolbar on the left, and SoftLinx V system messages are reported in the Messages window. Menu Bar: The menu bar is located at the top of the window. This provides basic functions of the protocol editor window.
Paste - Places the copied steps onto a selected location. (Ctrl + V) Delete - Removes the selected steps from the protocol. (Delete key) Manage Instruments - Opens the Instrument Manager. (Alt + F10) Access VBA Code Script - Open the script of the VBA step in its own IDE. (Alt + F11) Manage Protocol Variables - Opens the Protocol Variable Manager. Time Constraints - Opens the Time Constraint manager for a specific step. Run Protocol - Starts execution of the currently visible protocol.
Protocol Frame The protocol designer frame shows the protocol currently being edited. Multiple protocols can be opened, but only one protocol can be shown at a time. Protocols are managed by a tab system, located at the top of the frame. Tabs can be selected to bring focus to that protocol. In addition, users can close protocols, or hover over tabs to see a preview of the underlying protocol. When two or more protocols are active, an additional management tab is displayed to the left of all tabs.
Running the Protocol Protocol execution is controlled by using the three buttons in the taskbar: These buttons will only control the currently visible protocol. Any other protocols running from other unselected tabs, or from other programs, will not be affected by these buttons. The play button will only be active when the current protocol is stopped or paused. The pause button will only be active when the current protocol is running.
Steps that are currently executing will be marked with a green aura. Expanded steps with children steps that are executing will be marked with a light green aura. In addition, if a user manually stops a protocol run by SoftLinx, the last running steps which was executing will be marked with a red aura. Red auras will remain until the user restarts the protocol.
Protocol Variables Protocol variables can be defined to help facilitate the execution of the protocol's steps. Variables are often used in controlling Loop Process steps, Conditional Statements, or even directly setting values within instruments themselves through the use of the Modify Variable step or the VBA Script steps. By clicking on the variable icon, the user can define variables for that specific protocol.
Time Constraints Time constraints are user-defined delays between two specific steps. This allows users to run a step at a specific time after a step has completed, for time sensitive actions. Time constraints do not need to be defined between two adjacent steps. However, time constraints can not be defined across loops. Time constraints can be defined by clicking the time constraint icon on the main toolbar.
For users with SoftLinx Master installed, the maximum time slot is required for scheduling purposes.
Protocol Steps There are several different types of steps used in protocol development. SoftLinx V has a specific set of steps the user can place in methods. The Toolbox: The Toolbox holds every command that can be utilized by users in a protocol. General steps are listed, as well as commands from every active instrument. Only instruments which are checked in the Instrument List for the currently active protocol, will show their commands in the toolbox.
Refresh Command List - Obtains the list of commands from the interface, and adds them to the toolbox. Initialize Instrument - Refreshes the interface's connection to the instrument. Instrument Setup - Opens the Setup for that interface. Instrument Status - Opens the Status window for that interface, if available. View Interface Code - Opens the VBA editor for the selected interface. Protocol Steps: Protocol steps are specific actions which will be executed in protocols.
Instrument Steps All instruments have a unique set of commands which the protocol editor will present to the user. Each command is placed in the toolbox for the user to access. When dropped onto the protocol, the instrument step will open its own setup window, if applicable. In addition, each instrument step will be identified by a steel blue background, as well as its instrument name, its instrument command, its instrument specific icon, and when expanded, details about the command issued.
Run VBA Script The Run VBA Script step allows advanced users to create their own function which they may use in protocols. Users are only limited by the scope of VBA as to what they are able to create and utilize. To use this step, users must open VBA and create functions. To do this: - Click on the open VBA icon in the toolbar. - Press Alt + F11 on the main SoftLinx Protocol Editor - Place a VBA Code Activity on the active protocol and click "Open VBA Script.
Once a command is selected, the function is shown, including its return type and all required arguments. Users may enter arguments in the adjacent text box manually, or drag and drop the appropriate predefined variables to satisfy requirements. When opening the VBA Script, users have access to all installed instruments on the list, as defined on the Instrument Manager. Users can then apply commands from the instruments in their own predefined functions through VBA.
Run Program The Run Program step will run one command line string or open an executable with optional arguments. Users will enter the path of the executable and the arguments in the proper text boxes. Users may also test the command by clicking on the "Test Command" button. The "Hide Command Prompt" option will run the command without the command prompt window showing up at runtime, if applicable.
Send E-Mail The Send E-mail Notification step will allow a user to send out an email message at a certain location within the protocol. The user simply adds the basic fields to an email message: To/From addresses, subject, and body paragraphs. Additionally, the user must provide a mail server host which will be used to send the mail.
Modify Variable The Modify Variable step will change an instrument or protocol variable to a different value. Users can input direct values or functions to define the new value of a variable. SoftLinx will ensure that the result of the modification value is valid before the user can confirm the step. Invalid entries will not be accepted.
End Protocol Simply stops execution of the protocol. This can be useful in conditional statements, or used as stop points if a user wants to only run a portion of a protocol without making major modifications to an existing protocol.
Region Regions are collapsible actions which can hold any number of protocol steps. Users may place steps within a region, label the region, condense the region, and even deactivate it so that no steps within the region will execute at runtime. Region steps are used for organizational purposes, and do not have any special execution rules associated with them. Expanded: Condensed: Regions do not have special execution rules, and will run the steps in order, as if they were never placed within the region.
Conditional Statement Conditional statements are used when a decision to run only one set of specific steps is necessary. Based on the result of the current condition defined, one and only one of the two branches will execute its set of steps. Users can define a condition using the setup screen below: Users must write a function or statement which must evaluate to a "True" or "False" response, such as the example above, Crane.Speed = 50.
Loop Process Loops are composite steps, which will execute a set of activities within itself repeatedly for a set number of iterations. Steps must be placed between the loop and end loop boxes to be considered as part of the loop, and repeat as defined. Users can define the number of times a loop runs by one of three ways: - Forever (until stopped by an internal step or the stop button). - Finite number, either predefined or variables. - Loop by condition.
beginning of the loop's execution, the loop will continue to repeat itself. If the condition becomes false by the time the loop executes, or repeats execution, the loop will no longer execute, and the protocol will continue on to the next step following the End Loop box. Conditions are checked before a loop executes its process, and will re-evaluate the condition before repeating the process each time to determine if the loop should run.
Parallel process Parallel processes can run multiple sets of steps, either simultaneously or in a predefined order. Each branch holds its own set of steps. When this process begins, it will begin execution of each branch, either simultaneously or in a specified order. This process will not complete until all branches have been executed, and all child steps have been completed. Users may add branches by dragging steps onto the silver lines shown between steps.
Should a user have more than 9 branches, the user must use A-Z to denote branches 10-35. Branches 36 and above cannot be run using this method, however it is very uncommon to have 36 or more branches under one sequential protocol step. In addition, users can also select a protocol string variable to define the string used to control the execution of branches. The string must match the same format as specified above. Invalid characters will be ignored.
Protocol Tutorial Protocols are sets of instructions given to the instruments to perform in a specified manner. The following instructions will advise on how to create a simple protocol. Please note that any protocol can be created in multiple ways. 1. Define your task. It is very important to clearly understand the goal of the protocol before creating it. Problem: We wish to fill 20 micro plates with solution, using the Micro 10 (liquid dispenser) and the Plate Crane (micro plate handler).
All steps can be dropped from the toolbox to the canvas to create the pattern above. Protocols run from start to finish, top to bottom. 3. Test the protocol. This should complete the goal for a single plate. It is recommended to run this protocol now, to ensure that it acts the way you want it to run, and that all instruments are running properly. Ensure that the correct plate types and initial plate locations are defined for this protocol.
Protocol Tutorial - Advanced Advanced protocols require multiple steps of various types to complete. A sample advanced protocol which utilizes the Rapid Pick is shown below. 1. Define your task. Situation: We have a bunch of bacteria colonies in agar plates that we would like to pick, using the Rapid Pick colony picker, and place into 96 well micro plates. The micro plates must be pre-filled with solution from the Micro 10, and later sealed by a plate sealer of some type.
- Dispense liquid to the target plate. - Move the prepared target plate to the RapidPick. We can start by placing all the steps in a linear fashion, like so: This will work and load the plates. However, we don't have to wait for the micro 10 to be finished with the target plate before we move the other source plate. We can modify this part of the protocol even further by using a parallel process activity to run multiple instruments at once. Place a parallel process onto the canvas.
This allows the Crane to prepare the source plate while running the Micro 10 on the destination plate simultaneously, saving time to run the protocol. 2B. Build the Pick Colony region. The next part of the protocol will consist of picking the plates, and reloading the picker with new plates. Place this after the initial plate setup region. Note that you can also minimize regions. After a pick step is complete, we will need to do some type of clean up.
remove the source plate, target plate, or both, before starting a new pick. In this case, instrument variables can be used to make decisions within the protocol. The Rapid Pick has two variables which can be checked to see the status of the plates being worked on. RapidPick.Colonies - Denotes the number of colonies remaining on a source plate. If this value is zero, remove the plate. RapidPick.EmptyWells - Denotes the number of spaces left in a target plate that are yet to be filled.
This will replace the source plate when necessary. The target plates are handled in a similar manner, although additional steps must be taken when preparing new target plates and storing finished target plates. The steps are as follows: - Check the target plate. If it is not ready to be removed, do nothing. - If the plate is ready to be removed, move the finished target plate to the plate sealer. - Begin sealing the plate.
statement that checks the RapidPick.EmptyWells variable to see if we even need to replace the target plate. Place a move plate step, directed at the plate sealer, and a parallel process activity labeled "Seal old plate, load new plate." as shown below. Next, expand the "Seal Old Plate..." process. We need to run simultaneous actions here. We are going to simultaneously seal the old plate, while preparing the new plate, if a source plate is still available with colonies to be picked.
However, we only want to prepare the next plate, if a source plate is still present on the Rapid Pick. If the source plate has been removed, and not replaced from the previous conditional statement, we will not prepare a new plate.
To detect a plate at a specific location, we use the statement Plates.PlateExists("X"), where X is the name of the nest where the plate is located. By typing the condition below, it will only prepare a new plate if a source plate is ready to go on the Rapid Pick source nest.
So, for a protocol, we currently have the following: 45
This may work for one plate. However, we want the protocol to repeat the picking and replace plate steps multiple times. We can place the last three items in a loop. We only want to run the pick step if there are plates in the source and target nests of the RapidPick. To check that in the loop, enter the following statement in the "Loop While..." textbox: (Plates.PlateExists("RapidPick.Target_DeepWell") = 1) And (Plates.PlateExists("RapidPick.
2c. Final Cleanup The last step, "Remove final plates", is a region activity with processes on removing the last target plate, and the last source plate. Place a region activity after the colony pick loop.
We will then check to see if there is a target plate that needs to be removed. Use a conditional statement, which tests the statement below: Then, place in the true branch, a move plate step from the target nest of the RapidPick to the plate sealer. Finally, we can simultaneously check to see if there is a plate to seal, and check to see if the source plate has to be removed. Simultaneous actions require the use of the parallel process step.
Like the previous steps beforehand, check for a source plate using the following: Check for a target plate in the sealer using the following: 3. Test the protocol. Finally, once this part is done, test the protocol using empty plates and no liquid. Ensure that all of your source plates and destination plates are defined, and all initial plate locations match those used by this protocol. By testing the protocol, you will ensure that the protocol is written properly and no media is wasted on a faulty run.
The final protocol can condense to this: This concludes the protocol tutorials.