
Installation & Assembly
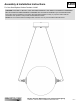

Assembly & Installation Instructions A469
For Otto Small Sphere Kitchen Pendant 161305 Page 4 of 4
Modern American Blacksmiths | Fine, Hand Crafted Lighting
Castleton, Vermont USA | HUBBARDTONFORGE.COM 36887
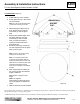
To Install Glass (Figure 2)
1. Install bulbs (H) (not included).
2. Screw glass tube (I) in the socket
cup until it stops.
Note: You can screw the glass tube
(I) into either socket cup to start.
3. While holding the glass tube (I)
at an upward angle, slide the
mesh tube (J) over the glass
tube.
4. Keeping the upward angle, slide
the glass globe (K) over the
mesh tube (J) until the mesh
tube (J) travels through the
openings at both ends of the
glass globe (K)
5. Screw the remaining socket cup
into the exposed end of the glass
tube (I) until it stops.
Note: Screw in the socket cup by
holding onto the brass ball.
Note: To orient the seam in the
mesh tube, lift the glass globe by
holding the brass balls on each end.
While tension is relieved in the cable
rotate the entire globe until the
mesh tube is oriented in the desired
position.
6. Push supply/support cables (G)
into canopy gripper until desired
height is reached.
Note: Fixture is shipped at max
height.
Note: To lengthen
supply/support cables (G) press
up on the gripper to release the
cable.
7. Restore electricity at main breaker.
If you need further assistance, or find that you are missing any parts, please contact the dealer from which you purchased
this product. We hope you enjoy your fixture!
* Hubbardton Forge will not be liable for injury or damage caused by improper installation, lamping or use of this fixture.
(Figure 2)