
Installation & Assembly

Assembly & Installation Instructions A469
For Otto Small Sphere Kitchen Pendant 161305 Page 3 of 4
Modern American Blacksmiths | Fine, Hand Crafted Lighting
Castleton, Vermont USA | HUBBARDTONFORGE.COM 36887
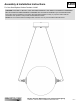
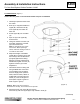
To Install Fixture (Figure 1)
Caution: Be sure power is off at the main breaker box prior to installation
1. Carefully unpack the fixture from
the carton.
2. Knob (F) is shipped installed on
nipple (B). Remove knob (F)
from nipple (B) and retain for
later use.
3. Screw nipple (B) into crossbar
(A).
4. Spin nut (D) onto nipple (B),
leave it loose.
5. Using two machine screws (not
provided), fasten the crossbar
(A) to the electric box.
Note: A new electric box comes
with screws. When replacing a
fixture, retain the existing screws for
use with the new fixture.
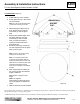
6. Adjust the length of threaded
nipple (B) in crossbar (A) so that
the knob (F) will hold the fixture
(E) tightly against the ceiling.
When the correct adjustment is
established, tighten lock nut (D)
against crossbar (A) to hold
adjustment.
7. Hold fixture close to ceiling and
using suitable wire connectors
(not provided) connect fixture
wires to supply wires (white to
white, black to black). Attach a
pigtail lead to crossbar ground
screw (C). Connect all ground
wires (bare copper or green to
bare copper or green).
Caution: Make sure wire connectors
are twisted on securely, and no bare wire is exposed.
8. Slide fixture (E) over nipple (B) and secure
with knob (F). Be sure nipple (B) is fully seated in knob (F).
(continued)
(Figure 1)