
Installation & Assembly
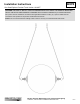


Installation Instructions A470
Otto Small Sphere Pendant Track Version 161305T Page 7 of 8
Modern American Blacksmiths | Fine, Hand Crafted Lighting
Castleton, Vermont USA | HUBBARDTONFORGE.COM 36888
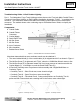
Note: The M3 Set Screw (F) must make electrical contact with the Coaxial Cable Inner Conductor (G),
yet the instructions do not call for the inner conductor to be stripped back to expose the wire beneath.
This is because the metal set screw pierces through the plastic insulation as the set screw is
tightened to full torque. However, if the tester will not light during test #3 it is recommended to strip
off 1/8” of insulation from the Coaxial Cable Inner Conductor (G). This will ensure that electrical
connection is made.
Part 2. All Open circuit or Short circuit conditions have been checked for and corrected as shown in
Part 1, but still the system does not turn on.
Determine if the Transformer is working. The transformer output is high frequency and cannot be
detected by most multi-meters. A simple Lamp test can verify the status of the Transformer.
Caution: Have a qualified person perform this operation. Do not hold lamp with bare hands as
lamp heats quickly and may cause injury. Hold the lamp carefully using insulated pliers.
Turn off power and remove Bi-Pin Lamp from socket Assembly. Examine Lamp to verify that it does
not appear defective. Lamp Glass should not be darkened and the filament should be intact.
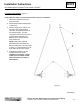
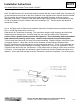
Expose Transformer by removing canopy and then turn power back on. These 12 Volt pendants are
supplied with a Class 2 (power limited) Low Voltage Transformer, so there is no potential for shock.
Carefully touch each one of the Transformer’s 12 Volt output wires to each pin of the Lamp as shown
in Figure 4. If the Lamp lights, this indicates a good Transformer and the Pendant lead needs to be
replaced. If the Lamp does not light, then the Transformer needs to be replaced. Turn off the power.
Figure 4 – Transformer Check