
Installation Sheet


Installation Instructions A416
For 124422, 124422F, 124432, & 124432F Semi-Flush Page 2 of 2
Hand-Forged, Vermont-Made Lighting and Accessories
P.O. Box 827, 154 Route 30 South, Castleton, Vermont 05735 33528
6. Slide canopy (A) over threaded studs and push firmly to ceiling, making sure that no wires are pinched
between canopy and ceiling. Fasten with
knurled balls (F). Be sure studs (E) are fully
seated in the knurled balls (F).
7. Install light bulb(s) (Fluorescent version bulbs
are included).
8. Install glass (refer to glass installation below).
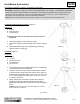
To Install Glass (Figure 3)
Components
B Support Rods (3)
C Knurled Ball (3)
H Ring Assembly
I Glass
1. Attach ring assembly (H) to two of the support
rods (B) using knurled ball (C).
2. Place glass (I) into ring assembly (H).
3. Move ring assembly (H) into position and
secure by inserting remaining support rod (B)
into ring assembly and attaching knurled ball
(C).
If you need further assistance, or find that you are missing any parts, please contact the dealer from which you purchased
this product. We hope you enjoy your fixture!
* Hubbardton Forge will not be liable for injury or damage caused by improper installation, lamping or use of this fixture.
Figure 3