
Installation & Assembly

ASSEMBLY & INSTALLATION INSTRUCTIONS
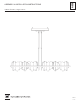
Hildene Pendant, Large 139652
A650
45394
4 OF 6
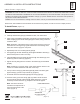
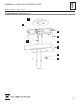
To Install Fixture (continued) (Figure 4)
G
K
J
L
B
I
G
(Figure 4)
11. Slide canopy pipes (G) onto xture pipes
(B) as far as necessary to give you the total
length of the xture which you desire. Be
careful not to scratch the pipe surfaces and to
pull excess wire up through the canopy pipe
(G). Once desired height has been reached,
screw clutchs (J) onto canopy pipes (G).
There must be a minimum 1-1/2" of inner pipe
inside the outer pipe. Tighten set screws (L)
in clutchs rmly with hex wrench provided.
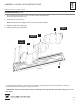
Note: To ensure full connection strength, be
sure the tapered end of the plastic sleeve
(K) is oriented toward the clutch (J) when
assembled and securely tighten set screw (L)
with provided hex wrench. (Figure 3)
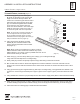
12. Using wood screws (N) attach mounting
bracket (M) to a structural member in the
ceiling, centering the bracket over the outlet
box.(Figure 5)
Note: Wood screws are supplied with your xture; however,
dierent materials and/or construction methods may require
dierent fasteners. If in doubt, contact a qualied electrician. Do not
attach bracket directly to outlet box.
13. Raise canopy (I). Connect safety cable (O) from canopy (I) to mounting bracket (M)
using a #8 screw that ships in the mounting kit bag.
14. Safety cable (O) is used to temporarily suspend canopy while wiring connections are made.
15. Blue or black and red wires on drivers are shipped with connectors attached. Connect the red wires from the
drivers to the connector with the red wires from the xture and do the same for the blue wires. Blue to blue or blue
to black.
16. Using ground screw (Q) and cupped washer (P) that ship in mounting kit bag, run a pigtail lead from bracket to the
junction box. Connect all ground wires (bare copper or green to bare copper or green). Push wires back into outlet
box.
17. Using suitable wire connectors (not provided) connect driver wires to supply wires (white to white and black to black).
18. Raise canopy (I) and push rmly to ceiling, making sure that no wires are pinched between canopy (I) and ceiling.
Threaded studs (R) ship attached to barrel knobs (S). Screw studs (R) into bent bracket (F) to secure canopy (I).
19. Follow instructions on following page to install decorative assemblies.
CAUTION: MAKE SURE WIRE CONNECTORS ARE TWISTED ON SECURELY AND NO BARE WIRE IS EXPOSED.