A652 ASSEMBLY & INSTALLATION INSTRUCTIONS Hildene Pendant 139651 45396 1 OF 5
A652 ASSEMBLY & INSTALLATION INSTRUCTIONS Hildene Pendant 139651 Component Parts A Canopy B Mounting Bracket C #10 Wood Screws (8) D Supply/Support Cable (4) E Driver F Cupped Washer G #8 Nut H Barrel Knobs (2) I Standoff (2) J Threaded Stud (2) K Safety Cable L Safety Cable Nut M Fixture N Gripper (4) O Gripper Cover (4) P Accent 1 (1) Q Accent 2 (2) 45396 2 OF 5
A652 ASSEMBLY & INSTALLATION INSTRUCTIONS Hildene Pendant 139651 CAUTION: FAILURE TO INSTALL THIS FIXTURE PROPERLY MAY RESULT IN SERIOUS PERSONAL INJURY OR DEATH AND PROPERTY DAMAGE. We recommend installation by a licensed electrician. This product must be installed in accordance with applicable installation code(s), by a person familiar with the construction and operation of the product and the hazards involved.* Caution: Do not exceed maximum wattage noted on fixture.
A652 ASSEMBLY & INSTALLATION INSTRUCTIONS Hildene Pendant 139651 To Install Fixture (continued) (Figure 2) 1. Align end of fixture (M) that has (+) and (-) labels with end of canopy (A) with (+) and (-) labels attached. 2. Unscrew gripper cover (O) from gripper (N). Slide gripper cover (O) over supply/support cable (D) with the small hole first. Insert cable (D) into gripper (N) until cable sticks through slot on side of gripper (N). 3. Repeat with remaining cables (D). 4.
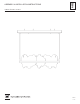
A652 ASSEMBLY & INSTALLATION INSTRUCTIONS Hildene Pendant 139651 To Install Accents (Figure 3) 1. Locate accent pieces (P+Q), fixture (M) will use two accent 2 (Q) and one accent 1 (P). 2. Install accents into fixture (M). Note: Point the tip of the triangle cutout in accent up to help orientation. 3. Once desired height of fixture (M) with accents installed is achieved, cut off excess supply/ support cable (D) as close to slot in gripper (N) as possible.