EchoLife HG532 Home Gateway User Guide HUAWEI TECHNOLOGIES CO., LTD.
EchoLife HG532 Home Gateway V100R001 User Guide Issue 03 Date 2010-06-25 Part Number 202147 Huawei Technologies Co., Ltd. provides customers with comprehensive technical support and service. Please feel free to contact our local office or company headquarters. Huawei Technologies Co., Ltd. Address: Huawei Industrial Base Bantian, Longgang Shenzhen 518129 People's Republic of China Website: http://www.huawei.com Email: terminal@huawei.
Copyright © Huawei Technologies Co., Ltd. 2010. All rights reserved. No part of this document may be reproduced or transmitted in any form or by any means without prior written consent of Huawei Technologies Co., Ltd. The product described in this manual may include copyrighted software of Huawei Technologies Co., Ltd and possible licensors.
Contents 1 Safety Precautions..................................................................................... 1 2 Connecting the Cables and Getting Started............................................ 4 2.1 Simple Connection .......................................................................................4 2.2 Connecting One Telephone ..........................................................................5 2.3 Connecting Multiple Telephones ......................................................
.5 Changing the IP Address Used for Logging In to the Web-Based Configuration Utility .........................................................................................15 5.6 Restoring Default Settings..........................................................................15 6 FAQs......................................................................................................... 17 7 Appendix..................................................................................................
1 Safety Precautions Thank you for purchasing the EchoLife HG532 Home Gateway (hereinafter referred to as the HG532). To use the device properly and safely, read these warnings and precautions carefully and strictly observe them during operation. Unless otherwise specified, the term "device" refers to the device and its accessories. Basic Requirements z During storage, transportation, and operation of the device, keep it dry and prevent it from colliding with other objects.
z During thunderstorms, power off the device, and then remove all the cables connected to it to prevent it from getting damaged due to lightning strikes. Precautions for Using Wireless Devices z When using the device, ensure that the antenna of the device is at least 20 cm away from all persons. z Do not use the device where using wireless devices is prohibited or may cause interference or danger.
Maintenance z If the device is not used for a long time, power it off, and then remove all the cables connected to it. z If any exception occurs, for example, if the device emits any smoke or unusual sound or smell, stop using the device immediately, power it off, remove all the cables connected to it, and then contact an authorized service center. z Do not trample, pull, or overbend any cable. Otherwise, the cable may get damaged, causing malfunction of the device.
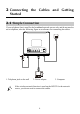
2 Connecting the Cables and Getting Started 2.1 Simple Connection If your telephone line is used for the broadband network access only and do not need to use a telephone, take the following figure as a reference for connecting the cables. 1 POWER USB LAN4 LAN3 LAN2 ADSL LAN1 RESET 2 3 1. Telephone jack on the wall 2. Power adapter 3. Computer If the wireless network function is used on the HG532 for the network access, you do not need to connect the cables.
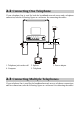
2.2 Connecting One Telephone If your telephone line is used for both the broadband network access and a telephone connection, take the following figure as a reference for connecting the cables. 1 POWER USB LAN4 LAN3 LAN2 ADSL LAN1 RESET LINE #### 2 #### MODEM 3 4 1. Telephone jack on the wall 2. Splitter 4. Computer 5. Telephone #### PHONE 5 3. Power adapter 2.
1 POWER USB LAN4 LAN3 LAN2 ADSL LAN1 RESET LINE # ### 2 ## # # MODEM 3 PHONE 5 4 5 ## ## 7 8 6 1 7 1. Telephone jack on the wall 2. Splitter 3. Power adapter 4. Computer 5. Telephone 6. Fax machine 7. Microfilter 8. T connector 2.4 Getting Started Press down the ON/OFF button on the side of the HG532 to power on the HG532.
3 Setting the Network-Access Parameters The HG532 supports ADSL2+ uplink and High-Speed Packet Access (HSPA) uplink through Huawei HSPA data card. Realizes dynamic mutual backup of voice and data services through the DSL link and HSPA link. 3.1 Configuring the HSPA uplink When the HG532 is working through Huawei HSPA data card, you need to install the Huawei HSPA data card on the HG532 so that your PC can connect to the Internet through HSPA uplink.
3.2 Configuring the ADSL uplink By configuring the HG532 and your computer, you can choose any of the following methods to surf the Internet: z Accessing the Network Through the Embedded PPP Dial-Up Software on the HG532 z Accessing the Network Through the PPP Dial-Up Software on Your Computer Accessing the Network Through the Embedded PPP Dial-Up Software on the HG532 If you select this method for accessing the network, the HG532 starts to set up a dial-up connection automatically after the startup.
operations on your computer upon each startup. To configure the HG532 and your computer for the network access, do as follows: Step 1 Set the working mode of the HG532 to Bridge. 1. In the navigation tree on the left of the Web-based configuration utility, choose Basic > WAN. 2. Select a PVC from the connection list. 3. Select Bridge from the Connection mode drop-down combo box. 4. Click Submit. Step 2 Install and configure the PPP dial-up software on your computer.
4 Configuring Connection the Wireless Network If a wireless network adapter is installed on your computer, you can connect you computer to the HG532 through a wireless connection. The hardware installation methods and driver installation methods of wireless network adapters provided by different companies vary from each other. For details, see the installation guide provided by the wireless network adapter provider.
If the WPS indicator does not blink, it indicates that the WPS function cannot be enabled. Note that the WPS function can be used only when the wireless network function is enabled and the wireless network security mode of the WLAN is set to WPA-PSK or WPA2-PSK. Setting Up a Wireless Connection Manually If your network adapter does not support the WPS function, you can set up a wireless connection between your PC and the HG532 manually.
1. Choose Start > All Programs > Accessories > Communications > Network Connections. 2. In the Network Connections window, right-click Wireless Network Connection to display a shortcut menu, and then select View Available Wireless Networks from the shortcut menu. 3. In the Wireless Network Connection Properties dialog box, select Wireless Networks. 4. Select Use Windows to configure my wireless network settings. 5. Click View Wireless Networks. 6.
Step 5 Click Submit. After you change the password successfully, the current page jumps to the page for logging in to the Web-based configuration utility. To log in to the Web-based configuration utility, enter the new password, and then click OK. If you forget the user name or password that has been changed, you can restore the default settings of the HG532 by pressing and holding the RESET button for over six seconds.
Step 1 Log in to the Web-based configuration utility. Step 2 In the navigation tree on the left, choose Basic > LAN. Step 3 Choose the WLAN page. Step 4 Enter a wireless network name in the SSID text box. Step 5 Select WPA-PSK from the Security drop-down combo box. Step 6 Enter an access password in the WPA pre-shared key text box. Step 7 Select TKIP from the WPA encryption drop-down combo box. Step 8 Click Submit to save the settings. 5.
The WPS applications may vary with different types of wireless network adapters. For details about the configuration and operations of the WPS application, refer to the operation guide provided by the application provider. 5.5 Changing the IP Address Used for Logging In to the Web-Based Configuration Utility To make the login IP address easy to remember, you can change the IP address after logging in to the Web-based configuration utility.
Step 1 Log in to the Web-based configuration utility. Step 2 In the navigation tree on the left, choose Maintenance > Device. Step 3 Choose the Reset page. Step 4 Click the Restore Default Settings button. After the preceding operations, the current page jumps to the login page. You can log in to the Web-based configuration utility by entering the default user name and password that are admin.
6 FAQs How can I quickly enable or disable the wireless network function? Press and hold the WLAN button for over one second, and then release the button to enable or disable the wireless network function. The WLAN indicator shows whether the wireless network function is enabled. How can I quickly restore the default settings of the terminal? To restore the default settings, press and hold the RESET button on the rear panel for over six seconds after the HG532 is powered on, and then release the button.
1. Ensure that the network adapter of the computer is enabled. 2. Ensure that the network cable between the terminal and the computer is properly connected. Remove and then insert the network cable or replace the network cable when necessary. If the LAN indicator is still off, contact an authorized maintenance center. Step 4 Check whether the driver for the network adapter is properly installed. Take a computer that runs Windows XP as an example.
Settings dialog box, ensure that the Use a proxy server for your LAN (These settings will not apply to dial-up or VPN connections). check box is cleared. Step 8 Try to access multiple Web sites to check whether the terminal can access these Web sites. If the terminal still cannot access Web sites, contact your network service provider.
After a broadband terminal is installed, does Internet access degrade call quality or do telephone calls lower the Internet access rate? No. The terminal uses the frequency division multiplexing (FDM) and splitter technologies to separate voice signals from data signals. Although the two types of signals are transmitted through one telephone line, they are carried by different frequency bands. Therefore, they do not interfere with each other.
Indicator Status Description WPS Blinking The HG532 is attempting to set up a wireless connection with a wireless client (such as a PC on which a wireless network adapter is installed) through the WPS function. This state lasts no more than 120s. On A wireless connection is set up between the HG532 and a wireless client through the WPS function. This state lasts 300s. Off The WPS function is disabled. Blinking Data is being transmitted through the Ethernet interface.
Interface or Button Description WLAN It is used to enable or disable wireless network function quickly. ON/OFF It is the power switch and is used to power on or power off the HG532. 7.3 Default Settings Parameter Setting IP address of the LAN interface 192.168.1.1 Subnet mask of the LAN interface 255.255.255.
Item Specification Standards ADSL standards z z z z DSL transmission rates ADSL2 standard ITU G.992.3 (G.dmt.bis) Annex A ADSL2+ standard ITU G.992.5 Annex A WLAN standard 802.11b, 802.11g, 802.11n G.dmt T1.413 z G.992.5 (ADSL2+) z z z Wireless transmission rates ITU G.992.1 (G.dmt) Annex A ITU G.992.2 (G.lite) ITU G.994.1 (G.hs) ANSI T1.413 Issue 2 Maximum downlink rate: 8 Mbit/s Maximum uplink rate: 896 kbit/s Maximum downlink rate: 24 Mbit/s Maximum uplink rate: 1024 kbit/s 802.
HUAWEI TECHNOLOGIES CO., LTD. Huawei Industrial Base Bantian, Longgang Shenzhen 518129 People's Republic of China www.huawei.