ENGLISH User manual © Copyright HT ITALIA 2011 Release EN 1.
HT3320 Table of contents: 1. PRECAUTIONS AND SAFETY MEASURES ............................................................... 3 1.1. Preliminary instructions ........................................................................................................3 1.2. During use ............................................................................................................................4 1.3. After use ..........................................................................................
HT3320 11.2. Environment .......................................................................................................................28 11.2.1. Environmental conditions ....................................................................................................... 28 11.3. Accessories provided .........................................................................................................28 11.4. Optional accessories .............................................................
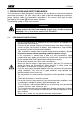
HT3320 1. PRECAUTIONS AND SAFETY MEASURES The instrument has been designed in compliance with the directives relevant to electronic measuring instruments. For your safety and in order to prevent damaging the instrument, please carefully follow the procedures described in this manual and read all notes preceded by the symbol with the utmost attention. The following symbol is used in this manual: WARNING When this symbol is displayed, the instrument is not able to emit a laser pointer.
HT3320 1.2. DURING USE Please carefully read the following recommendations and instructions: WARNING • Never press the T key when the laser is active and the instrument is directed towards the eyes. The instrument emits a laser pointer • If the object to be measured has a smooth surface reflecting the laser, prevent the laser from radiating to our eyes. • Never radiate the laser if flammable gas in present.
HT3320 3. PREPARATION FOR USE 3.1. INITIAL CHECKS Before shipping, the instrument has been checked from an electric as well as mechanical point of view. However, we suggest you to check it rapidly, to detect possible damage which may have occurred during transport. In case anomalies are found, immediately contact the Dealer. We recommend checking that the packaging contains all components indicated in § 11.3. In case the instrument should be replaced, please carefully follow the instructions given in § 12.
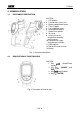
HT3320 4. NOMENCLATURE 4.1. INSTRUMENT DESCRIPTION CAPTION: 1. LCD display 2. Function keys (see § 4.2) 3. Battery compartment cover 4. T key (Trigger) 5. Lens protection cover 6. In-built photo camera 7. Double laser pointer 8. IR sensor 9. In-built sensor for temperature/humidity measurement 10. Connector for k-type thermocouple insertion 11. USB interface 12. Slot for SD card insertion 13. Battery Fig. 1: Instrument description 4.2. DESCRIPTION OF FUNCTION KEYS CAPTION: 1.
HT3320 4.3.
HT3320 5. SETTING SYSTEM PARAMETERS Every time it is switched on, the instrument shows the following general menu IR CAM IR MEASURE DEW POINT DATALOGGER DATA MEMORY SETTINGS Fig. 3: Instrument general menu Select item “SETTINGS” using the arrow keys S or T and confirming with the ENTER key. The following screen appears on the display: SYSTEM SET SYSTEM SET Date/Time Keypress Alert Unit (°C /°F) Memory Status Language Factory Settings Font color Cursor Backlight Auto Power Off Screen Timeout Fig.
HT3320 5.1. DATE/TIME SETTING In this section it is possible to set the system Date/Time. There are two options to set the Time: “24 hours” (00-24 format) or AM/PM. Date setting 1. Press the ENTER key to switch from a Date field to the other 2. Use the arrow keys S or T to set the Date values in format “DD-MM-YYYY” 3. Press the ESC key to save and exit the function Time setting 1. Press the ENTER key to switch from a Time format to the other 2. Use the arrow keys S or T to set the Time values 3.
HT3320 5.4. FONT COLOR SETTING In this section it is possible to set the color of the font shown on the instrument’s display 1. Use the arrow keys S or T to select the desired color, choosing among the available options: Orange, Green, Black, Blue, Gold and Purple (see Fig. 7) 2. Press the ESC key to save and exit the function Fig. 7: Font color selection 5.5. CURSOR SHAPE SETTING In this section it is possible to set the shape of the central cursor (if required) associated with the IR sensor 1.
HT3320 5.7. AUTO POWER OFF SETTING In this section it is possible to disable the Auto Power Off function of the instrument or to set a value among the available ones 1. Use the arrow keys S or T to select the options: Disabled, 3 Min, 15 Min or 60 Min (see Fig. 10) 2. Press the ESC key to save and exit the function Fig. 10: Auto Power Off setting selection 5.8.
HT3320 5.10. MEMORY STATUS SETTING In this section it is possible to select the type of memory (internal or SD Card) in which to save the measured data. The instrument also provides indications on the used and on the free memory space. 1. Use the arrow keys S or T to select the options: Device memory, SD Card (see Fig. 13) 2. Press the ENTER key to format the internal memory or the SD Card. Press the down arrow key T to confirm the operation or the up arrow key S to cancel the operation. 3.
HT3320 6. SETTING MEASURING FUNCTIONS In each measuring mode (see § 7), by pressing the ENTER key, the instrument shows the following screen: MEASURE SET MEASURE SET Emissivity Dewpoint / Wetbulb Alarm High Type K Alarm Low Laser Auto Mode Max/Min Average/Diff Ambient Temp. / %RH Fig. 14: Measurement setting menu Use the arrow keys S or T to select the items and confirm with ENTER to access the relevant programming sections. 6.1.
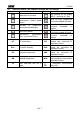
HT3320 Material Zinc (oxidized) Iron (polarized) Tin-plated steel Gold (polished) Silver (polished) Chromium (polished) Steel (ground sheet) Steel (oxidized) Liquid iron Oxidized aluminium Oxidized aluminium at 800°C Brass (rough) Copper (polished) Molten copper Lead (oxidized at 25°C) Nickel (pure) Nick-Chromium (oxidized) Marble Alumina (fine grain) Silica (fine grain) Quartz (rough) Timber Paint (any color) Water Rubber (rough) Paper Asphalt Concrete Cement Sand Earth Water Ice Snow Emissivity 0.
HT3320 6.2. SETTING THE MAXIMUM ALARM TEMPERATURE THRESHOLD The instrument is provided with an acoustic alarm on IR temperature measurements; the alarm sounds when a maximum threshold which can be set up to 1000°C is exceeded. 1. Use the arrow keys S or T to enable/disable the alarm (see Fig. 16) 2. With enabled alarm, press the ENTER key and then use the arrow keys S or T (press and hold the keys to quickly scroll the values) to set the threshold value. Press ENTER again to confirm. 3.
HT3320 6.6. MAX/MIN DISPLAY In this section it is possible to enable/disable the display of the Max and Min values of IR temperature. 1. Use the arrow keys S or T to select the options: Off, On (see Fig. 20) 2. Press the ESC key to save and exit the function Fig. 20: Max/Min display activation menu 6.7. AVERAGE/DIFFERENCE DISPLAY In this section it is possible to enable/disable the display of the Average and Difference values of the IR temperature measured by the instrument. 1.
HT3320 6.10. TEMPERATURE DISPLAY WITH K-TYPE PROBE In this section it is possible to enable/disable the display of the temperature values measured with the k-type probe. 1. Use the arrow keys S or T to select the options: Off, On (see Fig. 24) 2. Press the ESC key to save and exit the function Fig.
HT3320 7. OPERATING INSTRUCTIONS Upon start-up, the instrument shows the following 6 operating modes, which can be selected through the arrow keys S or T, confirming with ENTER IR VIDEO IR MEASURE DEW POINT DATALOGGER DATA MEMORY SETTINGS Fig. 25: Instrument general menu MEASURING MODE DESCRIPTION IR VIDEO IR temperature measurement with in-built photo camera + IR video recording + relative air temperature/humidity measurement with internal sensor (see § 7.
HT3320 7.3. IR VIDEO MODE This mode allows carrying out IR temperature measurement with the in-built photo camera, saving the images in standard JPG format, recording IR videos of IR temperature measurements saving them in 3GP format, measuring the air temperature/humidity with the in-built sensor and measuring temperature with type K probe (if enabled – see § 6.10) 1. Switch on the instrument and enter the “VIDEO IR” mode 2. Set the desired values of the measurement parameters (see § 6) 3.
HT3320 8. Make sure that the object whose temperature is to be measured is at least as large as the unit’s spot (see Fig. 28). The smaller the object is, the closer you should be to it. When accuracy is critical, make sure the object is at least twice as large as the spot size. To find a hot spot, aim the thermometer at the measured object, then move the instrument across the object until a hot spot is located. Fig. 28: Spot size area 9.
HT3320 7.4. INFRARED TEMPERATURE MEASUREMENT This mode allows rapidly measuring the IR temperature without using the in-built photo camera, further to carrying out air temperature/humidity/dew point/wet bulb measurements without saving them in the instrument’s memory. 1. 2. 3. 4. Switch on the instrument and enter the “IR MEASUREMENT” mode Set the desired values of the measurement parameters (see § 6) Hold the meter and point it towards the object whose temperature is to be measured.
HT3320 7.5. DEW POINT TEMPERATURE MEASUREMENT This mode allows displaying the dew point temperature, which is useful when making thermographic surveys for the construction sector, further to the normal IR temperature measures and air temperature/humidity measures. 1. 2. 3. 4. Switch on the instrument and enter the “DEW POINT” mode Set the desired values of the measurement parameters (see § 6) Hold the meter and point it towards the object whose temperature is to be measured.
HT3320 7.6. DATALOGGER FUNCTION In this mode, the instrument records the IR temperature and air temperature/humidity values with time scan and programmable alarm conditions on the measures. 1. Switch on the instrument and enter the “DATALOGGER” mode. 2. Set the desired values of the measurement parameters (see § 6) 3. Press the ENTER key to enter the programming section of the datalogger function. The following screen appears on the instrument’s display: Fig. 31: Datalogger function parameter setting 4.
HT3320 7.7. TEMPERATURE MEASUREMENT WITH K-TYPE PROBE WARNING • • Do not compare the infrared temperature measurement with the measurements made with K-type thermocouples, since (because of the totally different nature of the two methods) the obtained values may differ remarkably Measurement with the K-type thermocouple can be used in situations where IR measurement cannot be used (e.g.: measurement of shiny/bright surfaces such as glass and plexiglas) 1.
HT3320 8. OPERATIONS WITH THE MEMORY The instrument allows saving, in the internal memory or in the external mini SD Card (see § 5.10), IR images in JPG format (640x480pxl), IR videos in 3GP format and recordings in BIN/TXT format. These data can be recalled on the display as follows: 1. Select item “DATA MEMORY” using the arrow keys S or T and press ENTER. The following screen appears on the instrument’s display: Fig.
HT3320 10. MAINTENANCE 10.1. GENERAL 1. The instrument you purchased is a precision instrument. While using and storing the instrument, carefully observe the recommendations listed in this manual in order to prevent possible damage or danger during use. 2. Do not use the instrument in environments with high humidity levels or high temperatures. Do not expose to direct sunlight. 3. Always switch off the instrument after use.
HT3320 11. TECHNICAL SPECIFICATIONS Accuracy is indicated as [% of reading + degree]. It is referred to the following reference conditions: temperature 18 ÷ 28 °C (64 ÷ 82 °F), humidity < 80 % RH. INFRARED TEMPERATURE MEASUREMENT Function Measuring range °C Resolution Accuracy 0.1°C ±3.5°C (-50 ÷ 20°C) ±(1.0%rgd + 1.0°C) (20 ÷ 500°C) ±1.5%rdg (500 ÷ 1000°C) 0.1°F ±6.3°F (-58 ÷ 68°F) ±(1.0%rgd + 1.8°F) (68 ÷ 932°F) ±1.
HT3320 11.2. ENVIRONMENT 11.2.1. Environmental conditions Operating temperature: Operating humidity: Storage temperature: Storage humidity: Max operating altitude: 0°C ÷ 50°C (32°F ÷ 122°F) 10 ÷ 90%RH –10°C ÷ 60°C (14°F ÷ 140°F) < 90%RH 2000m (6562ft) This instrument complies with European Directive EMC 2004/108/EC 11.3. ACCESSORIES PROVIDED • Rechargeable Li-ION battery • K-type wire probe • Battery charger power supply • USB cable • Tripod • User manual • Carrying case 11.4.
HT3320 12. SERVICE 12.1. WARRANTY CONDITIONS This instrument is warranted against any material or manufacturing defect, in compliance with the general sales conditions. During the warranty period, defective parts may be replaced. However, the manufacturer reserves the right to repair or replace the product. Should the instrument be returned to the After-sales Service or to a Dealer, transport will be at the Customer’s charge. However, shipment will be agreed in advance.