ENGLISH Instruction manual © Copyright HT ITALIA 2011 Release EN 1.
HT2234N Index: 1. PRELIMINARY AND SAFETY .................................................................................... 2 1.1. PRELIMINARY INSTRUCTION ............................................................................ 2 1.2. DURING USE ....................................................................................................... 2 1.3. AFTRE USE.......................................................................................................... 2 2. INSTRUMENT DESCRIPTION ....
HT2234N 1. PRELIMINARY AND SAFETY This instrument conforms with safety Standard EN 61010-1 related to electronic measuring instruments. For your own safety and to avoid damaging the instrument follow the procedures described in this instruction manual and read carefully all notes preceded by this symbol . When taking measurements: • • Avoid doing that in rooms where explosive gas, combustible gas, steam or excessive dust is present.
HT2234N 2. INSTRUMENT DESCRIPTION The HT2234N meter performs the hereunder tests: • RPM and RPS speed measures with and without contact • m/min, ft/min and yd/min surface speed measures • Events counter • MAX/MIN/AVE functions 3. PREPARING TO USE 3.1. INITIAL This instrument has been checked mechanically and electrically prior to shipment. Every care has been taken to ensure that the instrument reaches you undamaged.
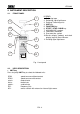
HT2234N 4. INSTRUMENT DESCRIPTION 4.1. FRONT PANEL LEGEND: 1. Reflecting tape. 2. Reflecting signal light beam. 3. Emitting / Receiving units. 4. UNIT key. 5. FUNCTION key. 6. START / STOP / HOLD key. 7. MAX/MIN/AVE symbols. 8. Low battery indication. 9. Start measure symbol. 10. Results display (bottom) and clock display (top) for Hours:Minutes. 11. Emitting signal light beam. 1 11 2 10 3 9 4 8 7 5 HT2234N 6 Fig. 1: front panel 4.2.
HT2234N • FUNCTION key Press ciclycally FUNCTION key to select the Maximum (MAX), Minimum (MIN) and Average (AVE) values of measured parameters at display, except for events counter results. MAX, MIN and AVE are shown at display. These functions allow users to analyze the stability of rotational speed.
HT2234N 5. OPERATING INSTRUCTIONS HT 2 234 N 5.1. SPEED MEASURE WITHOUT CONTACT 1. Cut off a piece of reflective tape of size 1.0 cm x 1.4 cm (optimal size). 2. Wipe off oil or stains from the surface where reflective tape will be adhered. 3. Stick the self-adhesive reflective tape on the object whose rotational speed is to be measured. The reflective tape should be attached as close to the outer edge of the object to be measured as possible. 4. Press ON/OFF key to turn ON the meter. 5.
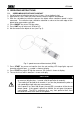
HT2234N 5.2. SPEED MEASURE WITH CONTACT 1. Insert the proper rubber head on the mechanical adapter. 2. Attach the mechanical adaptor to the unit and fasten the screw (see Fig. 3): Fig. 3: attach of mechanical adaptor 3. Press ON/OFF key to turn ON the meter. 4. Press UNIT key to select RPM / unit. 5. Press against the shaft of the object to be measured. Do not press against the shaft too hard to avoid hazardus situation for operator. 6. Press START key once to enable measure. symbol is shown at display. 7.
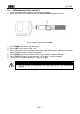
HT2234N 5.3. 1. 2. 3. 4. SPEED MEASURES ON SURFACES (m/min, ft/min, yd/min) Attach the mechanical adaptor to the unit and fasten the screw. Press ON/OFF key to turn ON the meter. Press UNIT key to select the desired m/min, ft/min or yd/min unit . Place the mechanical adaptor in contact with the surface on test, like is shown on Fig. 4: START HOLD ON/OFF HT2234N Fig. 4: speed measure on surfaces symbol is shown at display. 5. Press START key once to enable measure. 6.
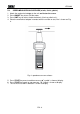
HT2234N HT2234N 5.4. EVENTS COUNTER WITH EXTERNAL LIGHT SOURCE 1. Place the external light source strictly close to Receiving unit (right side) like is shown in Fig. 5: Fig. 5: events counter with external light source 2. Press ON/OFF key to turn ON the meter. 3. Press cyclically UNIT key until selecting “NO.” unit at display. On this condition the meter shows values clear for each displays. Internal clock (with Hours and Minutes) start the counter and AutoPowerOFF function is automatically disabled. 4.
HT2234N HT2234N 5.5. EVENTS COUNTER WITH INTERNAL EMITTING UNIT 1. Place, if necessary, a piece of reflective tape on external surface which should be interested by red LED and place the meter like shown in Fig. 6: Fig. 6: events counter with Emitting unit 2. Press ON/OFF key to turn ON the meter. 3. Press cyclically UNIT key until selecting “NO.” unit at display. On this condition the meter shows values clear for each displays.
HT2234N 6. MAINTENANCE 6.1. GENERAL INFORMATION 1. This meter is a precision instrument. Whether in use or in storage, please do not exceed the specifications to avoid any possible damage or danger during use. 2. Do not keep this meter at high temperatures and/or humidity or expose to direct sunlight. 3. Be sure to turn the meter off after use. For long term storage, remove the battery to avoid leakage of battery fluid that can damage the internal components. 6.2.
HT2234N 7. TECHNICAL SPECIFICATIONS 7.1. TECHNICAL CHARACTERISTICS Accuracy is indicated as [% of reading + number of dgts]. It is referred to the following reference conditions: 23°C ± 5°C with RH <75%. Speed without contact Function Range RPM (Giri/min) 10.00 ÷ 99999 RPS (Hz) 0.200 ÷ 2000.0 Resolution 0.01 / 0.1 / 1 0.001 / 0.01 / 0.1 Speed with contact Function RPM / m/min ft/min yd/min Resolution 0.01 /0.1 / 1 0.001 / 0.01 / 0.1 0.01 / 0.1 / 1 0.01 / 0.1 / 1 Range 20.00 ÷ 29999 2.000 ÷ 2999.9 6.
HT2234N 8. SERVICE 8.1. WARRANTY CONDITION This instrument is guaranteed against material or production defects, in accordance with our general sales conditions. During the warranty period the manufacturer reserves the right to decide either to repair or replace the product. Should you need for any reason to return back the instrument for repair or replacement take prior agreements with the local distributor from whom you bought it.