User manual HT155 – HT157 Copyright HT ITALIA 2011 Release EN 1.
HT155 - HT157 Table of contents: 1. PRECAUTIONS AND SAFETY MEASURES .................................................................. 3 1.1. Preliminary instructions .................................................................................................... 3 1.2. During use ........................................................................................................................ 3 1.3. After use ........................................................................................
HT155 - HT157 8.1. Foreword ........................................................................................................................ 49 8.2. Minimum system requirements ...................................................................................... 49 8.3. Installing the driver USB................................................................................................. 49 8.4. Use of SoundView software ...........................................................................
HT155 - HT157 1. PRECAUTIONS AND SAFETY MEASURES The instrument has been designed in compliance with the directives regarding electronic measuring instruments. For your safety and to prevent damaging the instrument, we recommend following the procedures described in this manual and carefully reading all notes preceded by the symbol . Before and during measurements, carefully observe the following instructions: Do not perform any measurement in humid environments.
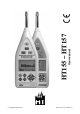
HT155 - HT157 2. GENERAL DESCRIPTION This manual refers to models HT155 and HT157.
HT155 - HT157 3. PREPARATION FOR USE 3.1. INITIAL INSPECTIONS Before shipment, the instrument’s electronics and mechanics have been inspected. All possible precautions have been taken in order for the instrument to be delivered without damage. However, we recommend generally inspecting the instrument in order to detect any damage suffered during transport. Should you detect any anomalies, immediately contact the forwarding agent.
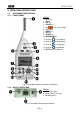
HT155 - HT157 4. OPERATING INSTRUCTIONS 4.1. INSTRUMENT DESCRIPTION 4.1.1. FRONT PANEL LEGEND: 1. Microphone 2. ON key 3. OFF key 4. CANCEL key 5. 6. 7. 8. 9. 10. Key to turn on the backlight LCD display ENTER key EXIT key OUTPUT key START/PAUSE key 11. Arrow key for programming 12. Arrow key for programming 13. Arrow key for programming 14. Arrow key for programming 15. SETUP key for programming Fig. 1: Description of the instrument’s front panel 4.1.2. OUTPUT INTERFACE LEGEND: 1.
HT155 - HT157 4.2. DESCRIPTION OF FUNCTION KEYS Key Description Pressing the ON key allows turning on and internally resetting the instrument at any time The OFF key allows turning off the instrument The CANCEL key allows deleting the saved data from the instrument’s memory Activates/deactivates the display’s backlight.
HT155 - HT157 4.4. DISPLAY CONTRAST ADJUSTMENT The instrument allows adjusting the display contract, proceeding as follows: 1. Turn on the instrument by pressing the screen: key. The display shows the following Fig. 4: Display contrast adjustment 2. Within 5s, press the arrow keys “ ” and “ ” respectively to decrease or increase the contrast level of the display. This parameter is shown in the upper right-hand part of the box “Realtime Analyzer”. Up to 30 contrast levels are possible 4.5.
HT155 - HT157 4.6. CONFIGURATION OF MEASURING PARAMETERS 4.6.1. FOREWORD Before activating a recording operation, it is necessary to set the necessary parameters such as the measure name, the measuring time, etc., on the instrument, starting from section “Setup” of the main menu (see Fig. 5) or pressing the “ ” key inside a measuring section. The instrument will automatically save the values of the parameters each time it is turned off, subsequently recalling them each time it is turned on.
HT155 - HT157 Line 1 On the left side of the line there is the voltage battery and on the right side the back-up battery voltage. In case the voltage value is > 10V, the message “Over” will appear on the display Line 2 In this line, it is possible to select the name of measurement as a reference for the data saved during the operation, choosing among a list of names, which can be created by the user (see § 4.6.3), using the “ ” and “ ” keys.
HT155 - HT157 4.6.3. DEFINING THE MEASURE NAME By selecting Line 3 inside the programming menu (see Fig. 6) and pressing the “ ” key, the instrument displays the following screen, which shows a list of the measure names created by the user: Fig. 7: Screen containing the list of measure names The first column, “Num”, refers to the number of the memory location used for saving the measure name.
HT155 - HT157 2. Press “ ” again to enter the next screen, where it is possible to digit the measure name by using the “ ”, “ ”, “ ” and “ ” keys, for the selection of the available characters, and the “ ” key to cancel the last input character. Fig. 9: Screen for typing the measure name 3. Press the “ ” key to confirm each character of the measure name (max 14 characters available) 4.
HT155 - HT157 5. CARRYING OUT MEASUREMENTS The instrument is capable of carrying out different types of analyses of the sound pressure level of a noise source: 1. Statistic analysis of noise 2. Spectrum analysis of noise with octave-band filter (1/1) (HT157 only) 3. Spectrum analysis of noise with third-octave band filter (1/3) (HT157 only) For simplicity, the following descriptions are referred to the instrument model HT157 5.1. STATISTIC ANALYSIS OF NOISE 5.1.1. INITIAL OPERATIONS 1.
HT155 - HT157 5.1.2. STATISTIC ANALYSIS OPERATIONS 1. Select the “Statistic” icon and confirm with “ ”. The instrument shows the following screen relevant to the numerical display of the measured quantities Line 1 Lines 2,8 Line 9 Fig. 11: Numerical screen of statistic analysis Line 1 Lines 2 8 The left part shows the current date/time set on the instrument, while the right part shows the measuring range currently used by the instrument.
HT155 - HT157 Line 9 This line contains: The “ ” icon, which indicates the battery charge level The “ ” icon, which indicates the measuring mode. In the same position, the following messages can be displayed: “OVER” and “UNDER”, to indicate that the measured values are respectively higher and lower than the maximum and minimum range set.
HT155 - HT157 Fig. 13: Graphic screen of statistic analysis 8. The screen shows the diagram of the statistic distribution corresponding to the recording in progress, with update every second. The left part of the graphic displays the statistic percentage of the sound pressure level corresponding to the dB value measured by the instrument, which can be changed by means of the “ ” and “ ” arrow keys, within the measuring range reported on the x-axis. In the example in Fig.
HT155 - HT157 5.1.3. 24-HOUR ANALYSIS OPERATIONS The “24Hours” analysis is a statistic analysis, but has a fixed duration of 24 hours starting from the programmable date/time, and divides the measuring results of the various quantities in 24 intervals of one hour each. After the analysis has automatically stopped, the calculated values of Ld, Ln and Ldn noise are also provided.
HT155 - HT157 Line 1 Line 2 Lines 3- 8 The left part shows the current date/time set on the instrument, while the right part shows the measuring range currently used by the instrument. Both the parameters can be programmed by the user as follows: Date/time setting 1. Use the “ ” and “ ” keys to move the flashing cursor to fields YYYY (year), MM (month), DD (day), HH (hours), MM (minutes) SS (seconds) 2. Use the “ ” and “ ” keys to select the desired program: Configuration of the measuring range 1.
HT155 - HT157 ” key to start measuring. After this operation, the instrument: 5. Press the “ Starts measuring from the minute indicated in the system date/time and shows this reference in column “hh:mm” with the relevant values of the quantities read in real time Shows the message “Run” on the display In line 1, it shows the measuring time “Tm” instead of the indication of the set range Disables the possibility of accessing the programming menu by pressing the “ ” key.
HT155 - HT157 Initial line Central lines The left part shows the current date/time set on the instrument, while the right part shows the measuring range currently used by the instrument. Both parameters can be programmed, as with numerical display By using the “ ” or “ ” keys to move the flashing cursor to the “hh:mm” field and repeatedly using the “ ” or “ ” keys, the instrument shows the graphic values of the 24 intervals from “0:00 to 23:00”. By moving the cursor to one of the parameters (e.g.
HT155 - HT157 5.1.4. INTEGRATION ANALYSIS OPERATIONS In this type of analysis, the instrument carries out an instant measurement, measures integrated values and peak “C” values of the sound pressure level in the three frequency weightings (A, C, Z) and in the three time constants (Slow, Fast, Impulse) 1. Use the “ ” or “ ” keys to select the “Integral” icon (see Fig. 19) and confirm with “ ”. Fig. 19: Integral analysis selection 2.
HT155 - HT157 Lines 2- 7 Line 8 Line 9 These lines show in real time the instant values of the following quantities, measured by the instrument: LAFp, LCFp, LZFp, LASp, LCSp, LZSp, LAIp, LCIp, LZIp, LAeq1s, LCeq1s, LZeq1s corresponding to the impulse levels of sound pressure with weightings A, C, Z and time constants Slow (S), Fast (F) and Impulse (I) The left part of the line shows a graphic bar, which dynamically updates the values of the instant quantities: LAFinst, LASinst, LAIinst, LCFinst, LCSinst
HT155 - HT157 Line 1 Lines 2-7 Line 8 Line 9 Fig.
HT155 - HT157 5.2. NOISE ANALYSIS IN 1/1 AND 1/3 OCTAVE BAND (HT157 ONLY) Further to the statistic analysis, the instrument HT157 allows carrying out accurate measurements of the noise spectrum by using internal octave-band (1/1) and third-octaveband (1/3) filters 5.2.1. INITIAL OPERATIONS ” key. The screen for the selection of the 1. Turn on the instrument by pressing the “ analysis type is shown on the display for approximately 5s (see Fig. 22) Fig.
HT155 - HT157 5.2.2. OCTAVE BAND ANALYSIS (1/1) 5.2.2.1. Operations for sections LIST, GRAPH and TOTAL 2. Select the “List” icon and confirm with “ numerical screen: ”. The instrument displays the following Line 1 Lines 2,8 Line 9 Fig. 23: Numerical screen of octave band analysis (1/1) Line 1 Lines 2 8 Line 8 The left part shows the current date/time set on the instrument, while the right part shows the measuring range selected. Date/time setting 1.
HT155 - HT157 ” key to start recording the values of the spectrum analysis 1/1 with a 3. Press the “ duration equal to the total measuring time (Tm) defined in the programming menu (see § 4.6). In this condition, the indication of the measuring range disappears and the measuring time appears, and cannot be changed while recording, and the “Leq,T” icon appears automatically on the display. The instrument displays the following screen: Fig. 24: Activation of recording of 1/1 spectrum analysis 3.
HT155 - HT157 Fig. 25: Graphic screen of 1/1 spectrum analysis 9. The screen shows the histogram of the sound pressure level associated to the frequency spectrum whose center is reported on the x-axis, further to the indications of the frequency weightings A, C, and Z. The minimum and maximum values on the y-axis are determined by the measuring range selection 10.Move the cursor to the line at the bottom of the x-axis and use the “ ” or “ ” keys to select the spectrum frequencies.
HT155 - HT157 CAUTION The “Max” and “Lock” functions are not active for instant values shown in the graphic bar 4. With flashing cursor on the “Linst” item, select the “Leq1s” options with the “ ” or “ ” keys. The instrument shows the following screen relevant to the values of the noise level equivalent to 1s: Fig. 27: Total section screen 1/1 spectrum analysis – Leq1s values 5.
HT155 - HT157 ” key with paused instrument, measurement is stopped and the 21.When pressing the “ result is saved in the internal memory 22.When pressing the “ ” key with paused instrument, the measurement being carried out is cancelled and the instrument waits for a new recording CAUTION The main menu cannot be selected while recording.
HT155 - HT157 5.2.3. ANALYSIS IN THIRD-OCTAVE BAND (1/3) 5.2.3.1. Operations for sections LIST, GRAPH 1. Select the “List” icon and confirm with “ numerical screen: ”. The instrument displays the following Line 1 Line 2 Lines 3,8 Line 9 Fig. 29: Numerical screen of analysis in third-octave band (1/3) Line 1 The left part shows the current date/time set on the instrument, while the right part shows the measuring range selected. Date/time setting 8.
HT155 - HT157 This line contains: The “ ” icon, which indicates the battery charge level Line 9 The “ ” icon which indicated the 1/3 measuring mode. In the same position, the following messages can be displayed: “OVER” and “UNDER”, to indicate that the measured values are respectively higher and lower than the maximum and minimum range set.
HT155 - HT157 With cursor flashing on the “ ” icon, press the “ “Lock” option. Subsequently, press the “ shown on the display. Press “ With cursor flashing on the “ ” or “ ” keys to select the ” key to lock the quantity data values ” again to exit the “Lock” function ” icon, press the “ ” or “ ” keys to select the “Max” option.
HT155 - HT157 5.2.3.2. Operations in TOTAL section 1. Select the “Total” item in the main menu (see Fig. 22) and confirm with “ instrument displays the following screen, relevant to the “Linst” item: ”. The Fig. 32: Total section screen 1/3 spectrum analysis – Instant values 2. The initial part shows the system date/time and the measuring range which can be modified by using the “ ” or “ ” keys.
HT155 - HT157 5. Use the “Save” functions to save the screen on the display and the options “Lock” and “Max” respectively to block the values on the display and show the maximum value of the quantities 6. With flashing cursor on the “Linst” item, select the “Leq,T” options with the “ ” or “ ” keys. The instrument shows the following screen relevant to the values of the equivalent noise level: Fig. 34: Total section screen 1/3 spectrum analysis – LeqT values 7.
HT155 - HT157 6. INSTRUMENT ACOUSTIC CALIBRATION 6.1.1. FOREWORD The instrument is regularly calibrated upon purchase and upon first use. The acoustic calibration of the sensitivity level of the microphone is recommended in order to always carry out correct tests at the beginning of each measuring campaign and must be carried out by using the provided portable calibrator in Class 1 HT151, with an operating frequency of 1kHz 1% and harmonic distortion <1%. 6.1.2.
HT155 - HT157 Line 4 Line 5 Line 6 This line indicated the sound pressure level set on the portable calibrator HT151 during the calibration operation (see § 6.1.3) This line shows the results of the calibration operation. When the instrument is calibrated by means of frequency weighting type C, “Lpx=” indicates the current sensitivity level of the microphone This line contains the menu items which can be selected by the user The “Rec.
HT155 - HT157 6.1.3. ACOUSTIC CALIBRATION WITH CALIBRATOR HT151 CAUTION For the first acoustic calibration of the instrument’s microphone, set the sound pressure level (SPL) according to the values allowed by the portable calibrator HT151 (94.0dB and 114.0dB). For values different from these reference values, program the instrument as described in § 6.1.
HT155 - HT157 5. Press and hold the “ON” key on the calibrator HT151 to activate the level equal to 94.0dB, looking at the activation of the red LED on the calibrator. Press and hold both “ON” and “+20dB” keys to activate the level equal to 114.0dB. Preliminarily check the emission of the output sound of the calibrator. Otherwise, replace the internal battery (see § 6. Select the “Cal.” option on the instrument (see Fig. 35) and press the “ ” key to activate calibration, which takes 10s 7.
HT155 - HT157 6.1.3.2. Calibration result display The instrument allows saving up to 256 calibration operations. For subsequent operations, the memory space is automatically reset and only the last operation carried out is saved. To recall the operation on the display, proceed as follows: 1. Use the keys “ ” or “ ” to select “Rec.” and confirm with “ ”. The instrument shows the following screen, which contains the date/time in which the operation was carried out and the measured sensitivity level Fig.
HT155 - HT157 7. OPERATIONS WITH THE MEMORY The instrument is provided with an internal Flash memory with a capacity of 64Kbytes for saving data. Each saved measure can have a maximum size of up to 512 bytes, and therefore it is possible to save up to 128 measure groups. The saved data can be transferred onto the provided USB pen or transferred to the PC via USB connection and analyzed with the provided software. Each measure can be recalled on the instrument’s display. 7.1.
HT155 - HT157 7.1.1. RECALLING THE STATISTIC ANALYSIS DATA ON THE DISPLAY 1. Select a datum corresponding to the “STA” indication available in the list of saved measures and press “ ”. The instrument displays the following screen: Line 1 Line 2 Line 3 Line 4 Lines 5-10 Fig. 41: Numerical display of "STA" analysis data Line 1 This line shows the measure name defined in the programming menu (see § 4.
HT155 - HT157 7.1.2. RECALLING THE 24H ANALYSIS DATA ON THE DISPLAY 1. Select a datum corresponding to the “24H” indication available in the list of saved measures and press “ ”. The instrument displays the following screen: Line 1 Line 2 Line 3 Line 4 Lines 5-10 Fig. 43: Initial numerical display of "24H" analysis data Line 1 This line shows the measure name defined in the programming menu (see § 4.
HT155 - HT157 Fig. 45: Display of distribution graphic of the "24H" analysis values 4. Press the “ ” or “ ” keys to go to the next pages and the “ ” or “ ” keys to display the values of data in the single intervals 5.
HT155 - HT157 7.1.3. RECALLING THE INTEGRATION MEASUREMENT DATA ON THE DISPLAY 1. Select a datum corresponding to the “INT” indication available in the list of saved measures and press “ ”. The instrument displays the following screen: Line 1 Line 2 Line 3 Line 4 Lines 5-10 Fig. 46: Initial page display of "INT" analysis data Line 1 This line shows the measure name defined in the programming menu (see § 4.
HT155 - HT157 7.1.4. RECALLING THE DATA OF THE OCTAVE BAND ANALYSIS (1/1) ON THE DISPLAY 1. Select a datum corresponding to the “OCT” indication available in the list of saved measures and press “ ”. The instrument shows the following screens, which can be selected by using the “ ” or “ ” keys Fig. 48: Numerical screens of 1/1 analysis data Line 1 (Page1) This line shows the measure name defined in the programming menu (see § 4.
HT155 - HT157 7.1.4.1. Recalling the data of the analysis in Total octave band (1/1) Within the “OCT” analysis, it is possible to display the following screens relevant to the “TOTAL” function, which considers the whole of the data: Fig. 50: Display of "TOTAL" analysis data Line 1 (Page1) This line shows the measure name defined in the programming menu (see § 4.
HT155 - HT157 7.1.5. RECALLING THE DATA OF THE ANALYSIS IN THIRD-OCTAVE BAND (1/3) ON THE DISPLAY 1. Select a datum corresponding to the “1/3OCT” indication available in the list of saved measures and press “ ”. The instrument shows the following screens, which can be selected by using the “ ” or “ ” keys Fig. 51: Numerical screens of 1/3 analysis data Line 1 (Page1) This line shows the measure name defined in the programming menu (see § 4.
HT155 - HT157 7.2. DATA TRANSFER ONTO USB PEN DRIVE CAUTION Transferring the data contained in the instrument’s memory onto an external USB pen drive unit is guaranteed only when using the USB pen drive provided with the instrument. This does not exclude, however, that appropriately formatted USB pen drives can be used. 1. Select section “Data” in the main menu and confirm with “ ”, when entering the instrument’s memory area (see Fig. 40) 2. Press the “ ” key.
HT155 - HT157 8. OPERATIONS WITH SOUNDVIEW SOFTWARE 8.1.
HT155 - HT157 5. Press the “Browse” key and select the folder …\Sound Meter usb driver\ inside the USB pen drive provided (after saving the content of the pen drive on the HD of the PC). Press “Next” 6. Select the file with extension “ch375wdm.inf” and proceed with “Next” 7. The installation procedure of the driver is started by the PC 8.
HT155 - HT157 8.4. USE OF SOUNDVIEW SOFTWARE After installing the software from the file “Setup.exe” contained in the USB pen drive provided with the instrument, launch the program. The PC shows the following screen: Fig. 53: Initial software screen 8.4.1. COPY AND PRINT COMMANDS With a open measure shown to PC (command “Input Data” of File menu), perform a right click on measure name the “Copy” and “Print” are available on program Fig.
HT155 - HT157 8.4.2. FILE MENU This menu contains the following controls: Control Input Name (CTRL+N) Key Input Data (CTRL+D) Key Description It allows opening a file with extension (*.XLS) relevant to a defined measure name, available inside the PC (see § 8.4.4) It allows selecting a folder in the PC, in which there are analyses downloaded from the instrument (corresponding to files with *.
HT155 - HT157 8.4.3. VIEW MENU In this menu there are the following controls, which can be activated by the user in order to carry out the operations more rapidly: Toolbar it allows displaying/hiding the toolbar Status bar it allows displaying/hiding the status bar Work Space it allows displaying/hiding the work space 8.4.4.
HT155 - HT157 8.4.5. RESULT MENU This menu contains the controls which allow transferring the recorder data from the instrument, analyzing the data and clearing all data from the instrument’s memory Control Read Results (CTRL+J) Key Description It allows downloading the instrument’s memory content onto the PC. According to the type of analysis, the downloaded data will appear in section “Measure Data” as TXT file and will be shown both in graphical and in numerical format in the working space.
HT155 - HT157 9. MAINTENANCE 9.1. GENERAL INFORMATION The instrument You purchased is a precision instrument. During use and storage, carefully observe the recommendations listed in this manual in order to prevent possible damage or dangers during use. Do not use the instrument in environments with high humidity levels or at high temperatures. Do not directly expose to sunlight. Always turn off the instrument after use.
HT155 - HT157 10. TECHNICAL SPECIFICATIONS 10.1.
HT155 - HT157 10.2. STATISTIC ANALISYS CHARARCTERISTICS Functions: SLM statistic analysis in weighting A Frequency integration with programmable period Statistic analysis in 24 hours (24H) Analysis type Statistic 24H Integration Measured parameters (*) LAFp, LAFmax, LAF5, LAF10, LAF50, LAF90, LAF95, LAFmin, SD, LAeq1s, LAeq,T, LAE, LAfeqT.
HT155 - HT157 10.5. GENERAL CHARACTERISTICS Display Characteristics: LCD, (240x160pxl), backlit Display update: 1Hz (numerical data), 10Hz (graphic data) Power supply Internal power supply: 4x1.5V alkaline batteries type IEC LR6, AA Low battery indication: Duration: External power supply: symbol “ ” and message “BATTERY LOW” approx.
HT155 - HT157 11. SERVICE 11.1. WARRANTY CONDITIONS This instrument is warranted against any material or manufacturing defect, in compliance with the general sales conditions. During the warranty period, defective parts may be replaced. However, the manufacturer reserves the right to repair or replace the product. Should the instrument be returned to the After-sales Service or to a Dealer, transport will be at the Customer's charge. However, shipment will be agreed in advance.
HT155 - HT157 12. 12.1.
HT155 - HT157 12.2.
HT155 - HT157 EN - 62
HT155 - HT157 EN - 63
HT155 - HT157 12.3. APPENDIX 3 – FREQUENCY WEIGHTING A, C Frequency [Hz] A [dB] C [dB] Frequency [Hz] A [dB] C [dB] 10 12.5 16 20 25 31.5 40 50 63 80 100 125 160 200 250 315 400 -70.4 -63.4 -56.7 -50.5 -44.7 -39.4 -34.6 -30.2 -26.2 -22.5 -19.1 -16.1 -13.4 -10.9 -8.6 -6.6 -4.8 -14.3 -11.2 -8.5 -6.2 -4.4 -3.0 -2.0 -1.3 -0.8 -0.5 -0.3 -0.2 -0.1 0 0 0 0 500 630 800 1000 1250 1600 2000 2500 3150 4000 5000 6300 8000 10000 12500 16000 20000 -3.2 -1.9 -0.8 0 0.6 1.0 1.2 1.3 1.2 1.0 0.5 -0.1 -1.1 -2.
HT155 - HT157 12.4.
Via della Boaria, 40 48018 – Faenza (RA)- Italy Tel: +39-0546-621002 (4 linee r.a.) Fax: +39-0546-621144 Email: ht@htitalia.it http://www.ht-instruments.