
User manual

When using in a vehicle
Connect the supplied DC car adaptor’s barrel plug into the charger’s
DC input jack. Plug the large end of the cord into the 12V car lighter
power port.
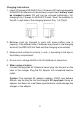
6. When AA/AAA/C/D cells are placed in the charger, the RED LED
will light up to indicate the proper charging. After the batteries are
fully charged, the RED LED will turn off and the GREEN LED will
light up indicating the trickle charge is on. The charged batteries are
ready for use.
7. When 9V cells are placed in the charger, the RED LED will light up.
After about 9-17 hours, remove the 9V cells from the charger and
now the charged batteries are ready for use. Observe the charging
time. Do not overcharge the batteries. (NOTE: The charging of
9V cells are by manual control, therefore the RED LED light will
continue to stay on unless you remove the 9V cells from the battery
compartment.)
8. Unplug the charger and remove the batteries from the charger
when not in use.
9. Begin again at Step 1 to charge the next set of batteries.
Bad Cell Detection:
When charge process is started, the charger detects the health
status of each of the cells in the battery compartment. If any battery
is unsuitable for charging. i.e. short circuit or reversed polarity, the
RED LED will fl ash.
All the charging processes will be terminated until the damage
cell(s) are removed.
4