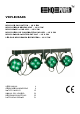
V VDPLD DJBA AR6 M INI LED D PAR B ATTEN – 16 X 3W 3 M INI LED DPAR BO OVENLIC CHT – 16 1 X 3W W M INI HER RSE À P AR LED – 16 X 3W M INI JUE EGO DE ILUMIN NACIÓN PAR LE ED – 16 X 3W M INI-LED DPAR-LI ICHTEFF FEKT-SE ET – 16 X 3W LE ED PAR MINI RAMPA R S SCENICZ ZNA – 1 6 X 3W US SER MANUAL GE EBRUIKER RSHANDL LEIDING NO OTICE D’E EMPLOI MA ANUAL DEL USUAR RIO BE EDIENUNGSANLEIT TUNG IN NSTRUKCJJA OBSŁU UGI 4 9 15 20 25 31
VDPLDJBAR6 V.
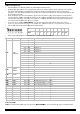
VDPLDJBAR6 *: not inc. – niet meegelev. – non incl. – no incl. – nicht mitgeliefert – nie zał. terminator eindweerstand résistance de terminaison terminación Terminierung terminator How to turn the controller line from 3-pins into 5-pins (plug and socket). Controller line van 3-pin naar 5-pin aanpassen (stekker en contact). Modifier la ligne du contrôleur de 3 broches en 5 broches (fiche et contact). Modificar la línea del controlador de 3 polos y 5 polos (conector y contacto).
V VDPLDJBAR R6 USER MAN NUAL 1.. Intro oduction To o all residen nts of the European E Un nion Im mportant en nvironmenttal informattion about this t produc ct This symbol on th he device orr the package indicates that t disposal of the device after its lifecycle coulld harm m the environ nment. Do not dispose of o the unit (o or batteries) as unsorted d municipal waste; w it should be taken to t a specialized company for recycling.
VDPLDJBAR6 • All modifications of the device are forbidden for safety reasons. Damage caused by user modifications to the device is not covered by the warranty. • Only use the device for its intended purpose. All other uses may lead to short circuits, burns, electroshocks, lamp explosion, crash, etc. Using the device in an unauthorised way will void the warranty.
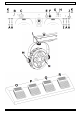
VDPLDJBAR6 • Slide the VDPLDJBAR6 over the tripod and secure it tightly by turning the knob [D] clockwise. Truss mounting: • Have the batten installed by a qualified person, respecting EN 60598-2-17 and all other applicable norms. • The carrying construction must be able to support 10 times the weight of the batten for 1 hour without deforming. • Remove both bolts [K] from the batten and replace them by 2 truss clamps (not incl.).
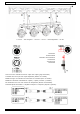
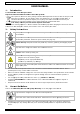
V VDPLDJBAR R6 DM MX controlled mode • witch 10 to th he ON-positiion to enable e DMX contrrolled mode. Set DIP sw • All DMX-co ontrolled dev vices need a digital startt address so that the corrrect device responds to the signals. This digital start addre ess is the cha annel numbe er from whic ch the device e starts to “listen” to the e DMX controller. The same starting addrress can be used u for a whole group of o devices orr an individual address can c be set for every e device e.
VDPLDJBAR6 Unplug the power cord from the VDPLDJBAR6 and connect the foot controller to the foot controller jack [I]. Reconnect the power cord. Foot controller functions: Press to select a built-in program. 1x pedal 1 (O) pedal 2 (P) pedal 3 (Q) pedal 4 (R) 8.
V VDPLDJBAR R6 GEBR RUIKER RSHAN NDLEID DING 1.. Inleiding Aa an alle inge ezetenen va an de Europ pese Unie Be elangrijke milieu-infor m rmatie betrreffende ditt product Dit sy ymbool op het h toestel off de verpakk king geeft aa an dat, als het na zijn lev venscyclus wordt w wegg geworpen, dit toestel sch hade kan toe ebrengen aan het milieu u.
VDPLDJBAR6 • Leer eerst de functies van het toestel kennen voor u het gaat gebruiken. Ongeschoolde personen mogen dit toestel niet gebruiken. Meestal is beschadiging het gevolg van onprofessioneel gebruik. • Om veiligheidsredenen mag u geen wijzigingen aanbrengen. Schade door wijzigingen die de gebruiker heeft aangebracht valt niet onder de garantie. • Gebruik het toestel enkel waarvoor het gemaakt is. Andere toepassingen kunnen leiden tot kortsluitingen, brandwonden, elektrische schokken, enz.
VDPLDJBAR6 Statief: • Volg nauwlettend de instructies die bij het statief werden meegeleverd. • Zorg ervoor dat de diameter van de statiefbuis minstens 25 mm bedraagt om een goede bevestiging te garanderen. • Plaats de VDPLDJBAR6 op het statief en draai de beveiligingsknop [D] stevig aan (rechtsom). Montage aan draagstructuur: • Laat een geschoolde technicus dit toestel installeren conform EN 60598-2-17 en andere toepasselijke normen.
V VDPLDJBAR R6 Au utomatische e sturing 1. Plaats DIP--schakelaar 9 in de ON-s stand en DIP P-schakelaarr 10 in de OFF-stand om m de automatische sturin ng in te schak kelen. ogrammasne elheid in mett DIP-schake elaars 1 tot 3. 3 2. Stel de pro aster/slave efunctie Ma 1. Koppel me eerdere VDP PLDJBAR6’s zoals omsch hreven onde er §6. e muziek- off automatisch he sturing in n op het mas stertoestel. 2. Schakel de d slaves op p ON om de slavefunctie in te schake elen. 3.
VDPLDJBAR6 kanaal functie CH11 spot3 DMX512-waarde 000 ~255 omschrijving groen dimmen van 0 ~ 100% CH12 spot3 000 ~255 blauw dimmen van 0 ~ 100% CH13 spot4 000 ~255 rood dimmen van 0 ~ 100% CH14 spot4 000 ~255 groen dimmen van 0 ~ 100% CH15 spot4 000 ~255 blauw dimmen van 0 ~ 100% Voetpedaal Opmerking: Het voetpedaal functioneert enkel indien de automatische of muzieksturing geselecteerd is. Ontkoppel de voedingsstekker en koppel het voetpedaal aan de ingang [I].
VDPLDJBAR6 Gebruik dit toestel enkel met originele accessoires. Velleman nv is niet aansprakelijk voor schade of kwetsuren bij (verkeerd) gebruik van dit toestel. Voor meer informatie over dit product en de laatste versie van deze handleiding, zie www.hqpower.eu. De informatie in deze handleiding kan te allen tijde worden gewijzigd zonder voorafgaande kennisgeving. © AUTEURSRECHT Velleman nv heeft het auteursrecht voor deze handleiding. Alle wereldwijde rechten voorbehouden.
V VDPLDJBAR R6 NOTIC CE D’EM MPLOI I 1.. Intro oduction Au ux résidents s de l'Union n européen nne De es informattions enviro onnementales importa antes conce ernant ce produit p Ce sy ymbole sur l'appareil ou l'emballage indique que l’élimination n d’un apparreil en fin de e vie peut pollue er l'environn nement.
VDPLDJBAR6 • Toute modification est interdite pour des raisons de sécurité. Les dommages occasionnés par des modifications par le client ne tombent pas sous la garantie. • N’utiliser le spot qu’à sa fonction prévue. Tout autre usage peut causer des courts-circuits, des brûlures, des électrochocs, etc. Un usage impropre annule d'office la garantie.
VDPLDJBAR6 • Monter la VDPLDJBAR6 sur le trépied et serrer le bouton moleté [D] fermement (vers la droite). Montage sur armature : • Un technicien qualifié doit installer l’appareil en respectant EN 60598-2-17 et toute autre norme applicable. • La construction portante de l’appareil doit être capable de supporter 10 x le poids de l’appareil pendant une heure, sans qu’une déformation de la construction en résulte.
V VDPLDJBAR R6 3. Placer l’interrupteur DIIP 1 et 10 su ur les appare eils esclaves s en position ON pour activer le mode esclave. Pillotage DMX X • Placer l’interrupteur DIIP 10 en pos sition ON pour activer le mode de pilotage DMX.. • ppareils pilottés par un signal DMX demandent une adresse de d départ DMX pour ass surer que les s Tous les ap appareils corrects c réag gissent sur le es signaux de d contrôle.
VDPLDJBAR6 Le pédalier Remarque : Le pédalier fonctionne uniquement en modes de pilotage automatique et par le son. Déconnecter le câble d’alimentation de la VDPLDJBAR6 et connecter le pédalier à l’entrée [I]. Réinsérer la fiche d’alimentation dans la prise de courant. Fonctions : Appuyer pour sélectionner un programme intégré.
V VDPLDJBAR R6 MA ANUAL L DEL USUAR U RIO 1.. Intro oducción n A los l ciudada anos de la Unión U Europ pea Im mportantes informacio ones sobre el medio am mbiente co oncerniente e a este pro oducto Este símbolo en este aparato o o el embala aje indica qu ue, si tira las s muestras inservibles, podrían p daña ar el me edio ambiente. No tire este aparrato (ni las pilas, p si las hubiera) h en la a basura dom méstica; deb be ir a una empresa e espec cializada en reciclaje.
VDPLDJBAR6 • Utilice sólo el VDPLDJBAR6 para aplicaciones descritas en este manual a fin de evitar p.ej. cortocircuitos, quemaduras, descargas eléctricas, etc. Un uso desautorizado puede causar daños y anula la garantía completamente. • Los daños causados por descuido de las instrucciones de seguridad de este manual invalidarán su garantía y su distribuidor no será responsable de ningún daño u otros problemas resultantes.
VDPLDJBAR6 • Fije el VDPLDJBAR6 al pie y atornille el botón de seguridad [D] firmemente (en el sentido de las agujas del reloj). Montar la barra: • Respete la directiva EN 60598-2-17 y toda norma nacional antes de instalar el aparato. La instalación debe ser realizada por un técnico especializado. • El soporte donde irá el aparato, debe ser capaz de sostener 10 veces el peso de éste durante una hora, sin que se produzca una deformación de dicho soporte.
V VDPLDJBAR R6 3. Ponga el in nterruptor DIP 1 y 10 de e los aparato os esclavos en e la posición n ON para activar el modo esclavo. Co ontrol DMX • X. Ponga el in nterruptor DIP 10 en la posición p ON para activarr el modo de e control DMX • Si se usa una u señal DM MX, cada apa arato tiene su s propia dirrección inicia al DMX para asegurar qu ue los aparattos reaccionen n a las señale es de contro ol correctas.
VDPLDJBAR6 Interruptor de pie Nota: el interruptor de pie funciona sólo en el modo de control automático y el modo de control por la música . Desconecte el cable de alimentación del VDPLDJBAR6 y conecte el interruptor de pie a la entrada [I]. Vuelva a conectar el aparato a la red eléctrica. Funciones: Pulse para seleccionar un programa incorporado.
V VDPLDJBAR R6 BED DIENUN NGSAN NLEITU UNG 1.. Einfü ührung An n alle Einwo ohner der Europäische E en Union Wiichtige Umw weltinform mationen üb ber dieses Produkt P Dieses Symbol au uf dem Produ ukt oder der Verpackung g zeigt an, dass die Ents sorgung dieses Produktes nach seinem Lebe enszyklus de er Umwelt Sc chaden zufüg gen kann.
VDPLDJBAR6 Vermeiden Sie Erschütterungen. Vermeiden Sie rohe Gewalt während der Installation und Bedienung des Gerätes. • Nehmen Sie das Gerät erst in Betrieb, nachdem Sie sich mit seinen Funktionen vertraut gemacht haben. Lassen Sie das Gerät nicht von Personen bedienen, die sich nicht mit dem Gerät auskennen. Meist ist die Beschädigung des Gerätes das Ergebnis von unfachmännischer Bedienung. • Eigenmächtige Veränderungen sind aus Sicherheitsgründen verboten.
VDPLDJBAR6 6.2 Montage Gefahr vor Verletzungen. Für die Installation des Gerätes ist eine solide praktische Erfahrung notwendig. Sie müssen die Höchstlast einer Tragkonstruktion berechnen können, wissen welches Baumaterial Sie verwenden können und Sie müssen das verwendete Material und das Gerät ab und zu kontrollieren lassen. Montieren Sie das Gerät nie selber wenn Sie keine Erfahrung damit haben. Eine schlechte Montage kann zu Verletzungen führen.
V VDPLDJBAR R6 Mu usiksteueru ung 1. Stellen Sie e DIP-Schalte er 10 auf OF FF um die Mu usiksteuerun ng einzuscha alten. 2. Regeln Sie e die Empfind dlichkeit des s Mikrofons [G] [ mit dem m Einstellknopf [H]. Au utomatische e Steuerung 1. Stellen Sie e DIP-Schalte er 9 auf ON und DIP-Sch halter 10 auff OFF um die e automatisc che Steuerun ng einzuschalten. 2. Stellen Sie e die Geschw windigkeit de es Programs mit den DIP P-Schaltern 1 bis 3 ein. aster-/Slav ve-Funktion n Ma 1.
VDPLDJBAR6 Kanal Funktion CH4 Scheinwerfer 1 DMX-512-Wert CH5 Scheinwerfer 1 000 ~255 Grün dimmen von 0 ~ 100% CH6 Scheinwerfer 1 000 ~255 Blau dimmen von 0 ~ 100% CH7 Scheinwerfer 2 000 ~255 Rot dimmen von 0 ~ 100% CH8 Scheinwerfer 2 000 ~255 Grün dimmen von 0 ~ 100% CH9 Scheinwerfer 2 000 ~255 Blau dimmen von 0 ~ 100% CH10 Scheinwerfer 3 000 ~255 Rot dimmen von 0 ~ 100% CH11 Scheinwerfer 3 000 ~255 Grün dimmen von 0 ~ 100% CH12 Scheinwerfer 3 000 ~255 Blau dimmen von 0
VDPLDJBAR6 9. Technische Daten Stromversorgung 230VAC ~ 50Hz Sicherung F2A/250V Stromverbrauch 50W LEDs 16 dreifarbige LEDs von 3W Abstrahlwinkel 15° Abmessungen 950 x 45 x 230mm Gewicht 6kg Verwenden Sie dieses Gerät nur mit originellen Zubehörteilen. Velleman NV übernimmt keine Haftung für Schaden oder Verletzungen bei (falscher) Anwendung dieses Gerätes. Für mehr Informationen zu diesem Produkt und die neueste Version dieser Bedienungsanleitung, siehe www.hqpower.eu.
V VDPLDJBAR R6 IN NSTRUK KCJA OBSŁU O GI 1.. Wstę ęp Niniejsza insttrukcja prz zeznaczona jest dla uż żytkownikó ów w krajac ch Unii Euro opejskiej Wa ażne inform macje dotyc czące ochro ony środow wiska Ninie ejszy symbol umieszczon ny na urządz zeniu bądź opakowaniu oznacza, o że w wyrzucenie zużytego z produ uktu może być b szkodliwe e dla środow wiska. Nie um mieszczać zu użytych urzą ądzeń (bądź baterii) w zwyk kłych pojemn nikach na odpady.
VDPLDJBAR6 Chronić urządzenie przed wstrząsami i użytkować wyłącznie zgodnie z przeznaczeniem. Podczas obsługi urządzenia unikać używania siły. • Przed rozpoczęciem pracy z urządzeniem należy zapoznać się z jego funkcjami. Zabrania się użytkowania urządzenia przez niewykwalifikowane osoby. Wszelkie możliwe uszkodzenia są zazwyczaj spowodowane nieprofesjonalną obsługą urządzenia. • Wprowadzanie zmian w urządzeniu jest zabronione ze względów bezpieczeństwa.
VDPLDJBAR6 6.2 Bezpieczny montaż Ryzyko obrażeń ciała. Montaż nadziemny wymaga dużego doświadczenia: obliczanie limitów obciążenia, wybór materiałów montażowych ... Urządzenie oraz materiały należy regularnie kontrolować. Bez wymaganego doświadczenia nie należy próbować samodzielnie instalować urządzenia, gdyż może to prowadzić do obrażeń ciała.
V VDPLDJBAR R6 Try yb sterowa ania dźwięk kiem 1. Aby urucho omić tryb regulacji dźwię ękiem, ustaw wić segmenttowy przełąc cznik dwusta anowy 10 w pozycji OFF (wył.). 2. Wyregulow wać czułość mikrofonu m [G G] używając c pokrętła do o regulacji cz zułości mikro ofonu [H]. Try yb automattyczny 1. Aby urucho omić tryb au utomatyczny y, ustawić se egmentowy przełącznik p d dwustanowy 9 w pozycji ON (wł.), a segmentow wy przełączn nik dwustano owy 10 w po ozycji OFF (w wył.).
VDPLDJBAR6 Kanał CH2 funkcja Wartość DMX-512 Program sterowania uprzywilejowany funkcja wył. przy uruchomionym CH1 lub CH3 dimmer 000 ~ 000 wył. 001 ~ 255 sterowanie światłem 0 ~ 100% wył.
VDPLDJBAR6 • W urządzeniu nie ma części, które wymagają prac serwisowych wykonywanych przez użytkownika. • W celu uzyskania części zamiennych należy skontaktować się ze sprzedawcą 9. Specyfikacja techniczna zasilanie 230VAC ~ 50Hz bezpiecznik F2A/250V zużycie mocy 50W diody LED Trójkolorowe diody LED 16x 3W kąt padania wiązki światła 15° wymiary 950 x 45 x 230mm masa całkowita 6kg Urządzenie może być używane wyłącznie z oryginalnymi akcesoriami.
Velleman® Service and Quality Warranty Since its foundation in 1972, Velleman® acquired extensive experience in the electronics world and currently distributes its products in over 85 countries. All our products fulfil strict quality requirements and legal stipulations in the EU. In order to ensure the quality, our products regularly go through an extra quality check, both by an internal quality department and by specialized external organisations.
Garantía de servicio y calidad Velleman® Desde su fundación en 1972 Velleman® ha adquirido una amplia experiencia como distribuidor en el sector de la electrónica en más de 85 países. Todos nuestros productos responden a normas de calidad rigurosas y disposiciones legales vigentes en la UE. Para garantizar la calidad, sometemos nuestros productos regularmente a controles de calidad adicionales, tanto a través de nuestro propio servicio de calidad como de un servicio de calidad externo.