VDPC130 240-CHANNEL DMX CONTROLLER WITH JOG WHEELS 240-KANAALS DMX CONTROLLER MET JOG-WIELEN CONTRÔLEUR DMX 240 CANAUX AVEC ROUES JOG CONTROLADOR DMX DE 240 CANALES CON RUEDAS JOG 240-KANAL-DMX-STEUERGERÄT MIT JOG-RÄDERN 240 KANAŁOWY STEROWNIK DMX Z DWOMA POKRĘTŁAMI USER MANUAL GEBRUIKERSHANDLEIDING NOTICE D’EMPLOI MANUAL DEL USUARIO BEDIENUNGSANLEITUNG INSTRUKCJA OBSŁUGI
VDPC130 – 240-CHANNEL DMX CONTROLLER WITH JOG WHEELS 1. Introduction To all residents of the European Union Important environmental information about this product This symbol on the device or the package indicates that disposal of the device after its lifecycle could harm the environment. Do not dispose of the unit (or batteries) as unsorted municipal waste; it should be taken to a specialized company for recycling. This device should be returned to your distributor or to a local recycling service.
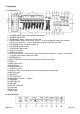
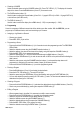
4. Description a. Front Panel (fig. 1) 1. 2. 3. 4. SCANNER selection buttons: Choose your desired projector. SCANNER indicator LEDs SCENE selection buttons: Choose your desired scene. CHANNEL faders: Adjust the DMX values. Channel 1 ~ 8 can be adjusted after pressing the respective scanner button. Channel 9 ~ 16 can be adjusted after pressing the page selection button. 5. FOG MACHINE button: Activate the fog machine. 6. FOG MACHINE heating indicator 7. FOG MACHINE ready indicator 8.
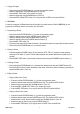
29. AUDIO input socket 30. MIDI input socket 31. DMX POLARITY selector 32. DMX output socket 33. DMX input socket 34. FOG MACHINE socket 35. DC input socket 36. POWER ON / OFF switch 5. Setup a. Installing the Device Install the device on a plane surface or install it in a rack. This device can be installed into a 19” rack. Make sure to use a double-door rack where both front and rear panels can be opened. The rack should be equipped with a cooling fan.
The DMX starting address should be assigned every 16 channels. Address every projector to the respective starting address otherwise the channel assignment will not be correct. Projectors with the same starting address will work synchronous. g. Channel Setting This device can control up to 12 x 16-channel scanners. The first 8 channels of each scanner can be controlled through the 8 faders. The next 8 channels are controlled through the 8 faders and the PAGE selection button (10) on page B.
• Checking a CHASER Select the desired chaser using the CHASER buttons (22). Press TAP / DELAY (17). The display will show the steps in the chaser. Press the BANK buttons (16 and 17) to see each scene. • The PAGE selection button (10) Use this button to adjust the channel faders (4) from CH1 ~ 8 (page A LED is lit) to CH9 ~ 16 (page B LED is lit) or both of them (both LEDs are lit). • The DISPLAY button (17) Use this button to switch the display from a DMX value (0 ~ 255) to a percentage (0 ~ 100%). b.
• Copying a Program o o o o o Press and hold the PROGRAM button (11) to enter the programming mode. Select the desired bank using the BANK buttons (15 and 16). Press the MIDI / REC button (19) to prepare for copying. Select the target bank using the BANK buttons (15 and 16). Press the MUSIC / BANK COPY button (12) to copy the bank. All LEDs on the panel will flash. c. The Chaser A chaser is a sequence of different banks that will be called up one after another.
o Inserting a Scene into a Chaser Press and hold the PROGRAM button (11) to enter the programming mode. Select the desired chaser in which the scene will be inserted using the CHASER buttons (22). The respective LEDs will be lit. Press the TAP / DISPLAY button (17) to switch to the step mode. Select the scene where the new scene is to be inserted using the BANK buttons (15 and 16). Now, the display will show the scene.
• Copying a Scene o o o o o o Press and hold the PROGRAM button (11) to enter the programming mode. Select the bank in which the scene will be copied using the BANK buttons (15 and 16). Select the scene you want to copy using the SCENE buttons (3). Press the MIDI / REC button (19) to prepare for copying. Select the bank where you desire to copy the scene to using the BANK buttons (15 and 16). Press the desired SCENE button (3). All LEDs on the panel will flash.
7. Cleaning and Maintenance 1. 2. 3. 4. 5. 6. All screws should be tightened and free of corrosion. The electric power supply cables must not show any damage. Have a qualified technician maintain the device. Disconnect the device from the mains prior to maintenance activities. Wipe the device regularly with a moist, lint-free cloth. Do not use alcohol or solvents. There are no user-serviceable parts. Contact your dealer for spare parts if necessary. 8.
• Sluit het toestel altijd als laatste aan. • Schade door wijzigingen die de gebruiker heeft aangebracht aan het toestel vallen niet onder de garantie. • Houd dit toestel uit de buurt van kinderen en onbevoegden. 3. Algemene richtlijnen • Dit toestel is DMX controller ontworpen voor het besturen van spots op podia, in disco's, enz. U mag dit toestel enkel binnenshuis gebruiken door de meegeleverde adapter aan te sluiten op een wisselspanning van maximum 230VAC / 50Hz. • Schud het toestel niet dooreen.
b. Achterpaneel (zie fig. 2) 29. Ingang AUDIO 30. Ingang MIDI 31. Keuzeschakelaar DMX POLARITEIT 32. Uitgang DMX 33. Ingang DMX 34. Ingang ROOKMACHINE 35. DC-ingang 36. POWER ON / OFF 5. Montage a. Het toestel monteren Installeer het toestel op een plat oppervlak of monteer het in een rack. De VDPC130 kan in een 19” rack worden gemonteerd. Gebruik hiervoor een rack met dubbele opening waar zowel het voor- als het achterpaneel geopend kan worden. Voorzie de rack van een ventilator.
Het DMX startadres wordt eens om de 16 kanalen toegewezen. Wijs elke projector toe aan het respectievelijke startadres om een foutieve adressering te vermijden. Projectors met eenzelfde startadres reageren synchroon. g. Instellen van de kanalen Met de VDPC130 bestuurt u tot 12 x 16-kanaals scanners. De eerste 8 kanalen van elke scanner worden bestuurd via de 8 schuifknoppen. De volgende 8 kanalen worden bestuurd via de 8 schuifknoppen en de keuzeknop van de PAGINA (10) op pagina B.
• Een CHASER controleren Selecteer de gewenste chaser met de CHASER-knoppen (22). Druk op TAP / DELAY (17). De display geeft de stappen in de chaser weer. Druk op de BANK-knoppen (16 and 17) om elke scène te bekijken. • Keuzeknop PAGINA (10) Gebruik deze knop om de kanaalschuifknoppen (4) van CH1 ~ 8 (LED van pagina A licht op) tot CH9 ~ 16 (LED van pagina B licht op) of beide (beide LEDs lichten op) in te stellen.
• Een programma kopiëren o o o o o Houd de PROGRAM-knop (11) ingedrukt. Selecteer de gewenste bank met de BANK-knoppen (15 en 16). Druk op MIDI / REC (19). Selecteer nu de doelbank met de BANK-knoppen (15 en 16). Druk op MUSIC / BANK COPY (12) om de bank te kopiëren. Alle LEDs op het paneel knipperen. c. De chaser Een chaser is een opeenvolging van verscheidene banken waarbij u een looplicht creëert. Met de VDPC130 kunt u tot 6 chasers met elk 240 scènes programmeren.
o Een scène in een chaser voegen Houd de PROGRAM-knop (11) ingedrukt. Selecteer de gewenste chaser waarin u de scène wenst toe te voegen met de CHASER-knoppen (22). De LEDs lichten op. Druk op TAP / DISPLAY (17) om naar de stappenmodus over te schakelen. Selecteer de scène waarnaar u de scène wenst in te voegen met de BANK-knoppen (15 en 16). De scène wordt op de display weergegeven.
• Een scène kopiëren o o o o o o Houd de PROGRAM-knop (11) ingedrukt. Selecteer de bank waarnaar u de scène wenst te kopiëren met de BANK-knoppen (15 en 16). Selecteer de te kopiëren scène met de SCÈNE-knoppen (3). Druk op MIDI / REC (19). Selecteer de bank waarnaar u de scène wenst te kopiëren met de BANK-knoppen (15 en 16). Druk op de gewenste SCÈNE-knop (3). Alle LEDs op het paneel flitsen. • Een scène wissen o o o o o o Houd de PROGRAM-knop (11) ingedrukt.
7. Reiniging en onderhoud 1. 2. 3. 4. 5. 6. Alle gebruikte schroeven moeten goed zijn aangespannen en mogen geen sporen van roest vertonen. De voedingskabels mogen niet beschadigd zijn. Laat het toestel onderhouden door een geschoolde technicus. Ontkoppel het toestel van het lichtnet voor u aan onderhoudswerkzaamheden begint. Maak het toestel geregeld schoon met een vochtige, niet pluizende doek. Gebruik geen alcohol of solvent. De gebruiker mag geen onderdelen vervangen.
• Le câble d’alimentation ne peut pas être replissé ou endommagé. Demander à votre revendeur de renouveler le câble d’alimentation si nécessaire. • Débrancher l’appareil s’il n’est pas utilisé ou pour le nettoyer. Tirer la fiche pour débrancher l'appareil ; non pas le câble. • Raccorder l’alimentation en dernier. • Les dommages occasionnés par des modifications à l’appareil par le client, ne tombent pas sous la garantie.
26. Témoin LED PILE UP / CHASE 27A. Roue PAN 27B. Roue TILT 28. Bouton MODE b. Panneau arrière (voir ill. 2) 29. Prise d’entrée AUDIO 30. Prise d’entrée MIDI 31. Sélecteur de POLARITÉ DMX 32. Connexion de sortie DMX 33. Prise d’entrée DMX 34. Prise d’entrée pour la MACHINE À FUMÉE 35. Prise d’alimentation CC 36. Interrupteur ON / OFF 5. Installation a. Montage de l’appareil Placer l’appareil sur une surface plane ou le monter dans un rack. Cet appareil peut être monté dans un rack 19”.
f. Codage des projecteurs Projecteur 1 2 3 4 Adresse de départ 1 21 41 61 Adresse de départ 81 101 121 141 Projecteur 5 6 7 8 Projecteur 9 10 11 12 Adresse de départ 161 181 201 221 Il est nécessaire d’attribuer l’adresse de départ DMX en pas de 16. Coder chaque projecteur correspondant à l’adresse de départ respective. Le cas contraire, l’assignement des canaux sera incorrect. Tous les projecteurs adressés avec une même adresse de départ fonctionneront de manière synchronisée. g.
En mode manuel, il est possible de sélectionner manuellement le scanner et de la contrôler depuis les glissières. Cependant, les réglages ne peuvent pas être sauvegardés. Sélectionner le scanner à l’aide du bouton de SCANNER (1) correspondant. Ajuster la fonction souhaitée à l’aide des glissières. • Vérification d’un BANC / d’une SCÈNE Sélectionner votre banc à l’aide des boutons BANK (16 et 17). Sélectionner la scène à l’aide des boutons SCENE (3).
• Vérification d’un programme o Maintenir enfoncé le bouton de PROGRAMMATION (11) et sélectionner votre banc à l’aide des boutons BANK (15 et 16). o Vérifier chaque scène individuellement en enfonçant le bouton SCENE (3) correspondant à la scène. • Éditer un programme o Si vous constatez qu’une scène ne correspond pas à vos présentations, il est nécessaire de modifier une scène manuellement. o Maintenir enfoncé le bouton de PROGRAMMATION (11) pour accéder au mode de programmation.
• Éditer une poursuite o Copie d’un banc vers une poursuite Maintenir enfoncé le bouton de PROGRAMMATION (11) pour accéder au mode de programmation. Sélectionner votre poursuite à l’aide des boutons de POURSUITE (22). Les LEDs respectives s’allument. Sélectionner le banc à copier à l’aide des boutons BANK (15 et 16). Enfoncer le bouton MUSIC / BANK COPY (12) pour lancer le mode de copie. Enfoncer le bouton MIDI / REC (19) pour copier le banc. Toutes les LEDs clignoteront.
o Mettre l’appareil hors tension. o Maintenir enfoncé le bouton BANK DOWN (16) et le bouton AUTO / DEL (21) tout en mettant sous tension l’appareil. Toutes les LEDs clignoteront. d. Les scènes • Insertion d’une scène o o o o o o o o Maintenir enfoncé le bouton de PROGRAMMATION (11) pour accéder au mode de programmation. Sélectionner la poursuite à l’aide des boutons de POURSUITE (22). Les LEDs respectives s’allument. Enfoncer le bouton TAP / DISPLAY (17). Les scènes de la poursuite seront affichées.
o Enfoncer un bouton de POURSUITE (22). La poursuite sera pilotée par la musique. Il est possible de sélectionner plusieurs poursuites et de les appeler une par une. o Régler le délai du fondu à l’aide de la glissière du DÉLAI DU FONDU (24). f. Mode automatique o Pour sélectionner le mode automatique, enfoncer le bouton AUTO / DEL (21) jusqu’à ce que la LED s’allume. o Si aucun bouton de POURSUITE (22) n’est enfoncé, le contrôleur lance automatiquement un banc.
¡Gracias por haber comprado el VDPC130! Lea cuidadosamente las instrucciones del manual antes de usarlo. Si el aparato ha sufrido algún daño en el transporte no lo instale y póngase en contacto con su distribuidor. 2. Instrucciones de seguridad Cuidado durante la instalación: puede sufrir una peligrosa descarga eléctrica al tocar los cables con un voltaje peligroso. No exponga este equipo a lluvia o humedad. Desconecte el cable de alimentación de la red antes de abrir la caja.
5. Botón « FOG MACHINE »: para activar la máquina de humo. 6. Indicador de sobrecalentamiento para la MÁQUINA DE HUMO 7. Indicador MÁQUINA DE HUMO 8. Indicador LED PÁGINA A 9. Indicador LED PÁGIN B 10. Botón de selección de la PÁGINA: En el modo manual, pulse este botón para controlar los canales 1 ~ 8 (página A) o los canales 9 ~ 16 (página B) o las dos páginas con el conmutador deslizante. 11. Botón de PROGRAMACIÓN 12. Botón « MUSIC / BANK COPY »: pulse este botón para conmutar al control por la música.
b. Control por la música Es posible controlar el aparato por la música gracias al micrófono incorporado o la toma de ENTRADA EN LÍNEA. Conecte la señal sonora que viene de la mesa de mezclas (p.ej. MASTER 2) a la entrada AUDIO (29) de la parte trasera del aparato. c. Conexión DMX512 Utilice sólo cables estéreo blindados y conectores XLR de 3 polos para conectar el controlador a un aparato o para conectar los aparatos el uno al otro. d.
Ejemplo: Ponga el conmutador deslizante de VELOCIDAD (23) en el canal 9 y el conmutador deslizante FADE TIME (24) en X. Esto quiere decir que el noveno canal del escáner se controlará con la rueda PAN (27A). h. Asignar el TIEMPO FADE Esta función le permite asignar el tiempo fade al movimiento pan/tilt o a todos los canales DMX. Esta función es muy práctica si la rotación del espejo o de la cabeza móvil debe efectuarse de manera lenta pero los gobos y los colores deben cambiar de manera rápida.
• Programar una escena o Mantenga pulsado el botón de PROGRAMACIÓN (11) durante 2 segundos para entrar en el modo de programación. El LED de PROGRAMACIÓN se ilumina. o Seleccione el escáner con los botones de selección SCANNER (1). o Ajuste los ajustes (el valor se visualizará) con los conmutadores deslizantes de CANAL (4). o Pulse el botón MIDI / REC (19) para activar el modo ‘guardar’. o Seleccione el banco (01 ~ 30) que quiere guardar con los botones BANK (15 y 16).
• Programar un chaser Mantenga pulsado el botón de PROGRAMACIÓN (11) para entrar en el modo de programación. Seleccione el chaser con los botones de selección del CHASER (22). Seleccione el programa con los botones BANK (15 et 16). Seleccione la escena con los botones de selección SCENE (3). Pulse el botón MIDI / REC (19). Programe la escena siguiente hasta que el chaser esté terminado o el número máx. de escenas (240) esté alcanzado. o Mantenga pulsado el botón de PROGRAMACIÓN (11) para guardar el chaser.
Seleccione la escena que quiere introducir con los botones SCENE (3). Pulse el botón MIDI / REC (19) para introducir la escena. Todos los LEDs parpadearán. o Borrar una escena en un chaser Mantenga pulsado el botón de PROGRAMACIÓN (11) para entrar en el modo de programación. Seleccione el chaser en que quiere borrar una escena con los botones CHASER (22). Pulse el botón TAP / DISPLAY (17). Seleccione la escena que quiere borrar con los botones BANK (15 y 16).
• Borrar una escena o o o o o o Mantenga pulsado el botón de PROGRAMACIÓN (11) para entrar en el modo de programación. Seleccione el banco en que está la escena que quiere borrar con los botones BANK (15 y 16). Mantenga pulsado el botón AUTO / DEL (21). Seleccione el chaser con los botones CHASER (21). Pulse el botón SCENE (3) que coincide con la escena que quiere borrar. La escena está borrada. Todos los LEDs parpadearán. Los 240 canales DMX de las escenas borradas se reinicializarán.
8. Especificaciones Alimentación Consumo Entrada/salida DMX Entrada MIDI Dimensiones Peso 9-12VCC, 500mA máx. 4W XLR hembra/macho de 3 polos DIN de 5 polos 19” x 132 x 80mm 2.5kg Se pueden modificar las especificaciones y el contenido de este manual sin previo aviso. VDPC130 – 240-KANAL-DMX-STEUERGERÄT MIT JOG-RÄDERN 1.
3. Allgemeine Richtlinien • Dieses Gerät ist eine Lichtsteuerung für den professionellen Einsatz auf Bühnen, in Discotheken, Theatern, usw. Das VDPC130 ist zur Verwendung in Innenräumen und mit einer Wechselspannung von 230Vac/50Hz konzipiert worden. • Vermeiden Sie Erschütterungen. Vermeiden Sie rohe Gewalt während der Installation und Bedienung des Gerätes. • Achten Sie bei der Wahl des Installationsortes darauf, dass das Gerät keinem Staub, keiner Feuchtigkeit und extremen Temperaturen ausgesetzt wird.
27A. SCHWENKRAD 27B. NEIGUNGSRAD 28. MODE-Taste b. Rückplatte (Siehe Abb. 2) 29. AUDIO-Eingang 30. MIDI-Eingang 31. DMX-POLARITÄTSWAHLSCHALTER 32. DMX-Ausgang 33. DMX-Eingang 34. NEBELMASCHINENANSCHLUSS 35. DC-EINGANG 36. EIN/AUS-SCHALTER 5. Konfiguration a. Gerät installieren Stellen Sie das Gerät auf eine stabile, flache Oberfläche oder montieren Sie es in einem Rack. Dieses Gerät kann in einem 19” Rack montiert werden.
f. Scheinwerferadressierung Scheinwerfer 1 2 3 4 Startadresse 1 21 41 61 Scheinwerfer 5 6 7 8 Startadresse 81 101 121 141 Scheinwerfer 9 10 11 12 Startadresse 161 181 201 221 Die DMX-Adresse sollte alle 16 Kanäle zugewiesen werden. Weisen Sie jedem Projektor die entsprechende Startadresse zu, sonst wird die Kanalzuweisung nicht korrekt sein. Scheinwerfer mit derselben Adresse werden synchron funktionieren. g. Kanaleinstellung Dieses Gerät kann bis zu 12 x 16-Kanal-Scanner steuern.
Im manuellen Modus können Sie die angeschlossenen Scanner manuell abrufen und sie über die Blendregler Fader steuern. Beachten Sie, dass die Einstellungen nicht gespeichert werden können. Wählen Sie den gewünschten Scanner mit der entsprechenden SCANNER-Taste (1). Regeln Sie die gewünschte Funktion über die Blendregler. • Eine BANK / SZENE überprüfen Wählen Sie die gewünschte Bank mit den BANK-Tasten (16 und 17). Wählen Sie die gewünschte Szene mit den entsprechenden SZENEN-Tasten (3).
o Sie können auch die Geschwindigkeit bestimmen, indem Sie die TAP-Taste (17) zweimal drücken. Das Zeitintervall zwischen zwei Tastendrücke bestimmt die Geschwindigkeit (bis zu 10 Minuten). • Ein Programm überprüfen o Halten Sie die PROGRAMM-Taste (11) und wählen Sie die gewünschte Speicherbank mit den BANK-Tasten (15 und 16). o Überprüfen Sie jede Szene individuell, indem Sie SZENEN-Taste (3) drücken.
• Einen Chaser überprüfen o Halten Sie die PROGRAMM-Taste (11) gedrückt und wählen Sie den gewünschten Chaser mit den CHASERTasten (22). o Drücken Sie DISPLAY-Taste um das Display auf 'Schrittmodus' umzuschalten. Überprüfen Sie jede Szene individuell, indem Sie die entsprechende BANK-Taste drücken (15 und 16). • Einen Chaser bearbeiten o Eine Speicherbank nach einem Chaser kopieren Drücken Sie die PROGRAMM-Taste (11) um den Programmiermodus zu öffnen.
• Einen Chaser löschen o Halten Sie die PROGRAMM-Taste gedrückt (11) um den Programmiermodus zu öffnen. o Wählen Sie den gewünschten Chaser mit den CHASER-Auswahltasten (22). o Halten Sie die AUTO / DEL-Taste (21) und die entsprechende CHASER-Taste (22) gedrückt um den Chaser zu löschen. Alle LEDs werden blinken. • Alle Chasers löschen VORSICHT: Wenn Sie diese Funktion selektieren, werden Sie alle Chaser unwiderruflich verlieren. Die individuellen Szenen und Programme werden erhalten bleiben.
• Alle Szenen löschen. VORSICHT: Wenn Sie diese Funktion wählen, werden alle programmierten Szenen unwiderruflich verloren gehen. o Halten Sie die PROGRAMM-Taste (11) und die BANK DOWN-Taste (16) gedrückt während Sie das Gerät vom Netz trennen. o Schließen Sie das Gerät wieder an das Netz an. e. Musikgesteuerter Modus o Drücken Sie die MUSIC / BANK COPY-Taste (12). Die LED wird aufleuchten. Wenn das Gerät ein Tonsignal empfängt, wird das Gerät in musikgesteuertem Modus funktionieren.
VDPC130 – 240 KANAŁOWY STEROWNIK DMX Z DWOMA POKRĘTŁAMI 1. Wstep. Przeznaczona dla mieszkańców Unii Europejskiej. Ważne informacje dotyczące środowiska. Ten symbol umieszczony na urządzeniu bądź opakowaniu wskazuje, że wyrzucenie produktu może być szkodliwe dla środowiska. Nie wyrzucaj urządzenia lub baterii do zbiorczego śmietnika, tylko do specjalnie przeznaczonych do tego pojemników na urządzenia elektroniczne lub skontaktuj się z firmą zajmującą się recyklingiem.
• Wszelkie szkody powstałe na skutek samodzielnej modyfikacji przez użytkownika nie są objęte gwarancją. • Używaj urządzenia tylko i wyłącznie zgodnie z jego przeznaczeniem. Wszystkie inne sposoby użytkowania mogą prowadzić do spięć elektrycznych, a co za tym idzie do pożarów, porażeń elektrycznych itd. Nie stosowanie się do tych zasad lub korzystanie z urządzenia niezgodnie z powyższymi postanowieniami spowoduje utratę gwarancji. 4. Opis produktu. a. Panel przedni (rysunek 1). 27.
b. Panel tylni (rysunek 2). 37. AUDIO wejście audio. 38. MIDI IN - wejście MIDI. 39. DMX POLARITY – przełącznik wyboru polaryzacji sygnału DMX. 40. DMX OUT - gniazdo wyjściowe sygnału DMX. 41. DMX IN - gniazdo wejściowe sygnału DMX. 42. FOG MACHINE – gniazdo wyjściowe sterowania wytwornicą dymu. 43. DC INPUT – gniazdo zasilania sterownika. 44. POWER ON / OFF – włącznik zasilania sterownika. 5. Ustawienia. a. Montaż urządzenia.
f. Projector Addressing Projektor 1 2 3 4 Adres początkowy 1 21 41 61 Adres początkowy 81 101 121 141 Projektor 5 6 7 8 Projektor 9 10 11 12 Adres początkowy 161 181 201 221 Należy prawidłowo przypisać urządzeniom adresy startowe DMX. Proszę posłużyć się powyższą tabelą i odczytać właściwe adresy. Źle dobrany adres będzie przyczyną niewłasciwą pracą urządzenia lub brakiem nad nim kontroli. Adres startowy DMX należy przypisać co 16 kanałów.
W trybie ręcznym możesz sterować poszczególnymi skanerami sterując nimi za pomocą suwaków SCENE (4). Pamietaj, że ustawienia nie zostaną zapamiętane. Wybierz właściwy skaner jednym z przycisków SCANNER (1). Regulujj wybrane przez siebie funkcje suwakami CHANNEL (4). • Odtwarzanie BANK / SCENE. Za pomocą przycisków wyboru banku BANK UP (15) /BANK DOWN (16) wybierz bank, który chcesz odtworzyć, a nastepnie wybierz właściwą scenę jednym z przycisków SCEANE (3). • Odtwarzanie sekwencji scen CHASER.
o Przy pomocy suwaków SPEED fader (23) oraz FADE TIME fader (24) ustaw czas trwania i czas przejścia jednej sceny w drugą scenę. o Prędkośc odtwarzania scen można ustawić inna metodą. Aby ustawić prędkość odtwarzania naciśnij dwukrotne przycisk TAP (17). Odstęp czasowy pomiędzy naciśnięciami jest automatycznie przeliczany na szybkość działania programu (max. do 10 minut). Jeżeli naciśniesz więcej niż dwa razy przycisk TAP (17) to tylko czas pomiędzy ostatnimi naciśnięciami zostanie przeliczony.
• Uruchamianie sewkecji scen ( CHASER). o Wybierz przyciskiem numer właściwej sekwencji sceny CHASER (22), a naciśnij przycisk AUTO / DEL (21). Ustaw prędkość odtwarzania nacikając dwukrotne przycisk TAP (17). Odstęp czasowy pomiędzy naciśnięciami jest automatycznie przeliczany na szybkość działania programu (max. do 10 minut). Jeżeli naciśniesz więcej niż dwa razy przycisk TAP (17) to tylko czas pomiędzy ostatnimi naciśnięciami zostanie przeliczony.
Przy pomocy przycisków wyboru banku BANK UP (15) /BANK DOWN (16) wybierz bank, w którym znajduje się scena do skopiownia. Przy pomocy przycisków SCENE (3) wybierz scenę, którą chcesz skopiować. Aby skopiowac bank wciśnij przycisk MIDI / REC (19). Wszystkie diody LED na panelu zaświecą się. o Usuwanie sceny z sekwencji scen chaser. Wejdź w tryb programowania przez naciśniecie i przytrzymanie przycisku PROGRAM (11) przez 2 sekundy dopóki nie zacznie pulsować dioda PROGRAM LED.
o Przy pomocy przycisków wyboru banku BANK UP (15) /BANK DOWN (16) wybierz bank, z którego chcesz skopiowac scenę. o pomocy przycisków SCENE (3) wybierz scenę,którą chcesz skopiować o Naciśnij przycisk MIDI / REC (19), aby przygotować dane do zapisu. o Przy pomocy przycisków wyboru banku BANK UP (15) /BANK DOWN (16) wybierz bank, do którego chcesz skopiowac scenę. o Naciśnij przycisk z numerem sceny SCENE (3), pod którą chcesz zapamiętać scenę. Wszystkie diody LED na panelu zaświecą się. • Usuwanie sceny.
g. Tryb pracy MIDI - MIDI Operation o Wciśnij i przytrzymaj przycisk MIDI / REC (19) na czas nie krótszy niż 2 sekundy. o Wybierz właściwy kanał MIDI w zakresie (1 ~ 20) uzywając w tym celu przycisków wyboru banku BANK UP (15) /BANK DOWN (16). o Wciśnij ponownie przycisk MIDI / REC (19), aby zapamietać ustawiony kanał i wyjść z trybu ustawiania. 7. Czyszczenie i konserwacja. 1. Wszystkie śruby mocujące oraz elementy urządzenia muszą być pewnie skręcone oraz nie mogą być skorodowane. 2.
Velleman® Service and Quality Warranty Velleman® has over 35 years of experience in the electronics world and distributes its products in more than 85 countries. All our products fulfil strict quality requirements and legal stipulations in the EU. In order to ensure the quality, our products regularly go through an extra quality check, both by an internal quality department and by specialized external organisations.
- Schäden verursacht durch Brandschaden, Wasserschaden, Blitz, Unfälle, Naturkatastrophen, usw. - Schäden verursacht durch absichtliche, nachlässige oder unsachgemäße Anwendung, schlechte Wartung, zweckentfremdete Anwendung oder Nichtbeachtung von Benutzerhinweisen in der Bedienungsanleitung. - Schäden infolge einer kommerziellen, professionellen oder kollektiven Anwendung des Gerätes (bei gewerblicher Anwendung wird die Garantieperiode auf 6 Monate zurückgeführt).