User Guide
© Copyright 2016 HP Development Company, L.P. Windows is either a registered trademark or trademark of Microsoft Corporation in the United States and/or other countries. The information contained herein is subject to change without notice. The only warranties for HP products and services are set forth in the express warranty statements accompanying such products and services. Nothing herein should be construed as constituting an additional warranty.
About This Guide This guide provides information on monitor features, setting up the monitor, and technical specifications. WARNING! Indicates a hazardous situation that, if not avoided, could result in death or serious injury. CAUTION: Indicates a hazardous situation that, if not avoided, could result in minor or moderate injury. NOTE: TIP: Contains additional information to emphasize or supplement important points of the main text. Provides helpful hints for completing a task.
iv About This Guide
Table of contents 1 Getting started ............................................................................................................................................. 1 Important safety information ............................................................................................................................... 1 Product features and components ........................................................................................................................ 2 Features .........
4 Maintaining the monitor .............................................................................................................................. 21 Maintenance guidelines ....................................................................................................................................... 21 Cleaning the monitor ........................................................................................................................................... 21 Shipping the monitor .........
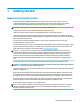
1 Getting started Important safety information An AC power cord is included with the monitor. If another cord is used, use only a power source and connection appropriate for this monitor. For information on the correct power cord set to use with the monitor, refer to the Product Notices provided on the optical disc or in your documentation kit. WARNING! To reduce the risk of electric shock or damage to the equipment: • Plug the power cord into an AC outlet that is easily accessible at all times.
Product features and components Features The monitor features include the following: ● 50.8 cm (20-inch) diagonal viewable screen area with 1600 × 900 resolution, plus full-screen support for lower resolutions; includes custom scaling for maximum image size while preserving original aspect ratio ● 55 cm (21.
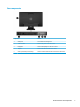
Rear components Component Function 1 VESA panel Covers the VESA mounting holes. 2 Power connector Connects the power cord to the monitor. 3 DisplayPort Connects the DisplayPort to the source device. 4 VGA port Connects the VGA cable to the source device. 5 Audio-in jack (select products only) Connects an audio cable from the source device to the monitor.
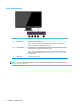
Front bezel controls Control 1 Function Menu button Opens and closes the OSD menu. NOTE: To activate the Menu and the Function buttons, press one of the OSD bezel buttons. The button icons will display on the screen. 2–4 Function buttons Use these buttons to navigate through the OSD menu based on the indicators above the buttons that are activated while the OSD menu is open. NOTE: You can reconfigure the Function buttons in the OSD menu to quickly select the most commonly used operations.
Setting up the monitor Installing the monitor stand CAUTION: Do not touch the surface of the LCD panel. Pressure on the panel may cause non-uniformity of color or disorientation of the liquid crystals. If this occurs, the screen will not recover to its normal condition. 1. Remove the stand/base assembly, and then lift the monitor from the box and place it face down on a flat surface. 2. Position the stand over the base, and press down firmly to lock it in place. 3.
2. Connect a video cable to the video input connector. NOTE: The monitor automatically determines which inputs have valid video signals. The inputs can be selected by pressing the Menu button to access the on-screen display (OSD) menu and selecting Input Control. 6 ● Connect one end of a VGA cable to the VGA connector on the rear of the monitor and the other end to the VGA connector on the source device.
3. To enable sound from the monitor’s speakers, connect one end of an audio cable to the audio-in jack on the monitor (select products only) and the other end to the audio-out jack on the source device. 4. Connect one end of the power cord to the power connector on the rear of the monitor and the other end to an AC outlet. WARNING! To reduce the risk of electric shock or damage to the equipment: Do not disable the power cord grounding plug. The grounding plug is an important safety feature.
Adjusting the monitor Tilt the display head forward or backward to set it to a comfortable eye level. Turning on the monitor 1. Press the power button on the computer to turn it on. 2. Press the power button on the front of the monitor to turn it on. CAUTION: Burn-in image damage may occur on monitors that display the same static image on the screen for 12 or more consecutive hours of nonuse.
When the monitor is powered on, a Monitor Status message is displayed for five seconds. The message shows which input is the current active signal, the status of the auto-switch source setting (On or Off; default setting is On), the current preset screen resolution, and the recommended preset screen resolution. The monitor automatically scans the signal inputs for an active input and uses that input for the screen.
b. 3. 10 Pull the bottom edge of the VESA panel up and off the display (2). Remove the four screws from the VESA holes located on the rear of the display head.
4. Secure the mounting plate to the wall or swing arm of your choice using the four screws included with the mounting plate. Installing a security cable You can secure the monitor to a fixed object with an optional security cable available from HP.
2 Using the monitor Software and utilities The optical disc, if one is included with the monitor, contains the following files you can install on the computer. If you do not have an optical drive, you can download the files from http://www.hp.com/support.
1. Go to http://www.hp.com/support. 2. Select Find your product. 3. Follow the on-screen instructions to select your monitor and download the software. Using the On-screen display (OSD) menu Use the On-screen display (OSD) menu to adjust the monitor screen image based on your preferences. You can access and make adjustments in the OSD menu using the buttons on the monitor's front bezel. To access the OSD menu and make adjustments, do the following: 1.
Assigning the Function buttons Pressing one of the four front bezel Function buttons activates the buttons and displays the icons above the buttons. The factory default button icons and functions are shown below. Button Function 1 Menu Opens the OSD (On-Screen Display) menu. 2 Display Information Opens the Information menu. 3 Color Control Opens the Color menu to adjust the screen color. 4 Next Active Input Switches the monitor's input source to the next active input.
Using Auto-Sleep Mode The monitor supports an OSD (On-screen display) menu option called Auto-Sleep Mode that allows you to enable or disable a reduced power state for the monitor. When Auto-Sleep Mode is enabled (enabled by default), the monitor will enter a reduced power state when the host PC signals low power mode (absence of either horizontal or vertical sync signal).
3 Support and troubleshooting Solving common problems The following table lists possible problems, the possible cause of each problem, and the recommended solutions. Problem Possible Cause Solution Screen is blank or video is flashing. Power cord is disconnected. Connect the power cord. Monitor is off. Press the front bezel power button. NOTE: If pressing the power button has no effect, press and hold the Power button for 10 seconds to disable the Power Button Lockout feature.
Using the auto-adjustment function (analog input) When you first set up the monitor, conduct a Factory Reset of the computer, or change the resolution of the monitor, the auto-adjustment feature automatically engages, and attempts to optimize your screen for you. You may also optimize the screen performance for the VGA (analog) input at any time by using the OK/Auto button on the monitor and the auto-adjustment pattern software utility on the optical disc provided (select products only).
Optimizing image performance (analog input) Two controls in the on-screen display can be adjusted to improve image performance: Clock and Phase (available in the OSD menu). NOTE: The Clock and Phase controls are adjustable only when using an analog (VGA) input. These controls are not adjustable for digital inputs. The Clock must first be set correctly since the Phase settings are dependent on the main Clock setting.
2. Press the buttons on the monitor front bezel to properly adjust the position of the image in the display area of the monitor. The Horizontal Position shifts the image left or right; the Vertical Position shifts the image up and down. Button lockouts Holding down the Power button or Menu button for ten seconds will lock out the functionality of that button. You can restore the functionality by holding the button down again for ten seconds.
Locating the serial number and product number The serial number and product number are located on a label on the rear of the display head. You may need these numbers when contacting HP about the monitor model.
4 Maintaining the monitor Maintenance guidelines ● Do not open the monitor cabinet or attempt to service this product yourself. Adjust only those controls that are covered in the operating instructions. If the monitor is not operating properly or has been dropped or damaged, contact an authorized HP dealer, reseller, or service provider. ● Use only a power source and connection appropriate for this monitor, as indicated on the label/back plate of the monitor. ● Turn the monitor off when not in use.
A Technical specifications NOTE: The product specifications provided in the user guide might have changed between the time of manufacturing and delivery of your product. For the latest specifications or additional specifications on this product, go to http://www.hp.com/go/ quickspecs/ and search for your specific monitor model to find the model-specific QuickSpecs. 50.8 cm/20-inch Display 50.8 cm wide screen Type TFT-LCD Viewable image size 50.
Maximum graphic resolution 1920 x 1080 Optimum graphic resolution 1920 x 1080 Environmental requirements temperature Operating temperature 5 to 35° C 41 to 95° F Storage temperature -20 to 60° C -4 to 140° F Power source 100–240 V ac 50/60 Hz Input terminal One VGA connector with cable included; one DisplayPort connector with cable included; one audio connector with cable included (select products only) Preset display resolutions The display resolutions listed below are the most commonly used
7 1280 × 1024 63.981 60.020 8 1440 × 900 55.935 59.887 9 1600 × 900 60.000 60.000 10 1680 × 1050 65.290 59.954 11 1920 × 1080 67.500 60.000 Entering user modes Under the following conditions, the video controller signal may occasionally call for a mode that is not preset: ● You are not using a standard graphics adapter. ● You are not using a preset mode. It this occurs, you may need to readjust the parameters of the monitor screen by using the on-screen display.
B Accessibility HP designs, produces, and markets products and services that can be used by everyone, including people with disabilities, either on a stand-alone basis or with appropriate assistive devices. Supported assistive technologies HP products support a wide variety of operating system assistive technologies and can be configured to work with additional assistive technologies.