
- Hewlett-Packard Widescreen LCD Monitor User's Guide


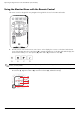
Table Of Contents
- Notational Conventions
- Product Features
- Safety and Maintenance Guidelines
- Setting Up the Monitor
- Unpacking the Monitor
- Installing the Monitor
- Assembling the cantilever base
- Unfolding the double-hinged monitor
- Preparing the cantilever-base monitor for wall-mounting
- Wall-mounting the double-hinged monitor
- Preparation
- Connecting the VGA (Analog) or DVI-D (Digital) Cable
- Connecting the VGA / DVI-I Cable (Select Models Only)
- Connecting the HDMI Cable (Select Models Only)
- Audio and Video Cables and Adapters
- Connecting the Audio Cable
- Connecting the USB Hub Cable (Select Models Only)
- Connecting USB Devices to the Monitor (Select Models Only)
- Connecting the Power Cable
- Cable Management
- Adjusting the Tilt
- Adjusting the Swivel
- Keyboard Parking
- Operating the Monitor
- CD Software and Utilities
- My Display Software (Select Models Only)
- Front-Panel Controls
- Using the On-screen Display (OSD)
- Selecting Video Input Connectors
- Identifying Monitor Conditions
- Adjusting Screen Quality
- Power-Saver Feature
- Ambient Light Sensor (Select Models)
- Task Light (Select Models)
- Webcam (Select Models)
- High-Bandwidth Digital Content Protection (HDCP)
- Operating the Digital Picture Frame Card Reader (Select Models)
- Preparing the Monitor for Shipping
- Troubleshooting
- Technical Specifications
- Agency Regulatory Notices
- Federal Communications Commission Notice
- Declaration of Conformity for Products Marked with FCC Logo, United States Only
- Materials Disposal
- Chemical Substances
- Canadian Notice
- Avis Canadien
- European Union Regulatory Notice
- Disposal of Waste Equipment by Users in Private Households in the European Union
- Japanese Notice
- Japanese Power Cord Notice
- Japanese Material Content Declaration
- Korean Notice
- EPA ENERGY STAR® Compliance
- HP Recycling Program

Operating the Monitor
4–8 User’s Guide
Selecting Video Input Connectors
The input connectors are:
■ VGA connector (analog)
■ DVI-D connector (digital)
■ HDMI connector
The monitor automatically determines which inputs have valid video signals, and displays the image.
You can connect the VGA cable, the DVI-D cable, or both. If both cables are installed, the default input selection is
DVI. The HDMI cable is in place of the DVI-D cable. The source of input can be switched using the Switch Video
Input option in the OSD menu. Switching from a VGA to an HDMI input source may take several seconds.
Identifying Monitor Conditions
Special messages appear on the monitor screen for the following monitor conditions:
■ Input Signal Out of Range — Indicates the monitor does not support the video card’s input signal because
its resolution or refresh rate are set higher than the monitor supports.
Change your video card settings to a lower resolution or refresh rate. Restart your computer for the new settings
to take effect.
■ Monitor Going to Sleep — Indicates the screen display is entering a sleep mode. The speakers are turned
off in sleep mode.
■ Check Video Cable — Indicates a video input cable is not properly connected to the computer or monitor.
■ OSD Lock-out — The OSD can be enabled or disabled by pressing and holding the Menu button on the front
panel for 10 seconds. If the OSD is locked, the warning message OSD Lock-out appears for 10 seconds.
If the OSD is locked, press and hold the Menu button for 10 seconds to unlock the OSD.
If the OSD is unlocked, press and hold the Menu button for 10 seconds to lock the OSD.
■ No Input Signal — Indicates the monitor is not receiving a video signal from the computer on the monitor
video input connector(s). Check to see if the computer or input signal source is off or in the power-saver mode.
■ Auto Adjustment in Progress — Indicates the auto-adjustment function is active. See “Adjusting Screen
Quality” in this chapter.
Adjusting Screen Quality
The auto-adjustment feature automatically fine-tunes the image quality for display size, position, clock, and phase
each time a new video mode is displayed. For more precise adjustments of VGA input, run the Auto-Adjustment
software on the CD. See “Using the Auto-Adjustment Function” in this chapter.
If you want additional image-quality improvement, use the Clock and Clock Phase controls of the monitor to fine-tune
the image. See “Optimizing Analog Video” in this chapter.
Optimizing Analog Video
Some monitors contain advanced circuitry that allow the monitor to function as a standard analog monitor. Two
controls in the OSD menu can be adjusted to improve analog image performance:
■ Clock — Increase or decrease the value to minimize any vertical bars or stripes visible on the screen
background.
■ Clock Phase — Increase or decrease the value to minimize video distortion or video jitter.
Use these controls only when the auto-adjustment function does not provide a satisfactory monitor image in
analog mode.