
Specifications


46 Chapter2
Parts Replacement Procedures
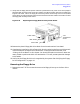
Hard Disk Drive
Figure 2-36 The Hard Drive Slots
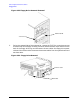
2. Loosen the captive T-15 Torx thumbscrew securing the disk drive bracket to the system
board. As you grasp the tray and slide to the front of the workstation, the tray will
unseat from the chassis rail. See Figure 2-37. You may need to angle the disk drive tray
slightly to disengage the hooks as you slide it along the rail.
Figure 2-37 Removing the Hard Disk Drive Bracket
SCSI ID 5
SCSI ID 6
Power
Supply
PCI
Slots
Memory slots (4)
(4)
Captive T-15 Torx
Thumbscrews