
Specifications


Chapter 2 31
Parts Replacement Procedures
CD Drive
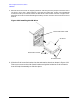
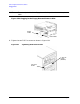
4. Remove both CD drive bracket screws (T-15 Torx/slotted screws) and pull the CD drive out of the
chassis assembly as shown in Figure 2-18.
Figure 2-18 Removing the CD Drive
5. Remove the four CD drive mounting screws (T-15 Torx/slotted screws) as shown in Figure 2-18
and remove the CD drive from the bracket.
Installing a CD Drive
Install the CD drive by following the procedure covered in this section.
WARNING Turn the workstation off and unplug the power cord before
installing the CD drive.
CAUTION To avoid damage to the CD drive, verify that your static-grounding strap is
securely attached to your wrist and to bare metal on the workstation chassis.
Note that the installed CD drive will not need any jumpers set on the back of your CD
drive, as they are set at the factory. However, if you bought a new CD drive to install in
Bracket Guide
CD Drive Mounting
Screws (T-15 Torx Screws)
Bracket Screws
Bracket Runner
CD Drive
(T-15 Torx Screws)
CD Drive Bracket