
User's Manual

Virtual Connect domains 39
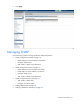
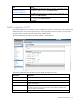
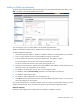
Adding an SNMP trap destination
To add an SNMP trap destination, right-click the header row of the SNMP Trap Destination table, or click
Add at the bottom of the SNMP Trap Destination table.
You can configure up to five VC-Enet and five VC-FC SNMP trap destinations.
SNMPv1 and SNMPv2 trap formats are disabled when the domain is in FIPS mode.
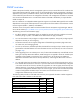
To add an SNMP trap destination:
1. Select the Trap Format: SNMPv1, SNMPv2, or SNMPv3. SNMPv2 is not supported for VC-FC modules.
2. Enter a unique name for the new trap being added. No spaces are allowed.
3. Enter the SNMP trap community string for the specified trap. The default is "public."
For VC-Enet modules, the maximum trap community string length is 39.
For VC-FC modules, the maximum trap community string length is 24.
4. Select the correct radio button, and then enter the IPv4 address, IPv6 address, or DNS name for the trap
destination. DNS is not supported for VC-FC modules.
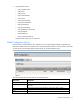
5. For SNMPv3, the default port value is 162. You can change this value.
6. For SNMPv3, select the Inform message checkbox to send messages to a remote user.
7. For SNMPv3, select a security level.
8. For SNMPv3, select an SNMP User from the drop-down list.
9. Click OK to save the information and return to the main SNMP configuration screen, or continue and
select trap categories or trap severities.
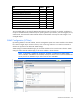
If you enter information that is invalid (for example, if you use a space in the Destination name), a red box
appears around that field. Hover the mouse over the box to see information regarding the error.
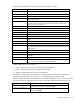
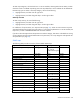
Select trap categories
Selecting a trap category allows multiple traps to be enabled or disabled as a group.