
User's Manual

Virtual Connect server profiles 188
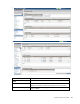
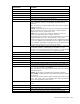
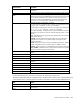
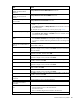
Task Action
port 2 Click the pull-down arrow in the SAN Boot box.
3 Select Disabled.
Revert to BIOS settings for Fibre
Channel Boot
1 Select the Fibre Channel Boot Parameters check box.
2 Click the pull-down arrow in the SAN Boot box.
3 Select Use BIOS.
Change the profile bay
assignment
1 Click the pull-down arrow in the Server column.
2 Select the device bay, or select Unassigned.
Save changes and go to the Edit
Server Profile screen
Click Apply. Changes are saved, and you have the opportunity to make any
additional changes to the profile.
Save changes and go to the
Server Profiles screen
Click Apply & Close.
Cancel without saving changes
Click Cancel.
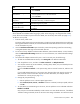
If using VC-assigned MAC addresses, WWNs, or non-default Fibre Channel boot parameters, always power
off the affected server blades before assigning a profile. When assigning a VC-assigned serial number,
power off the server blade. To power off a server blade, see "Server Bay status screen (on page 270)."
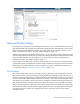
To define a server profile:
1. Enter the server profile name.
The server profile name can be up to 64 characters in length (no spaces). Because the server profile can
be assigned to different locations, HP recommends that the name reflect the server function. The profile
can be renamed at any time.
2. Leave the Hide Unused FlexNICs option checked to prevent the operating system from enumerating
unassigned FlexNICs that might consume shared resources.
3. To use server factory defaults for Ethernet MAC addresses, Fibre Channel WWNs, or serial numbers,
select the Advanced Profile Settings check box. For more information, see "Advanced Profile Settings
(on page 181)."
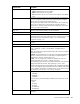
4. Set up Ethernet Adapter Connections for ports 1 and 2. For each port, do the following:
a. To select an available Ethernet network, click Unassigned in the Network Name field.
b. Click the pull-down arrow, and then click Select a network... or Multiple Networks.
c. You can filter networks by various attributes, including name, labels, color, and shared uplink set
name (if one is associated).
If you clicked Select a network... in the previous step, select a network from the list, and then click
OK.
If you clicked Multiple Networks in the previous step, drag and drop each network into the right
table, and enter a Server VLAN ID if required. For more information, see "Multiple network
connections for a server port (on page 199)."
d. Change the port speed setting:
i. Click the pull-down arrow in the Port Speed Type Column.
ii. Select Preferred, Auto, Custom, or Disabled. If Custom is selected, set the port speed, and then
click OK.
e. To override the current PXE settings on the server, click the pull-down arrow under PXE and select
Disabled or Enabled.
Only one port can have PXE enabled by Virtual Connect on a server blade. However, if the default
'Use BIOS' setting is selected, the server uses the current settings in the BIOS. On mezzanine cards