
Installation Guide
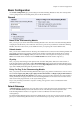


Chapter 4. Network Configuration
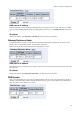
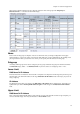
No.
The DNS servers are used in the order they are presented in the table. To move a server to a certain row, enter the
number on the row to which you want to move it. You need only renumber servers that you want to move; other
servers are renumbered automatically. When you click on Save, the DNS servers are re-sorted.
DNS Name Or IP Address
The DNS name/IP address of the DNS server which the Telecommuting Module should use. Note that to use DNS
names here, there must exist a DNS server in the Telecommuting Module’s permanent configuration.
IP address
Shows the IP address of the DNS name or IP address you entered in the previous field.
Delete Row
If you select this box, the row is deleted when you click on Add new rows, Save, or Look up all IP addresses
again.
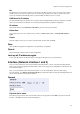
Create
Enter the number of new rows you want to add to the table, and then click on Create.
Save
Saves the Basic Configuration configuration to the preliminary configuration.
Cancel
Reverts all the above fields to their previous configuration.
Look up all IP addresses again
Looks up the IP addresses for all DNS names on this page in the DNS servers you entered above.
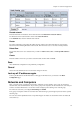
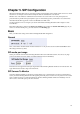
Interface (Network Interface 1 and 2)
There is a menu selection for each network interface (Network Interface 1 and 2) on the Telecommuting Module.
Select a page to make configuration for that interface. There is also a page where configuration for all interfaces can
be viewed and changed.
Here, you set the interface name, whether the interface is on or off, the IP address, alias, and static routing.
For each interface, go to Directly Connected Networks and state the IP address of the Telecommuting Module and
the size of the network connected to this interface.
General
Physical device name
This tells the physical device name of the network interface. The physical interface eth0 corresponds to Network
Interface 1, and eth1 corresponds to Network Interface 2.
19