3Com® Telecommuting Module User Manual Version 4.6.
Com® Telecommuting Module User Manual: Version 4.6.5 Part Number BETA Published April 2009 3Com Corporation, 350 Campus Drive, Marlborough MA 01752-3064 Copyright © 2005, 3Com Corporation. All rights reserved. No part of this documentation may be reproduced in any form or by any means or used to make any derivative work (such as translation, transformation, or adaptation) without written permission from 3Com Corporation.
Table of Contents Part I. Introduction to 3Com VCX IP Telecommuting Module .......................................i 1. Introduction to 3Com VCX IP Telecommuting Module ........................................... 1 2. Installing 3Com VCX IP Telecommuting Module .................................................... 7 3. Configuring 3Com VCX IP Telecommuting Module.............................................. 17 Part II. How To....................................................................................
ii
Part I.
Chapter 1. Introduction to 3Com VCX IP Telecommuting Module Some of the functions of 3Com VCX IP Telecommuting Module are: • SIP proxy: Forwarding of SIP requests. • SIP registrar: Registration of SIP users. • Protection against such attacks as address spoofing. • Logging/alarm locally on the Telecommuting Module, via email and/or via syslog. • Managing several logical/directly-connected networks and several network connections/physical networks.
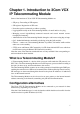
Chapter 1. Introduction to 3Com VCX IP Telecommuting Module For a DMZ or DMZ/LAN type which uses a private IP address on the interface connected to the DMZ of the firewall, its corresponding public IP address must be entered on the Interoperability page. DMZ Configuration Using this configuration, the Telecommuting Module is located on the DMZ of your firewall, and connected to it with only one interface.
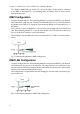
Chapter 1. Introduction to 3Com VCX IP Telecommuting Module Standalone Configuration Using this configuration, the Telecommuting Module is connected to the outside on one interface and your internal networks on the others. Use this configuration only if your firewall lacks a DMZ interface, or for some other reason cannot be configured for the DMZ or DMZ/LAN alternatives. Fig 3. Telecommuting Module in Standalone configuration.
Chapter 1. Introduction to 3Com VCX IP Telecommuting Module • Go to the Network Interface 1 page under Network Configuration and enter the necessary configuration. See also the Interface section. Note that the Telecommuting Module must have at least one IP address which can be reached from the Internet.
Chapter 1. Introduction to 3Com VCX IP Telecommuting Module About settings in 3Com VCX IP Telecommuting Module 3Com VCX IP Telecommuting Module uses two sets of Telecommuting Module configurations: preliminary and permanent configuration. The permanent configuration is what is used in the active Telecommuting Module. The preliminary configuration is where you change and set the configuration. See chapter 3, Configuring 3Com VCX IP Telecommuting Module, for instructions.
Chapter 1.
Chapter 2. Installing 3Com VCX IP Telecommuting Module Installation There are three ways to install an 3Com VCX IP Telecommuting Module: using a serial cable, using a diskette or perform a magic ping. Installation with a serial cable or a diskette requires being at the same place as the Telecommuting Module, but will give more options for the start configuration.
Chapter 2. Installing 3Com VCX IP Telecommuting Module • Connect the Telecommuting Module to your workstation with the enclosed serial cable. • Plug in the power cord and turn the Telecommuting Module on. • Wait while the Telecommuting Module boots up. • Log on from your workstation. • Run the installation program (see following instructions). • Connect the network cables to the network interfaces. • Configure the rest through a web browser.
Chapter 2. Installing 3Com VCX IP Telecommuting Module • The other way is as a number between 0 and 32. An IP address has 32 bits, where the number of the network mask indicates how many bits are used in the network’s addresses. The rest of the bits identifies the computer on the network. Now, you can select to deactivate any network interfaces. Select y to deactivate all interfaces but the one you just configured.
Chapter 2. Installing 3Com VCX IP Telecommuting Module If you choose to allow only one computer to configure the Telecommuting Module, you are asked for the IP address (the mask is set automatically). IP address [0.0.0.0]: 10.47.2.240 If this IP address is not on the same network as the IP address of the Telecommuting Module, you are asked for the router. Enter the IP address of the router on the network where the Telecommuting Module is connected.
Chapter 2. Installing 3Com VCX IP Telecommuting Module Password []: Finally, you are asked if you want to reset other configuration. Other configuration Do you want to reset the rest of the configuration? (y/n) [n] If you answer n, nothing is removed. If you answer y, you have three alternatives to select from: 1. Clear as little as possible. This is the alternative that is used if you answer n to the question above.
Chapter 2. Installing 3Com VCX IP Telecommuting Module Now, finish configuration of the Telecommuting Module from the computer/computers specified in the installation program. Installation with a diskette These steps are performed when installing with a diskette: • Select an IP address and store it on the installation diskette as described below. • Insert the installation diskette into the Telecommuting Module’s floppy drive. • Plug in the power cord and turn the Telecommuting Module on.
Chapter 2. Installing 3Com VCX IP Telecommuting Module Basic unit installation program version 4.6.5 Press return to keep the default value Network configuration inside: Physical device name[eth0]: IP address [0.0.0.0]: 10.47.2.242 Netmask/bits [255.255.255.0]: 255.255.0.0 Deactivate other interfaces? (y/n) [n] Computers from which configuration is allowed: You can select either a single computer or a network.
Chapter 2. Installing 3Com VCX IP Telecommuting Module If the network or partial network is not directly connected to the Telecommuting Module, you must enter the IP address of the router leading to that network. Then enter the network’s address and mask. Static routing: The network allowed to configure from is not on a network local to this unit. You must configure a static route to it. Give the IP address of the router on the network this unit is on. The IP address of the router [0.0.0.0]: 10.47.3.
Chapter 2. Installing 3Com VCX IP Telecommuting Module Note that the diskette contains a command to erase certain parts of the configuration during boot when the diskette is inserted. Make sure to eject it once the Telecommuting Module has booted up to avoid future loss of data. If you happen to forget the administrator password for the Telecommuting Module, you can insert the diskette into the Telecommuting Module again and boot it.
Chapter 2.
Chapter 3. Configuring 3Com VCX IP Telecommuting Module You connect to your 3Com VCX IP Telecommuting Module by entering its name or IP address in the Location box of your web browser. Logging on Before you can configure the Telecommuting Module, you must enter your administrator username and password or RADIUS username and password. The admin user is predefined with complete administration privileges.
Chapter 3. Configuring 3Com VCX IP Telecommuting Module Log out When you have finished looking at or adding settings, you should log out from the Telecommuting Module. Below the menu there is a Log out button which will end your session. Note: You will not be logged out automatically just by directing your web browser to a different web address. You should log out using the button to make the browser forget your username and password.
Chapter 3. Configuring 3Com VCX IP Telecommuting Module Basic Configuration Under Basic Configuration, select Telecommuting Module Type and the name of the Telecommuting Module. You also enter IP addresses for DNS servers. Here you also configure if the Telecommuting Module should interact with a RADIUS, a DynDNS or an SNMP server. Administration Under Administration, you store or load a configuration.
Chapter 3. Configuring 3Com VCX IP Telecommuting Module Failover Under Failover, you configure the failover team and its dedicated network. You can also view the status of the other team member. Virtual Private Networks Under Virtual Private Networks, you configure the encrypted traffic between your Telecommuting Module and other VPN gateways and clients. VPN connections can be made using IPSec or PPTP.
Chapter 3. Configuring 3Com VCX IP Telecommuting Module When the configuration has been applied, you should save a backup to file. Press Save to local file to save the configuration. Preliminary and permanent configuration 3Com VCX IP Telecommuting Module has two kinds of settings: preliminary and permanent configuration. When the Telecommuting Module is running, the permanent configuration controls the Telecommuting Module functions.
Chapter 3. Configuring 3Com VCX IP Telecommuting Module still being run by the permanent configuration. You do this by selecting Abort all edits on the Save/Load Configuration page under Administration. This will discard all changes made in the preliminary configuration since last time you applied a configuration by pressing Save configuration. You can save the preliminary configuration to a file on your work station (the computer that is running your web browser).
Chapter 3. Configuring 3Com VCX IP Telecommuting Module You can perform all of these functions on the Save/Load Configuration page under Administration. Configuring IP addresses and masks in 3Com VCX IP Telecommuting Module IP address IP addresses are written as four groups of numbers with dots between them. The numbers must be between 0 and 255 (inclusive); for example, 192.168.129.17. Mask/Bits The binary system uses the numbers 0 and 1 to represent numbers. A binary digit is called a bit.
Chapter 3. Configuring 3Com VCX IP Telecommuting Module power of two number you selected, but under 255. In the above example, this means 0, 8, 16, 24, 32, 40, 48 and so on, up to 248. You might choose to start with 136 (17 x 8). This would give the computers the IP addresses 196.176.1.136, 196.176.1.137, 196.176.1.138, 196.176.1.139, 196.176.1.140, 196.176.1.141, 196.176.1.142 and 196.176.1.143. One of the IP addresses is free and can be used for an eighth computer in the future.
Chapter 3. Configuring 3Com VCX IP Telecommuting Module The results of these DNS queries are stored in the Telecommuting Module. • When you click on Look up all IP addresses again. The results of these DNS queries are stored in the Telecommuting Module. • When negotiations start for an IPsec tunnel where the IPsec peer has a dynamic DNS name. The results of these DNS queries are stored in the Telecommuting Module.
Chapter 3.
Part II. How To In the How To part, you find step-by-step descriptions for many common configurations for the Telecommuting Module. You also find references to relevant chapters in Part III, Description of 3Com VCX IP Telecommuting Module settings.
Chapter 4. How To Configure SIP 3Com VCX IP Telecommuting Module provides a lot of SIP possibilities. In this chapter, the most common SIP setups are setup with step-by-step instructions for the configuration. DMZ Telecommuting Module, SIP server on the WAN The simplest SIP scenario is when the SIP server is managed by someone else, and the Telecommuting Module SIP function is only used to traverse NAT.
Chapter 4. How To Configure SIP Surroundings To make the Telecommuting Module aware of the network structure, the networks defined above should be listed on the Surroundings page. Settings in the Surroundings table are only required when the Telecommuting Module has been made the DMZ (or LAN) type. The Telecommuting Module must know what the networks around it looks like.
Chapter 4. How To Configure SIP Basic Settings Go to the Basic Settings page under SIP Services and turn the SIP module on. Here you also select log classes for SIP event logging. Interoperability You need to set the URI Encoding settings on the Interoperability page to "Use shorter, encrypted URIs".
Chapter 4. How To Configure SIP Filtering To allow SIP traffic through the Telecommuting Module, you must change the Default Policy For SIP Requests on the Filtering page. As the Telecommuting Module does not manage any SIP domains, there are no Local SIP Domains. This means that you must select Process all for this setting. Routing On the Routing page, you can enter the SIP server managing your SIP domain. Enter the name or IP address of the SIP server under Outbound proxy.
Chapter 4. How To Configure SIP Save/Load Configuration Finally, go to the Save/Load Configuration page under Administration and apply the new settings by pressing Apply configuration. When the configuration has been applied, you should save a backup to file. Press Save config to CLI file to save the configuration. DMZ Telecommuting Module, SIP server on the LAN For various reasons, you might want to use a separate SIP server instead of the built-in server in the Telecommuting Module.
Chapter 4. How To Configure SIP Here are the settings needed for this. It is assumed that the Telecommuting Module already has a network configuration. Only the additional SIP settings are listed. Networks and Computers The Telecommuting Module must know the network structure to be able to function properly. On the Networks and Computers page, you define all networks which the Telecommuting Module should serve and which are not reached through the default gateway of the firewall.
Chapter 4. How To Configure SIP One effect of this is that traffic between two users on different networks, or between one of the listed networks and a network not listed here, is NAT:ed. Another effect is that for connections between two users on the same network, or on networks where neither is listed in Surroundings, no ports for RTP sessions will be opened, since the Telecommuting Module assumes that they are both on the same side of the firewall.
Chapter 4. How To Configure SIP Routing If the SIP server is located on a NATed network, all SIP traffic from the outside will be directed to the Telecommuting Module, which must know where to forward it. One way to do this is to enter the SIP domain in the DNS Override For SIP Requests table on the Routing page, to link the SIP server IP address to the name. The Telecommuting Module will look up the domain here instead of in the DNS server, and send the SIP traffic to the correct IP address.
Chapter 4. How To Configure SIP Basic Configuration If no Outbound proxy is entered, the Telecommuting Module must be able to look up SIP domains in DNS. DNS servers are entered on the Basic Configuration page under Basic Configuration. Save/Load Configuration Finally, go to the Save/Load Configuration page under Administration and apply the new settings by pressing Apply configuration. When the configuration has been applied, you should save a backup to file.
Chapter 4. How To Configure SIP Here are the settings needed for this. It is assumed that the Telecommuting Module already has a network configuration. Only the additional SIP settings are listed. Basic Settings Go to the Basic Settings page under SIP Services and turn the SIP module on. Here you also select log classes for SIP event logging. Interoperability You need to set the URI Encoding settings on the Interoperability page to "Use shorter, encrypted URIs".
Chapter 4. How To Configure SIP Filtering To allow SIP traffic through the Telecommuting Module, you must change the Default Policy For SIP Requests on the Filtering page. As the Telecommuting Module does not manage any SIP domains, there are no Local SIP Domains. This means that you must select Process all for this setting. Routing On the Routing page, you can enter the SIP server managing your SIP domain. Enter the name or IP address of the SIP server under Outbound proxy.
Chapter 4. How To Configure SIP Save/Load Configuration Finally, go to the Save/Load Configuration page under Administration and apply the new settings by pressing Apply configuration. When the configuration has been applied, you should save a backup to file. Press Save config to CLI file to save the configuration. Client Settings SIP clients will use the Telecommuting Module as their outgoing SIP proxy and the SIP domain as the registrar.
Chapter 4. How To Configure SIP Here are the settings needed for this. It is assumed that the Telecommuting Module already has a network configuration. Only the additional SIP settings are listed. Basic Settings Go to the Basic Settings page under SIP Services and turn the SIP module on. Here you also select log classes for SIP event logging.
Chapter 4. How To Configure SIP Module will look up the domain here instead of in the DNS server, and send the SIP traffic to the correct IP address. Interoperability You need to set the URI Encoding settings on the Interoperability page to "Use shorter, encrypted URIs". Filtering To allow SIP traffic through the Telecommuting Module, you must change the Default Policy For SIP Requests on the Filtering page. As the Telecommuting Module does not manage any SIP domains, there are no Local SIP Domains.
Chapter 4. How To Configure SIP Save/Load Configuration Finally, go to the Save/Load Configuration page under Administration and apply the new settings by pressing Apply configuration. When the configuration has been applied, you should save a backup to file. Press Save config to CLI file to save the configuration. Client Settings SIP clients will use the Telecommuting Module as their outgoing SIP proxy and the SIP domain as the registrar.
Chapter 4. How To Configure SIP Here are the settings needed for this. It is assumed that the Telecommuting Module already has a network configuration. Only the additional SIP settings are listed. Basic Settings Go to the Basic Settings page under SIP Services and turn the SIP module on. Here you also select log classes for SIP event logging. Interoperability You need to set the URI Encoding settings on the Interoperability page to "Use shorter, encrypted URIs".
Chapter 4. How To Configure SIP Filtering To allow SIP traffic through the Telecommuting Module, you must change the Default Policy For SIP Requests on the Filtering page. As the Telecommuting Module does not manage any SIP domains, there are no Local SIP Domains. This means that you must select Process all for this setting. Routing On the Routing page, you can enter the SIP server managing your SIP domain. Enter the name or IP address of the SIP server under Outbound proxy.
Chapter 4. How To Configure SIP When the configuration has been applied, you should save a backup to file. Press Save config to CLI file to save the configuration. Client Settings SIP clients will use the Telecommuting Module as their outgoing SIP proxy and the SIP domain as the registrar. DMZ/LAN Telecommuting Module, SIP server on the LAN For various reasons, you might want to use a separate SIP server instead of the built-in server in the Telecommuting Module.
Chapter 4. How To Configure SIP Routing If the SIP server is located on a NATed network, all SIP traffic from the outside will be directed to the Telecommuting Module, which must know where to forward it. One way to do this is to enter the SIP domain in the DNS Override For SIP Requests table on the Routing page, to link the SIP server IP address to the name. The Telecommuting Module will look up the domain here instead of in the DNS server, and send the SIP traffic to the correct IP address.
Chapter 4. How To Configure SIP Filtering To allow SIP traffic through the Telecommuting Module, you must change the Default Policy For SIP Requests on the Filtering page. As the Telecommuting Module does not manage any SIP domains, there are no Local SIP Domains. This means that you must select Process all for this setting. Basic Configuration If no Outbound proxy is entered, the Telecommuting Module must be able to look up SIP domains in DNS.
Chapter 4. How To Configure SIP When the configuration has been applied, you should save a backup to file. Press Save config to CLI file to save the configuration. Client Settings SIP clients will use the Telecommuting Module as their outgoing SIP proxy and the SIP domain as the registrar. LAN Telecommuting Module For various reasons, you might want to use a separate SIP server instead of the built-in server in the Telecommuting Module. That SIP server would be located on the inside or maybe on a DMZ.
Chapter 4. How To Configure SIP All computers that can reach each other without having to go through the firewall connected to the Telecommuting Module should be grouped in one network. You can also define networks and parts of networks for other configuration purposes. Surroundings To make the Telecommuting Module aware of the network structure, the networks defined above should be listed on the Surroundings page.
Chapter 4. How To Configure SIP Filtering To allow SIP traffic through the Telecommuting Module, you must change the Default Policy For SIP Requests on the Filtering page. As the Telecommuting Module does not manage any SIP domains, there are no Local SIP Domains. This means that you must select Process all for this setting. Basic Configuration The Telecommuting Module must be able to look up SIP domains in DNS. DNS servers are entered on the Basic Configuration page under Basic Configuration.
Chapter 4. How To Configure SIP Remote SIP Connectivity If you have remote SIP clients behind other NAT boxes, you need to activate Remote NAT Traversal. Interoperability You need to set the URI Encoding settings on the Interoperability page to "Use shorter, encrypted URIs". You need to enter the public IP that corresponds to the Telecommuting Module under Public IP address for NATed Telecommuting Module. This will make the Telecommuting Module able to rewrite outgoing SIP packets properly.
Chapter 4. How To Configure SIP When the configuration has been applied, you should save a backup to file. Press Save config to CLI file to save the configuration. The Firewall The firewall in front of the LAN Telecommuting Module must be configured in this way: • There must be a static IP address that can be mapped to the Telecommuting Module’s private IP address. All traffic to this IP address must be forwarded to the SIParator.
Chapter 4.
Chapter 5. How To Configure Advanced SIP 3Com VCX IP Telecommuting Module provides a lot of SIP possibilities. In this chapter, some advanced SIP setups will be presented with step-by-step instructions for the configuration. How To Use Your SIP Operator Account Via 3Com VCX IP Telecommuting Module This is how to configure your Telecommuting Module to register at your SIP operator, and to use that SIP account for your local users.
Chapter 5. How To Configure Advanced SIP Show One Number When Calling You can select to show one single calling number regardless of which user makes the call. This is useful when you want others to use your Answering service/Auto Attendant when calling back to you. In the Matching From Header table, you define from which network the calls can come. You can also select what the From header (that tells who is calling) should look like. This is used when matching requests in the Dial Plan table below.
Chapter 5. How To Configure Advanced SIP At last, you combine these definitions in the Dial Plan table. Make one line for international calls and one for other calls, because we need to add the international prefix for international calls only. Now, when a local user calls an external phone number, the Telecommuting Module will route this call to your SIP operator and rewrite the signaling to use your SIP operator account.
Chapter 5. How To Configure Advanced SIP In the Forward To table, you define where calls should be forwarded. This is used in the Dial Plan table below. In this case, calls from one user should be forwarded to the corresponding SIP operator account. Create one row per user and select the account under Account. At last, you combine these definitions in the Dial Plan table.
Chapter 5. How To Configure Advanced SIP Then, match on the incoming phone number and domain in the Matching Request-URI table. The Domain will usually be the public IP address of the Telecommuting Module. If the operator uses a ’+’ in front of the phone number and your SIP server doesn’t want that, enter ’+’ in the Prefix field. This will make the Telecommuting Module strip the ’+’ before forwarding the call. Enter the SIP server in the Forward To table. Combine these in the Forward To table.
Chapter 5. How To Configure Advanced SIP How To Use Your SIP Operator Account and Your IP-PBX Via 3Com VCX IP Telecommuting Module This is how to configure your Telecommuting Module to forward requests between your SIP operator and your local IP-PBX. The configuration varies slightly depending on if the operator uses accounts or IP addresses for the authentication. This feature is only available when the Advanced SIP Routing or the SIP Trunking module has been installed.
Chapter 5. How To Configure Advanced SIP In the Matching From Header table, you define from which network the calls can come. You can also select what the From header (that tells who is calling) should look like. This is used when matching requests in the Dial Plan table below. Name each definition properly, to make it easier to use further on. In this case, we want to match on calls coming from the IP-PBX.
Chapter 5. How To Configure Advanced SIP In this case, the calls should be forwarded to your SIP operator account that was defined before. You select the account under Account. The calls can also be forwarded to your SIP operator using the operator’s IP address in the Replacement URI field. At last, you combine these definitions in the Dial Plan table. Make one line for international calls and one for other calls, because we need to add the international prefix for international calls only.
Chapter 5. How To Configure Advanced SIP In the Matching Request-URI table, you define callees. This is used when matching requests in the Dial Plan table below. In this case, you want to define the calls that should be routed to your SIP operator, which is call destinations where the usernames consist of numbers only, as these most likely are intended to go to the PSTN network. Call destinations that look like helen@sip.ingate.
Chapter 5. How To Configure Advanced SIP Now, when a local user calls an external phone number, the Telecommuting Module will route this call to your SIP operator and rewrite the signaling to use your SIP operator account. Incoming Calls All incoming calls from the operator should be forwarded to the PBX. This is done on the Dial Plan page. On the Dial Plan page, you define what type of calls should be redirected to your SIP operator. First, turn the Dial Plan on.
Chapter 5. How To Configure Advanced SIP In the Forward To table, you define where calls should be forwarded. This is used in the Dial Plan table below. In this case, the calls should be forwarded to your SIP operator account that was defined before. You select the account under Account. Enter the IP address of the IP-PBX in the Replacement URI field. This will make the Telecommuting Module replace the domain part in the incoming call with this IP address. The username part of the URI will be kept.
Chapter 5. How To Configure Advanced SIP Multiple Operators (Least Cost Routing) If any of the SIP operators use accounts, enter that on the Local Registrar page. You enter the username and password from the operator, and select the XF/Register account type. This account type will make the Telecommuting Module register at the SIP operator with the credentials you enter. Some operators don’t require registration. In this case, select the XF account type instead.
Chapter 5. How To Configure Advanced SIP The basic way of recognizing calls is to check the country code, which is the first part of the phone number. In the table, there are three rows for matching UK calls. The two "UK numbers 00" rows give the same result, as does the two "US numbers" rows. The 10.47.2.243 IP address is that of the Telecommuting Module itself. The ".*" expression in the Reg Expr fields match 0 or more characters of any kind.
Chapter 5. How To Configure Advanced SIP Multiple PBXs If you have multiple PBXs on the inside, you might want to send calls to different servers based on the sender or the called number. On the Dial Plan page, you define which calls should be redirected to which PBX. First, turn the Dial Plan on. In the Matching From Header table, you define from which network the calls can come. You can also select what the From header (that tells who is calling) should look like.
Chapter 5. How To Configure Advanced SIP The same matching definitions can be made with regular expressions. Here, each number range only needs one definition, as the "?" sign marks that the previous character can appear 0 or 1 times. The part of the number that we want to forward should be within parantheses. In the Forward To table, you define where calls should be forwarded. This is used in the Dial Plan table below.
Chapter 5. How To Configure Advanced SIP If regular expressions were used, you only need one line per PBX. As the expressions were designed to match calls from both operators, you don’t need to select an operator here. Finally, go to the Save/Load Configuration page under Administration and apply the new settings by pressing Apply configuration.
Chapter 5. How To Configure Advanced SIP RADIUS server listens for authentication requests (usually ports 1812 or 1645). On the Dial Plan page, you define how calls should be routed through the Telecommuting Module. First, turn the Dial Plan on. In the Matching Request-URI table, you define call destinations. This is used when matching requests in the Dial Plan table below. In this case, you want to define a Reg Exp (regular expression) which matches all RequestURIs. Enter "(.+)@(.
Chapter 5. How To Configure Advanced SIP At last, you combine these definitions in the Dial Plan table. Make a new row in the table and select the definitions from the tables above. Now, when a SIP user calls another SIP user, the Telecommuting Module will step in and always stay in the path for the call. Both SIP clients will signal to the Telecommuting Module only, and the Telecommuting Module will forward signaling between them. Media will still go directly between the clients.
Part III. Description of 3Com VCX IP Telecommuting Module Settings This part contains complete descriptions of settings in the 3Com VCX IP Telecommuting Module GUI. The descriptions are grouped in the same way as they are in the GUI.
Chapter 6.
Chapter 6. Basic Configuration Default domain Here, you can enter a default domain for all settings. If a default domain is entered, the Telecommuting Module will automatically assume that an incomplete computer name should be completed with the default. If, for example, Default domain contains company.com, you could as the name of the computer axel.company.com use only axel. If no default domain should be used, the Default domain field should contain a single dot (.).
Chapter 6. Basic Configuration Dynamic If an interface will receive its IP address from a DHCP server, the Telecommuting Module can also get information about its DNS server from that server. In this case, select the corresponding IP address here and leave the other fields empty. DNS Name Or IP Address The DNS name/IP address of the DNS server which the Telecommuting Module should use. Note that to use DNS names here, there must exist a DNS server in the Telecommuting Module’s permanent configuration.
Chapter 6. Basic Configuration You also select what kind of authentication will be performed for the users trying to access the administration interfaces. To further increase security, the Telecommuting Module can only be configured from one or a few computers that are accessed from one of these interfaces. Enter the IP address or addresses that can configure the Telecommuting Module. The IP addresses can belong to one or more computers.
Chapter 6. Basic Configuration This is the IP address and port which should be entered in your web browser to connect to the Telecommuting Module. For configuration via ssh, you need an ssh client to log on to the Telecommuting Module. Configuration via HTTP Select which IP address and port the Telecommuting Module administrator should direct her web browser to when HTTP is used for Telecommuting Module configuration.
Chapter 6. Basic Configuration Configuration via SSH Select which IP address and port the Telecommuting Module administrator should direct her ssh client to when SSH is used for Telecommuting Module configuration. You can select from the Telecommuting Module IP addresses configured on the Interface pages under Network Configuration. For SSH configuration, the Command Language Interface is used. See also chapter 18, Command Line Reference.
Chapter 6. Basic Configuration Network address Shows the network address of the DNS Name Or Network Address you entered in the previous field. Netmask/Bits Netmask/Bits is the mask that will be used to specify the configuration computers. See chapter 3, Configuring 3Com VCX IP Telecommuting Module, for instructions on writing the netmask. To limit access so that only one computer can configure, use the netmask 255.255.255.255.
Chapter 6. Basic Configuration No. The No. field determines the order of the lines. The order is important in deciding what is logged and warned for. The Telecommuting Module uses the first line that matches the configuration traffic. Perhaps you want to configure the Telecommuting Module so that configuration traffic from one specific computer is simply logged while traffic from the rest of that computer’s network is both logged and generates alarms.
Chapter 6. Basic Configuration is used for user authentication from VPN connections, you must do additional configuration on the Authentication Server page. The Telecommuting Module can also send accounting information about SIP calls to a RADIUS server. RADIUS Servers Enter the server(s) that the Telecommuting Module should use.
Chapter 6. Basic Configuration Identifier A RADIUS client may use either of two ways to identify itself for the RADIUS server: an IP address or a name (identifier). You must use at least one of these ways, or the authentication will fail. Select here which method to use. The address or name in use must be registered at the RADIUS servers specified in the top table, and must be unique in that RADIUS database.
Chapter 6. Basic Configuration RADIUS server The IP address for this RADIUS server. Score Radiusmux gives points (the scale is 1 to 40, inclusive) to the different servers according to their performance. The better server performance, the higher score. Radiusmux uses the score to select which server to query primarily. Sent requests The number of UDP packets sent to this server. Received replies The number of UDP packets received from this server.
Chapter 6. Basic Configuration Configuration of a RADIUS server In this section it is assumed that you know how to configure your RADIUS server. Consult your RADIUS manual for details. Add the Telecommuting Module as a client in the RADIUS server. Make sure that the shared secret here is the same as in the Telecommuting Module. The Telecommuting Module checks the permissions for a user by looking at its RADIUS attribute Service-Type.
Chapter 6. Basic Configuration The 3Com VCX IP Telecommuting Module can only send parameters to the server; no changes of configuration can be made through SNMP requests. For more information about SNMP, read RFC 1157. General Here, select the IP addresses (local and remote) involved in the SNMP signaling. You can also enter contact information for the Telecommuting Module.
Chapter 6. Basic Configuration Access via SNMPv1 and SNMPv2c Select if access via SNMP version 1 or 2c (using communities as the autentication method) should be On or Off. Community Enter a password. Note that this password is stored unencrypted. Delete Row If you select this box, the row is deleted when you click on Create new rows, Save, or Look up all IP addresses again. Create Enter the number of new rows you want to add to the table, and then click on Create.
Chapter 6. Basic Configuration User Enter a username which the server should use when contacting the Telecommuting Module. Password Press the Change password button to enter a password for this user. Authentication Select the authentication algorithm to use for SNMP requests. 3Com VCX IP Telecommuting Module supports the MD5 and SHA-1 algorithms. Privacy Select whether the SNMP request should be encrypted using AES or DES, or not be encrypted at all.
Chapter 6. Basic Configuration Trap sending function Select if trap sending (at boot and failed SNMP authentication) should be On or Off. Trap receiver Enter the IP address, or a name in the DNS, of the server to which the Telecommuting Module should send traps. If you enter a DNS name instead of an IP address, you must enter the IP address of a DNS server on the Basic Configuration page. IP address shows the IP address of the DNS Name Or IP Address you entered in the previous field.
Chapter 6. Basic Configuration SIP Sessions Trap Levels Enter the SIP sessions levels here. When the number of SIP sessions reaches the Alarm by level, an SNMP trap is sent. SIP User Registrations Trap Levels Enter the SIP user registrations levels here. When the number of registered SIP users reaches the Alarm by level, an SNMP trap is sent. CPU Load Trap Levels Enter the CPU load levels here. When CPU usage increases above the Alarm by limit, an SNMP trap is sent.
Chapter 6. Basic Configuration Save Saves the SNMP configuration to the preliminary configuration. Cancel Reverts all of the above fields to their previous configuration. Look up all IP addresses again Looks up the IP addresses for all DNS names on this page in the DNS servers you entered on the Basic Configuration page. This button will only be visible if a DNS server has been configured. Dynamic DNS update Usually, static DNS servers are used to associate a domain or host name with an IP address.
Chapter 6. Basic Configuration IP address for updates Select the IP address which the Telecommuting Module should send to dyndns.org. If a dynamic IP address is selected, the Telecommuting Module will update the DynDNS service every time the address changes. Wildcard hostnames If you select to turn this feature On, all DNS queries for any hostname.example.com will return your IP address. If this feature is Off, only queries for example.com will return your IP address.
Chapter 6. Basic Configuration SMTP server Enter the host name of your SMTP server. This is the name that SMTP DNS queries for example.com should return. You can’t enter an IP address here; neither can you enter a host name that is a CNAME (a kind of DNS alias), but must enter the server’s primary name. SMTP server is backup If you selected No here, the DynDNS server will assume that the SMTP server entered above is the primary email server for example.com.
Chapter 6. Basic Configuration Certificates Here, you create X.509 certificates for the Telecommuting Module, to be used for authentication in various applications, like when configuration over HTTPS is performed. On this page you also upload CA certificates to the Telecommuting Module. For the applications (HTTPS, VPN, RADIUS authentication of road warriors, and SIP over TLS), you select one or more CA certificates to trust.
Chapter 6. Basic Configuration Create certificate or certificate request Press Create New to create a new X.509 certificate. A new page with a form appears, requesting information about the Telecommuting Module. Fill in the form to apply for a certificate or create a self-signed certificate. Fields marked * are mandatory. Expire in The expiration time defines how many days the certificate will last. Default time is 365 days, one year.
Chapter 6. Basic Configuration Organization The name of the organization/company owning the Telecommuting Module. Organizational Unit The department using the Telecommuting Module. Serial number If you generate more than one certificate with the same information, and you want to give them separate names and treat them as different certificates, you need to give them different serial number. Enter a serial number for this certificate here. Challenge password Enter a password.
Chapter 6. Basic Configuration Name Enter a name for this CA certificate. The name is only used internally in the Telecommuting Module. CA Certificate You upload the CA certificate to the Telecommuting Module, inspect the current certificate, or download it to use somewhere else, by pressing the Change/View button. CA CRL A CRL (Certificate Revocation List) is used to tell the Telecommuting Module that some certificates issued by this CAs are not valid, even though they may not have expired yet.
Chapter 6. Basic Configuration Long timeouts consume memory for all connections. Timeout for one-way UDP connections The Timeout for one-way UDP connections regards UDP connections where packets have only been sent in one direction. Timeout for two-way UDP connections The Timeout for two-way UDP connections regards UDP connections where packets have been sent in both directions.
Chapter 6. Basic Configuration This is the most secure configuration, since all traffic goes through both your firewall and your Telecommuting Module. It is also the most flexible, since all networks connected to any of your firewall’s interfaces can be SIP-enabled. The drawback is that the SIP traffic will pass the firewall twice, which can decrease performance.
Chapter 6. Basic Configuration Internal users have to configure the Telecommuting Module as outbound proxy, or an internal proxy has to use the Telecommuting Module as outbound proxy. The Telecommuting Module derives information about your network topology from the interface configuration. Standalone Configuration Using this configuration, the Telecommuting Module is connected to the outside on one interface and your internal networks on the others.
Chapter 6. Basic Configuration Change type Press the Change type button to set the new Telecommuting Module Type. This setting, like others, must be applied on the Save/Load Configuration page before it affects the Telecommuting Module functionality.
Chapter 7.
Chapter 7. Administration automatically reverts to the old permanent configuration. If this occurs, you will be informed when trying to press a button. Apply configuration Saves the preliminary configuration to the permanent configuration and puts it into use. You can test your preliminary configuration before finalizing it. Three buttons are displayed during the test: Save configuration saves your preliminary configuration to the permanent configuration and puts it into use.
Chapter 7. Administration Save to diskette Insert a formatted diskette into the Telecommuting Module’s floppy drive and press Save to diskette to save the preliminary configuration. Do not remove the diskette until the light on the floppy drive goes out. Check that you get a confirmation of the saving. If not, the diskette may be faulty. Load from diskette Insert the diskette with the saved configuration into the Telecommuting Module’s floppy drive and press Load from diskette.
Chapter 7. Administration Browse Browse is used to scan your local disk. The web browser opens a new window where you can search among files and directories. Go to the right directory and select the file you want to upload. Revert to Old Configurations You can revert to old configurations of the Telecommuting Module, either back to the last configuration successfully applied, or to the configuration delivered with your Telecommuting Module from the factory.
Chapter 7. Administration User Administration On the User Administration page, you change the administration password for the admin account on your Telecommuting Module and create other administrator user accounts. The characters in the password are displayed as little stars. Remember that the password is sent unencrypted over the network if you use HTTP instead of HTTPS. Settings made on this page (the admin password and other accounts) will not be included when saving the configuration to file.
Chapter 7. Administration New password, Confirm password Enter the new password in both fields. You must enter the exact same password in both fields, to make sure that you did not make a mistake. Change administration password Click on this button to change the password for the admin user. The new password is now saved on the Telecommuting Module. Other Accounts Here, you define other user accounts that can access the Telecommuting Module.
Chapter 7. Administration VPN Admin means that the user can make any changes on the Virtual Private Networks pages and apply configurations, but can’t change any other configuration. VPN Renegotiator means that the user is allowed to press the Renegotiate IPsec tunnels button to negotiate new IPsec tunnels, but can’t change any configuration. SIP Admin means that the user can make any changes on the SIP Services and SIP Traffic pages and apply configurations, but can’t change any other configuration.
Chapter 7. Administration Log Out If your user has full access to the web interface, you can log out other users. However, if you do not change their password (or change the Account type to Off), they can just log on again. Upgrade Read these instructions carefully before upgrading. You find version upgrades for 3Com VCX IP Telecommuting Module at http://www.3com.com/voip/. The upgrade is signed with GNU Privacy Guard.
Chapter 7. Administration Step 3 If Apply upgrade was pressed, the buttons Try the upgrade and Remove upgrade will appear. Try the upgrade Try the upgrade will reboot the Telecommuting Module and test the loaded upgrade. When the reboot is done, log on to continue upgrading the Telecommuting Module. Remove upgrade Remove upgrade removes the loaded upgrade from the Telecommuting Module. The upgrade will not be installed.
Chapter 7. Administration To change a row, click in the Edit Row box for that row and click on Save, Add new rows, or the tab for the desired configuration page. The page is updated so that you can change the configurations on the row. You can select several rows to change. With an Edit Row column, tables with many rows are loaded faster, provided that only few of the Edit Row boxes are checked. Edit Column Select if all, some or none of the Telecommuting Module tables should have an Edit Row column.
Chapter 7. Administration Always have an Edit column Regardless of the table size, all tables will have an Edit Row column. Sometimes have an Edit column Only the tables of the size entered below will have an Edit Row column. Never have an Edit column Regardless of the table size, no table will have an Edit Row column. Tables with at least this many rows have an Edit column This is an additional setting which only takes effect if you selected Sometimes have an Edit column above.
Chapter 7. Administration Active time zone shows the current time zone setting. Change time zone by selecting one in the left-hand box and press the Change time zone button. Preferrably, select a city in your country as opposed to selecting a GMT time zone. With the location selection, the Telecommuting Module will also compensate for things like Daylight Saving Time. Change Date and Time Manually Here you change the Telecommuting Module clock manually.
Chapter 7. Administration Change Date and Time With NTP Instead of setting the time manually, you can let the Telecommuting Module get the correct time from an NTP server. The time for synchronizing will be notably shorter if the Telecommuting Module time is approximately correct when NTP is activated. N.B. Before you change time here, make sure that the Telecommuting Module uses the correct time zone above. Synchronize time with NTP Here, select if NTP synchronizing should be enabled or not.
Chapter 7. Administration Save Saves all Date and Time configuration to the preliminary configuration. Cancel Clears and resets all fields in new rows and resets changes in old rows. Look up all IP addresses again Looks up the IP addresses for all DNS names on this page in the DNS servers you entered on the Basic Configuration page. This button will only be visible if a DNS server has been configured. Restart Here, you can reboot the Telecommuting Module or restart certain modules.
Chapter 7. Administration This restart will not have the same effect as when you press the Restart SIP module button: all active SIP sessions are torn down, but SIP registrations will not be removed. If the module is not restarted, ongoing calls will usually be unharmed, but no new calls can be set up. For this monitoring to work, the Telecommuting Module must be set up to respond to SIP requests via UDP.
Chapter 7.
Chapter 8. Network Configuration Under Network Configuration, you configure: • Network groups which are used for the Telecommuting Module configuration • The Telecommuting Module’s IP addresses on all network interfaces • Routings for the networks so that computers behind routers can be contacted • VLAN settings • PPPoE settings • The Telecommuting Module network environment (only for the DMZ type) Networks and Computers Here, you name groups of computers and networks.
Chapter 8. Network Configuration Name Enter a name for the group of computers. You can use this name when you change configuration on the pages mentioned above. A group can consist of several rows of IP addresses or series of IP addresses. By clicking on the plus sign beside the name, you add more rows where you can specify more IP addresses for this group. Subgroup An already defined group can be used as a subgroup to new groups. Select the old group here and leave the fields for DNS name empty.
Chapter 8. Network Configuration Upper Limit DNS Name Or IP Address Here, enter the last DNS name/IP address of the network or group. For computers in an IP range that you want to give a network name, enter the last IP address in the seriesrange. The IP address in Upper Limit must be at least as high as the one in Lower Limit. If this field is left empty, only the IP address in Lower Limit is used. If you use a subgroup, leave this field empty.
Chapter 8. Network Configuration Default Gateway Main Default Gateways The Default gateway is the IP address of the router that is used to contact the outside world. This IP address is usually the firewall. Default gateway must be an IP address from one of the Directly Connected Networks of the Telecommuting Module’s interfaces. See appendix D, Definitions of Terms, for further description of routers/gateways. The Telecommuting Module must have at least one default gateway to work.
Chapter 8. Network Configuration Delete Row If you select this box, the row is deleted when you click on Create new rows, Save, or Look up all IP addresses again. Create Enter the number of new rows you want to add to the table, and then click on Create. Policy For Packets From Unused Gateways This policy controls how packets from the currently unused gateway(s) should be treated. The packet can be allowed (subject to the rest of the configuration) or discarded.
Chapter 8. Network Configuration Create Enter the number of new rows you want to add to the table, and then click on Create. Save Saves the Default Gateway configuration to the preliminary configuration. Cancel Clears and resets all fields in new rows and reset changes in old rows. Interface (Network Interface 1 and 2) There is a page for each network interface (Network Interface 1 and 2) on the Telecommuting Module. Select a page to make configuration for that interface.
Chapter 8. Network Configuration Obtain IP Address Dynamically Specify if this network interface should obtain its IP address from a DHCP or PPPoE server instead of an address entered on this page. If DHCP client ON is selected, the Telecommuting Module will send out a DHCP request when you apply the configuration and at boot. The request is sent out to the network connected to this interface.
Chapter 8. Network Configuration Netmask/Bits Enter the mask of the network where the DNS Name Or IP Address applies. Network address The IP address of the network where the DNS Name Or IP Address applies. Broadcast address Shows the broadcast address of the network in the Network address field. VLAN Id VLANs are used for clustering IP ranges into logical networks. A VLAN id is simply a number, which identifies the VLAN uniquely within your network. Enter a VLAN id for this network.
Chapter 8. Network Configuration Name Enter the name of your alias. This name is only used internally in the Telecommuting Module. DNS Name Or IP Address Enter the IP address of this alias, or a name in the DNS. If you enter a DNS name instead of an IP address, you must enter the IP address of a DNS server on the Basic Configuration page. IP address Shows the IP address of the DNS Name Or IP Address you entered in the previous field.
Chapter 8. Network Configuration Routed network Enter the DNS name or IP address of the routed network under DNS Name Or Network Address. The IP address of the routed network is shown under Network address. In the Netmask/Bits field, enter the netmask of the network. Router The name or IP address of the router that will be used for routing to the network. If there are several routers between the Telecommuting Module and the network, fill in the router closest to the Telecommuting Module.
Chapter 8. Network Configuration VLAN VLANs are used for clustering IP ranges into logical networks. A VLAN id is simply a number, which identifies the VLAN uniquely within your network. Named VLANs Here, you can list the VLANs you wish to use and give them names, to make administration easier. Named VLANs can also be selected instead of interfaces on the Networks and Computers page. Name The name of this VLAN.
Chapter 8. Network Configuration Cancel Clears and resets all fields in new rows and resets changes in old rows. Interface Status On this page, status about the physical interfaces and links are shown. Status of dynamic IP addresses is also shown here. Interface Status Physical Device The name of the physical network interface. Interface Name The name you gave this interface. Type Here the speed options for the interface are shown. MAC Address The MAC address of the interface.
Chapter 8. Network Configuration DHCP Client Status When an interface is configured to obtain its IP via DHCP, the DHCP Client Status section is shown. Here you find information about the DHCP lease. IP address The IP address obtained via DHCP. Netmask The netmask for the network on which the IP address is. Default gateway Default gateway for the network on which the IP address is. Lease obtained from The DHCP server which served the IP address to the Telecommuting Module.
Chapter 8. Network Configuration PPPoE server The PPPoE server which leased the IP address. PPPoE PPPoE (Point-to-Point Protocol over Ethernet) is a modification of PPP and is used to assign an IP address to a computer as long as it is connected to the PPPoE server. When it disconnects, it instantly loses the IP address. Many Internet providers use PPPoE instead of DHCP to distribute IP addresses. Authentication The Telecommuting Module must be authenticated to get an IP address.
Chapter 8. Network Configuration LCP echo-request interval Enter the interval (in seconds) between two requests. Leave the field empty to turn this function off. Logging The PPPoE negotiations generate log messages. Here, you can select how to log these messages. Log class for PPPoE negotiations Select a log class for PPPoE negotiations. Select from the log classes defined on the Log Classes page. Save Saves all PPPoE configuration to the preliminary configuration.
Chapter 8. Network Configuration since the Telecommuting Module assumes that they are both on the same side of the firewall. For DMZ and LAN SIParators, at least one network should be listed here. If no networks are listed, the Telecommuting Module will not perform NAT for any traffic. Network Select a network. The alternatives are the networks you defined on the Networks and Computers page.
Chapter 8. Network Configuration Interface Select a data interface here. Delete Row If you select this box, the row is deleted when you click on Create new rows or Save. Create Enter the number of new rows you want to add to the table, and then click on Create. Save Saves all Surroundings configuration to the preliminary configuration. Cancel Clears and resets all fields in new rows and resets changes in old rows.
Chapter 8.
Chapter 9. Logging 3Com VCX IP Telecommuting Module can log different types of traffic, attempts to connect and other events. You can select to have the logs stored on the Telecommuting Module’s local hard drive, in which case they can be queried. When the Telecommuting Module’s hard drive gets full, it removes the oldest data to make space for saving new data.
Chapter 9. Logging Support Report When you press Export support report, the Telecommuting Module will create a compressed file with a log for the time period selected, and configuration files. This is the preferred way of sending information to the 3Com support team. If the time interval entered does not contain any log files, the Telecommuting Module will display an error message. Check that you entered the correct date.
Chapter 9. Logging Packet Type Selection You can limit the selection to only allowed packets or rejected/discarded packets, or a subset of these. For example, you can select allowed, un-NAT:ed packets only. IP Address Selection You can limit the selection by specifying certain IP addresses. In these fields, enter a single IP address (e. g., 10.3.27.3), a range of IP addresses (e. g., 10.3.27.1-10.3.28.254), an IP address followed by a netmask (e. g.,10.3.27.
Chapter 9. Logging the field is empty, any port will match. See appendix G, Lists of ports, ICMP and protocols, for more information on port numbers. If you want to study all traffic except the one to or from a specific port or group of ports, enter the port number(s) here and mark the "not this port" box. The selection can be modified by the control boxes under the fields A and B: A src Packets from the port number in field A matches. Field B is ignored.
Chapter 9. Logging Note that you must have selected a log class which saves to local file, for encrypted packets, to be able to display them here. Protocol number Here, you enter the number(s) of the protocols you want to search for. You can enter a single number (e. g., 5), a range of numbers (e. g., 5-10), a list of numbers and ranges, separated by commas (e. g., 5, 10-20) or nothing at all. If the field is empty, any protocol will match.
Chapter 9. Logging From Header Enter one or more URIs that appear in the From headers for the event you want to examine. The From headers typically contain usernames and domains, like george@ingate.com. To Header Enter one or more URIs that appear in the To headers for the event you want to examine. The To headers typically contain usernames and domains, like george@ingate.com.
Chapter 9. Logging leave the time field blank and enter a date in the date field, the time is set to 23:59:59. If both fields are left blank, all events until the latest log event will be displayed. Show newest at top Choosing Show newest at top will display the log in reverse order, i. e., the latest log event will be displayed first. Periodical search Periodical search will cause new events to appear automatically in the log display.
Chapter 9. Logging You can choose between different file formats; TAB-separated file, comma-separated file and WELF (WebTrends Enhanced Log Format). These are text formats, which means that you can import the files in a text editor for analysis. TAB- and comma-separated files contain all information from the log file. WELF is an open standard used by several log analyzer tools. However, all WELF compatible syslog messages will not be exported.
Chapter 9. Logging S A U P F R SYN ACK URG PUSH FIN RST Request for connection Response to a previous packet Contains out-of-band data Packets that must be delivered quickly Disconnect request Reset - response to incorrect packet For more information on flags, see RFC 793.
Chapter 9. Logging Packet Load Interface You can select one or more of the Telecommuting Module’s interfaces or the total traffic. Selecting more than one interface will generate one graph per interface. You can also select to view only VPN traffic. Direction Select one or more of Sent, Received and Sent+Received. Each selection generates a separate graph in the diagram. Unit Select between displaying packets/second or bits/second. The graphs may look different, because all packets aren’t the same size.
Chapter 9. Logging Value Select maximum, average or minimum value of each sample period. If viewing load for time periods within the last week, all three selections will result in the same graph. Show This The Telecommuting Module also stores load values for CPU, memory and swap usage. These values can also be shown in the diagram. Check the boxes for the values to be shown. Each selection generates a separate graph in the diagram.
Chapter 9. Logging The Diagram Diagram Size Enter the desired width and height of the resulting load diagram. Diagram Heading You can enter a heading for the load diagram. This is useful if you view several diagrams and save them. View diagram Creates a diagram at the top of the page. For each combination of selections, a graph will be generated. Example: You selected eth0 and Total as interfaces, and Sent, Received and Sent+Received as directions.
Chapter 9. Logging When an IP packet is received by the Telecommuting Module, a log message is generated, containing sender and receiver IP addresses and other information such as the protocol used and if the packet was allowed, rejected or discarded. The Telecommuting Module then uses the log settings for Configuration Transport and Log class for non-SIP packets to know how to process the log message.
Chapter 9. Logging Log class for DHCP requests Here, you select a log class for DHCP requests. DHCP is a protocol used for dynamic allocation of IP addresses. Requests are sent by broadcast from computers wanting an IP address to a DHCP server. The Telecommuting Module logs all DHCP related packets using the log class you select here. There are usually a lot of these packets, so we recommend using the log class "None", meaning that no packets are logged at all.
Chapter 9. Logging VPN Events The same settings can also be found on the IPsec Settings and PPTP pages under Virtual Private Networks. Log class for IPsec key negotiations Here, you set the log class for new negotiations of IPsec connection keys. Log class for IPsec key negotiation debug messages Here, you set the log class for debug information about negotiations of IPsec connection keys.
Chapter 9. Logging Log class for IPsec user authentications Here, you set the log class for Telecommuting Module messages about road warrior authentications via RADIUS and their disconnections. Log class for PPTP negotiations The Telecommuting Module generates log messages about the progress of the PPTP negotiations. Here, you select a log class for these messages. Log class for PPTP packets PPTP clients wanting to establish a VPN tunnel connects to the Telecommuting Module on port 1723.
Chapter 9. Logging Log class for SIP packets The Telecommuting Module logs all SIP packets (one SIP packet is many lines). Select a log class for the SIP packets. Log class for SIP license messages The Telecommuting Module logs license messages. Select a log class for these messages. Log class for SIP errors The Telecommuting Module sends a message if there are any SIP errors. Select a log class for these log messages.
Chapter 9. Logging Log class for PPPoE negotiations The Telecommuting Module generates log messages for its own PPPoE negotiations. Here, you select a log class for these messages. Save Saves the Logging Configuration configuration to the preliminary configuration. Cancel Reverts all of the above fields to their previous configuration. Log Classes Log classes determine the handling of traffic logs, other event logs and alarms.
Chapter 9. Logging Syslog Syslog sends log messages to a syslog server. You enter the IP address of the syslog server on the Log Sending page. Select Facility and Level for the syslog message. See your syslog server manual for more information on facility and level. Selecting None for both Facility and Level turns the syslog alternative off. None must be selected for both or none of Facility and Level. The Telecommuting Module will display a red warning text until both or none of them are None.
Chapter 9. Logging SMTP Server Here, you set an SMTP server for the log messages that the Telecommuting Module generates. This server will send the email messages to the email addresses set on the Log Classes page. If the connection between the Telecommuting Module and the SMTP server isn’t working, an error message will be shown on this page, and be logged according to the log class set on the Logging Configuration page.
Chapter 9. Logging Save Saves the configuration for Log Sending to the preliminary configuration. Cancel Reverts the fields to the previous configuration.
Chapter 9.
Chapter 10. SIP Services SIP (Session Initiation Protocol) is a protocol for creating and terminating various media stream sessions over an IP network. It is for example used for Internet telephone calls and distribution of video streams. SIP takes care of the initiation, modification and termination of a session with one or more participants. The protocol makes it possible for the participants to agree on what media types they should share.
Chapter 10. SIP Services Additional SIP Signaling Ports Normally, the Telecommuting Module listens for SIP signaling on ports 5060 (UDP and TCP) and 5061 (TLS). You can make it listen for SIP signaling on additional ports. When ports are added here, they are reserved for SIP signaling on all the Telecommuting Module IP addresses. Port Enter an additional port on which the Telecommuting Module should listen for SIP signaling.
Chapter 10. SIP Services SIP Media Port Range State a port interval which the Telecommuting Module should use for SIP media streams. You can use any high ports except 4500 (reserved for NAT-T) and 65097-65200 (reserved for RADIUS). Note! A change in the port interval will make the SIP module restart when the configuration change is applied. When the SIP module is restarted, all active SIP sessions (SIP calls, video conferences etc) will be torn down and all SIP user registrations will be removed.
Chapter 10. SIP Services Server Enter the host name, domain name, or IP address of the server to be monitored. Port Enter the port to be monitored on that host. This should be the port to use for SIP signaling. Transport Select the transport to be monitored on that host. This should be the transport to use for SIP signaling. Delete Row If you select this box, the row is deleted when you click on Create new rows or Save.
Chapter 10. SIP Services Log class for SIP signaling For each SIP packet, the Telecommuting Module generates a message, containing the sender and receiver of the packet and what type of packet it is. Select a log class for these log messages. Log class for SIP packets The Telecommuting Module logs all SIP packets (one SIP packet is many lines). Select a log class for the SIP packets. Log class for SIP license messages The Telecommuting Module logs license messages. Select a log class for these messages.
Chapter 10. SIP Services Save Saves the Basic Settings configuration to the preliminary configuration. Cancel Clears and resets all fields in new rows and resets changes in old rows. Interoperability The SIP standard is still young and under considerable development. As an effect, several implementations of the standard omits parts of it, or makes guesses as to what will be accepted.
Chapter 10. SIP Services Remove Via Headers Some SIP servers won’t accept requests with more than one Via header. To be able to communicate via these servers, you can select to remove all Via headers but one in requests to those servers. The Via headers are added again when the reply passes the Telecommuting Module. Here, list servers that won’t accept more than one Via header in SIP requests. SIP Server Enter the DNS name or IP address for the SIP servers that won’t accept more than one Via header.
Chapter 10. SIP Services Delete Row If you select this box, the row is deleted when you click on Create new rows, Save, or Look up all IP addresses again. Create Enter the number of new rows you want to add to the table, and then click on Create. Expires Header Some SIP clients don’t understand the expires: parameter in the Contact header. To set the expiration time for those clients, you can make the Telecommuting Module add to REGISTER request replies an Expires header with the expires value in it.
Chapter 10. SIP Services URI Encoding When registering a SIP client on one side of the Telecommuting Module to a SIP server on the other side, the Contact header is normally encrypted and rewritten. By doing this, we make it possible for the SIP server to track when the same user is sending requests from different places. It is possible to turn encryption and rewriting off, and to shorten the encrypted URI in Contact headers passing through the Telecommuting Module. Select what to do with Contact headers.
Chapter 10. SIP Services Signaling Order of Re-INVITEs When the Telecommuting Module acts as a B2BUA (e.g. almost always when performing SIP Trunking), it normally handles re-INVITEs by forwarding them and waiting for a response, just as for the original INVITE. With some SIP devices, this can cause problems. For these situations, the Telecommuting Module can instead handle the re-INVITEs hop by hop, meaning that it sends a "200 OK" response back before forwarding the INVITE to the next SIP device.
Chapter 10. SIP Services Accept RTP/AVP With sdescriptions When sdescriptions are used, they should be presented as "RTP/SAVP" in the SDP offer sent by the client. Some clients choose to code them as "RTP/AVP" instead, to make clients, unaware of sdescriptions, to accept the SDP as an offer. Select here if the Telecommuting Module should accept incoming offers where sdescriptions are presented as "RTP/AVP" offers.
Chapter 10. SIP Services client/server. The Record-Route header makes all subsequent SIP signaling for this session to be routed via the Telecommuting Module even if it is not the shortest route. Here, you select to add Record-Route headers for all requests or not. Force Remote TLS Connection Reuse Enter SIP servers to which the Telecommuting Module connects using TLS. For the listed servers, the Telecommuting Module will use the actual source port for the TLS connection instead of port 5061.
Chapter 10. SIP Services Select if TCP packets with TLS content should be accepted. The recommended setting is not to accept them. Allow Large UDP Packets Sometimes, the SIP signaling UDP packets get larger than the standard (RFC 3261) allows. There are two ways to handle this; either send large UDP packets, which may become fragmented into several packets, or use TCP. Some SIP devices may not be able to receive TCP packets, which is a violation of RFC 3261.
Chapter 10. SIP Services Select if the Telecommuting Module should remove these headers in 180 responses. The recommended setting is to keep the headers. Forward CANCEL Body Normally, a CANCEL request does not contain a body. There are some systems which put a body in these requests. As every SIP proxy generates a new CANCEL instead of just forwarding the incoming request, any body in the incoming request is usually dropped.
Chapter 10. SIP Services Open Port 6891 For File Transfer Messenger clients do not always use the ports that are negotiated in the SIP signaling. In particular, the File Transfer function always uses the same port, regardless of what is negotiated. To make File Transfer work through the Telecommuting Module you must open port 6891, the Messenger File Transfer port.
Chapter 10. SIP Services Select if "%20" should be converted into a whitespace or preserved in URIs. Strip ICE Attributes Some SIP clients, like Microsoft Communicator 2007, seem to prefer ICE "a=candidate" attributes in SDP over other information, and it doesn’t perform STUN tests as it is supposed to in order to verify the connection. This may sometimes result in no media. A way to avoid this is to make the Telecommuting Module remove these attributes for all requests.
Chapter 10. SIP Services Save Saves the Interoperability configuration to the preliminary configuration. Cancel Reverts all of the above fields to their previous configuration. Look up all IP addresses again Looks up the IP addresses for all DNS names on this page in the DNS servers you entered on the Basic Configuration page. This button will only be visible if a DNS server has been configured.
Chapter 10. SIP Services "0" or an empty field means that SIP over TCP or TLS cannot be used to the Telecommuting Module. Allowed number of concurrent sessions Enter the number of concurrent SIP sessions which the Telecommuting Module should handle. Leave the field empty to allow as many sessions as there are SIP traversal licenses on the Telecommuting Module (number displayed inside parantheses). You can purchase additional SIP traversal licenses from your retailer.
Chapter 10. SIP Services Allowed number of media streams per SIP session Enter the number of media streams a single SIP session can handle. This restriction is primarily made for preventing DOS attacks. Timeout for one-way media streams This setting is used by the Telecommuting Module to detect when media is only sent in one direction. If no media packets are received in one direction during the configured number of seconds, the Telecommuting Module creates a log message about this.
Chapter 10. SIP Services Select if all codecs should be allowed, or just the codecs that are listed as allowed in the Codecs table. Codecs If you selected to only allow some codecs, enter the allowed codecs in the table. Codecs that are not allowed can also be listed here, as long as you select "Off" under This Codec Is Allowed. Type Select the codec type. The "-" option will make this row match all media types where the codec name is defined. Name Enter the name of the codec to be allowed.
Chapter 10. SIP Services Local Ringback When a call is transfered by the Telecommuting Module, the calling person normally does not hear any new ring tone. For various purposes, you might want the Telecommuting Module itself to play a ring tone for call transfers. Local Ringback Played at Call Transfer Select to never play local ringback, to play it when the new target phone rings, or to play it when the transferer hangs up.
Chapter 10. SIP Services Requests You can configure timeouts for the different functions of the Telecommuting Module SIP module here. It is not recommended to change from the default values unless you really know what you’re doing. Default timeout for INVITE requests When sending an INVITE request you can specify a timeout, telling how long you can wait before getting an answer. If no timeout is given when an INVITE request is sent, the Telecommuting Module sends the default timeout entered here.
Chapter 10. SIP Services Base retransmission timeout for SIP requests When the Telecommuting Module sends out a SIP request, it will expect a reply within a certain time. If no reply has been received within the Base retransmission timeout, the Telecommuting Module will start resending the request.
Chapter 10. SIP Services does not do STUN (or if the STUN-capable client is located behind a Symmetric NAT device), you have to use the Remote NAT Traversal feature. This is easier for the client, but generates more network traffic for the Telecommuting Module. The settings on this page are only available when the Remote SIP Connectivity module has been installed. STUN Server Use the STUN server if you have STUN-aware SIP clients.
Chapter 10. SIP Services Remote NAT Traversal If your SIP client is not STUN-capable, you can use the built-in Remote NAT traversal feature of the Telecommuting Module. The client must register on the Telecommuting Module (or through it). The SIP client needs to re-REGISTER, or respond to OPTIONS packets, rather often for this to work. The exact period for this depends on the NAT-ing device, but 20 seconds should be enough to get across most NAT boxes. Remote NAT traversal Switch this function on or off.
Chapter 10. SIP Services Forward Signaling from IP Address Select which IP address the Telecommuting Module should use as the sender IP address when forwarding signaling from remote clients. As all other SIP signaling will be forwarded using the IP address entered in the Directly Connected Networks, you must select an Alias IP address here. NAT keepalive method Clients using this function will have to send SIP packets very often, to keep the IP/port NAT binding.
Chapter 11. SIP Traffic SIP (Session Initiation Protocol) is a protocol for creating and terminating various media stream sessions over an IP network. It is for example used for Internet telephone calls and distribution of video streams. SIP takes care of the initiation, modification and termination of a session with one or more participants. The protocol makes it possible for the participants to agree on what media types they should share.
Chapter 11. SIP Traffic Method Enter the name of the SIP method. This should be the name used in RFC 3261. Traffic To Here, you select the direction of the traffic. Local domains means that traffic to Local SIP Domains of this Telecommuting Module is affected by this row. Other domains means that traffic to all domains which are not Local SIP Domains of this Telecommuting Module is affected by this row. Both means that this row affects all traffic for the method, regardless of where the traffic is bound.
Chapter 11. SIP Traffic Save Saves the SIP Methods configuration to the preliminary configuration. Cancel Clears and resets all fields in new rows and reset changes in old rows. Filtering Under Filtering, you can filter out SIP requests based on various criteria. Filter based on sender IP address (Sender IP Filter Rules ), sending and receiving SIP user (Header Filter Rules), or content type (Content Types). Sender IP Filter Rules Here, you set all the rules for SIP requests from different networks.
Chapter 11. SIP Traffic Create Enter the number of new rows you want to add to the table, and then click on Create. Default Policy For SIP Requests Select what to do with SIP requests that do not match any of the Proxy Rules. The choices are Process all, which handles all requests regardless of destination, Local only, which only handles requests to Local SIP Domains (entered on the Local Registrar page), and Reject all, which doesn’t handle any requests at all.
Chapter 11. SIP Traffic Delete Row If you select this box, the row is deleted when you click on Create new rows or Save. Create Enter the number of new rows you want to add to the table, and then click on Create. Header Filter Rules Header Filter Rules lets you filter out SIP requests based on the contents of the To and From headers. This could be useful if you want to prevent groups of users to make calls through the Telecommuting Module.
Chapter 11. SIP Traffic Create Enter the number of new rows you want to add to the table, and then click on Create. Default Header Filter Policy Select what to do with SIP requests that do not match any of the Header Filter Rules. The choices are Process and Reject. Rejected requests get a code 403 packet in reply. Save Saves the Filtering configuration to the preliminary configuration. Cancel Reverts all of the above fields to their previous configuration.
Chapter 11. SIP Traffic Domain Enter the name of the domain, such as 3com.com. Sometimes you have to use an IP address (of the Telecommuting Module) as the domain as well, when the SIP client substitutes the domain for the IP address noted in DNS. Delete Row If you select this box, the row is deleted when you click on Create new rows or Save. Create Enter the number of new rows you want to add to the table, and then click on Create.
Chapter 11. SIP Traffic Authentication Name If the user should use a different name than its user name for authentication purposes, please enter the authentication name here. It is only used for authentication. Password If authentication is required for some methods, press the button to enter the password. Register From Here, you can restrict from where this user’s SIP traffic can come when he registers. Select a computer/group of computers.
Chapter 11. SIP Traffic Authentication settings SIP Authentication Decide whether SIP authentication should be On or Off. If Off, the Telecommuting Module will not ask clients for authentication for any SIP method, regardless of what settings are made in the SIP Methods table. SIP Realm When authentication is required for a method, the SIP client will ask for a password. The Realm is what the client will present on your screen when asking for a password. If you, for example, use sip.3com.
Chapter 11. SIP Traffic More information about how to configure the RADIUS server to authenticate SIP users can be found in the RADIUS section. P-Asserted-Identity When the P-Asserted-Identity header is used, this header is added to all outgoing requests for which the Telecommuting Module has performed authentication. For incoming requests from untrusted domains, where this header is present, the header will be removed before the request is processed.
Chapter 11. SIP Traffic RADIUS Accounting RADIUS Accounting can be used to keep track of user calls. This enables billing users for SIP calls. When RADIUS Accounting is turned on, the Telecommuting Module sends account ticks to notify the configured RADIUS server about when calls start and stop. RADIUS Accounting is defined in RFC 2866. When RADIUS Accounting is used, you must also enter a RADIUS server on the RADIUS page under Basic Configuration.
Chapter 11. SIP Traffic Matching From Header Here you create criterias for the From header of the SIP messages. This is used when matching requests in the Dial Plan table. For a request to match, all criterias must be fulfilled. You can enter a username and domain or create a regular expression (reg exp) to match the From header. This table is only available when the Advanced SIP Routing or the SIP Trunking module has been installed. Name Enter a Name for this From header pattern.
Chapter 11. SIP Traffic Delete Row If you select this box, the row is deleted when you click on Create new rows or Save. Create Enter the number of new rows you want to add to the table, and then click on Create. Matching Request-URI Here you create criterias for the Request-URI of the SIP messages. This is used when matching requests in the Dial Plan table. For a request to match, all criterias must be fulfilled.
Chapter 11. SIP Traffic The "anything" option means that any character and any number of characters are allowed in the Tail. The "nothing" option means that the Tail must not contain any character, which means that the username consists only of the Prefix and Head parts. If you use a Reg Exp, select "-" as the Tail. When neither the Advanced SIP Routing or the SIP Trunking module has been installed, this column only offers a limited number of options. Min.
Chapter 11. SIP Traffic Name This is the name for this destination. The name is used in the Dial Plan table. Subno. This field is used to sort rows within this destination group. The rows are used in the displayed order. If the first receiver does not respond, or if the Telecommuting Module receives a 5xx or 6xx response, the request is sent to the receiver on the next row. This column is only available when the Advanced SIP Routing or the SIP Trunking module has been installed.
Chapter 11. SIP Traffic as $1, and user, which is referred to as $2. You can always refer to the entire Request-URI with $0. By adding the parameter ";b2bua" at the end of the expression, you force the request to the Telecommuting Module back-to-back user agent, which will make it stateful for all requests. This can be useful if you want the Telecommuting Module to send RADIUS accounting tickets for all calls.
Chapter 11. SIP Traffic Request-URI Select a matching Request-URI pattern, created in the Matching Request-URI table; Action Select actions for this request. The Telecommuting Module can do the following: Forward: The request is sent to the destination selected under Forward To. Auth: The Telecommuting Module asks the requestor for authentication. ENUM: The Telecommuting Module performs an ENUM lookup to get the new destination.
Chapter 11. SIP Traffic Comment Enter a comment to remind yourself what this row is meant to do. Delete Row If you select this box, the row is deleted when you click on Create new rows or Save. Create Enter the number of new rows you want to add to the table, and then click on Create. Methods in Dial Plan In this table, enumerate which SIP methods the Dial Plan should handle. The ACK, PRACK, CANCEL, BYE, NOTIFY, UPDATE and INFO methods can’t be handled by the Dial Plan.
Chapter 11. SIP Traffic ENUM Root In this table, ENUM roots can be listed. The ENUM root is something like a DNS top domain. Normally, only the standard ENUM root e164.arpa. is used, but other roots can be added, e.g. for test purposes. Read more on ENUM in RFC 3824 This table is only available when the Advanced SIP Routing or the SIP Trunking module has been installed. Name Enter a name for this combination of ENUM roots. Subno.
Chapter 11. SIP Traffic Registrations), and to forward all requests addressed to a specific SIP domain to a SIP server (DNS Override For SIP Requests). You can also configure how incoming calls for local SIP users should be processed. You can restrict allowed callers and send the calls on to a voice mail server. You can also select to process class 3xx messages in the Telecommuting Module or pass them on to the client.
Chapter 11. SIP Traffic Relay To DNS Name Or IP Address Enter the IP address for the SIP server handling the domain. You can also enter a DNS name for the SIP server, if it has a DNS-resolvable host name, even if the SIP domain is not possible to look up in DNS. IP address Shows the IP address of the DNS Name Or IP Address you entered in the previous field. Port Here, enter the port on which the SIP server listens for SIP traffic. The standard port is 5060 (5061 for TLS).
Chapter 11. SIP Traffic No. The order of the function. You change order of the functions by giving them new order numbers. Routing Function These are the functions to be ordered. DNS Override means the DNS Override For SIP Requests table. Local Registrar means all locally registered users (but not registration requests) and the Static Registrations table. Dial Plan means the Dial Plan table.
Chapter 11. SIP Traffic Static Registrations You can specify that calls to a certain user address should also be redirected to another address, or that calls to a non-person user name (like support@company.com) should be redirected to one or more other addresses. Static registrations only affect SIP requests addressed to Local SIP Domains. Even if a call should be forwarded, the Telecommuting Module will try to put it through to the original addressee.
Chapter 11. SIP Traffic sip/sips Select if the request to this address should be sent by SIP or SIPS (SIP Secure). With SIPS, you require that the request is sent over TLS all the way to the addressee. Transport Select the protocol to use when sending the request. Delete Row If you select this box, the row is deleted when you click on Create new rows, Save, or Look up all IP addresses again. Create Enter the number of new groups and rows you want to add to the table, and then click on Create.
Chapter 11. SIP Traffic For clients not supporting replaces When SIP clients start a dialog, they provide a list of supported SIP methods and parameters. With this option, the Telecommuting Module will intercept REFER requests bound to client that did not list "replaces" as a supported parameter.
Chapter 11. SIP Traffic Delete Row If you select this box, the row is deleted when you click on Create new rows, Save, or Look up all IP addresses again. Create Enter the number of new rows you want to add to the table, and then click on Create. User Routing This table makes it possible to allow advanced routing options to be enabled per user. You may enter aliases that are used to match incoming request to a specific user.
Chapter 11. SIP Traffic Forward You can send the request to other users. Select here how and whom it should be sent. Action One of the following actions can be selected: Reject: The call is rejected. Nothing is forwarded. Forward: The call will only be forwarded to the users under To; if there are any registrations for the user selected under User, they will not receive the call. Parallel: The call is forwarded to all users under To and all local registrations for the user selected under User.
Chapter 11. SIP Traffic Voice Mail Server Here you configure which voice mail server to use for the users in the User Routing table. You can also enter the Request-URI to use when connecting to the voice mail server. The Request-URI must start with a sip: or sips:, and can contain references to various usernames and domains. This table is only available when the Advanced SIP Routing module has been installed. No. The Voice Mail servers are used in the order they are presented in the table.
Chapter 11. SIP Traffic Create Enter the number of new rows you want to add to the table, and then click on Create. Outbound Proxy Here, you can enter one or more external SIP proxies to which all or part of the SIP requests should be sent. This could be useful e.g. if the Telecommuting Module separates two local departments of a company, and all SIP requests should be processed by the main firewall connected to the Internet.
Chapter 11. SIP Traffic Port Enter the port number of the external SIP proxy. If no port number is entered, the Telecommuting Module will make a DNS query for an SRV record. If a port number is entered, it will query for an A record. Gateway Enter the gateway for the external SIP proxy. You can select which default gateway should be used for requests sent to this SIP proxy. If you select "-", the requests will be sent to the SIP Default Gateway.
Chapter 11. SIP Traffic Look up all IP addresses again Looks up the IP addresses for all DNS names on this page in the DNS servers you entered on the Basic Configuration page. This button will only be visible if a DNS server has been configured. Registrar and Session Status You can monitor the current SIP activity. The tables are updated when you select the page or reload it. Active Sessions Here the currently active sessions are listed. Start The time when the call started.
Chapter 11. SIP Traffic Monitored SIP server The name of the SIP server being monitored by the Telecommuting Module. Port The port of the SIP server being monitored by the Telecommuting Module. Transport The transport being monitored by the Telecommuting Module for this SIP server. Monitored SIP server status The status for the monitored SIP server. Monitored SIP server is online means that the Telecommuting Module can contact the SIP server.
Chapter 12. Tools Under Tools, you find handy tools to troubleshoot the Telecommuting Module setup. Packet Capture 3Com VCX IP Telecommuting Module has a built-in packet capturer which can produce pcap trace files. This sniffer will capture all IP packets according to your selections, even those you can’t see in the log (like RTP packets). The Telecommuting Module capturer needs to be manually activated and deactivated.
Chapter 12. Tools A any Packets to or from the IP address in field A matches. Field B is ignored. A to B Packets from A to B matches. B to A Packets from B to A matches. Between A&B Packets from A to B, or from B to A, matches. not this combination Packets that do not match the given combination of A and B are shown in the log. If you, for example, want to study all packets to or from 10.3.27.18, except those to the file server 10.3.27.
Chapter 12. Tools not this combination Packets that do not match the given combination of A and B are shown in the log. If you, for example, want to search for all packets to a web server, but not packets on the "normal" client and server ports in your environment, fill in the form like this: ICMP ICMP packets contain a type field and a code field. When searching for ICMP packets, you can select all packets or only those matching certain criteria.
Chapter 12. Tools Collect data Below the selection boxes, you activate and deactivate the capture function by pressing the Start capture and Stop capture buttons. When the capturer has been stopped, the captured log can be downloaded by pressing the Download captured data button. The captured data can be deleted by pressing the Delete captured data button.
Chapter 12. Tools A trace test will result in a list of all network elements the packets use to get to the target host.
Chapter 12.
Chapter 13. Firewall and Client Configuration Additional configuration for the firewall and the SIP clients is required to make the Telecommuting Module work properly. The amount and nature of the configuration depends on which Telecommuting Module Type was selected.
Chapter 13. Firewall and Client Configuration • Let through TCP traffic between the Internet (all high ports) and the Telecommuting Module (ports 1024-32767). You must allow traffic in both directions. • Let through TCP traffic between the internal networks (all high ports) and the Telecommuting Module (ports 1024-32767). You must allow traffic in both directions.
Chapter 13. Firewall and Client Configuration The Firewall The firewall to which the Telecommuting Module is connected should have the following configuration: SIP over UDP • Let through UDP traffic between the Internet (all high ports) and the Telecommuting Module (port 5060). You must allow traffic in both directions. • Let through UDP traffic between the Internet (all high ports) and the Telecommuting Module (the port interval for media streams which was set on the Basic Settings page).
Chapter 13. Firewall and Client Configuration The SIP clients SIP clients will use the Telecommuting Module as their outgoing SIP proxy and as their registrar (if they can’t be configured with the domain only). If you don’t want to use the Telecommuting Module as the registrar, you should point the clients to the SIP registrar you want to use.
Part IV. 3Com VCX IP Telecommuting Module Serial Console This part contains complete descriptions of settings in the 3Com VCX IP Telecommuting Module terminal interface.
Chapter 14. Basic Administration Some settings are available without having to log on the web interface, but instead connecting to the Telecommuting Module console via the serial cable. Here, the settings available from the console are listed. The serial console is a text user interface which requires a terminal software on your workstation, such as Hyperterm in Windows.
Chapter 14. Basic Administration 3Com VCX IP Telecommuting Module Administration 1. Basic configuration 2. Save/Load configuration 5. Wipe email logs 6. Set password 7. Command line interface a. About q. Exit admin ==> 1. Basic configuration Basic settings for the Telecommuting Module, such as the IP address and the password. This is one of two ways of giving the Telecommuting Module an IP address. The other way is to perform a magic ping (see chapter 2, Installing 3Com VCX IP Telecommuting Module). 2.
Chapter 14. Basic Administration Basic configuration Use Basic configuration to give the Telecommuting Module a start configuration. You can assign an IP address to it (for the web GUI), enter the IP addresses of computers allowed to connect to the web GUI and change the administrator password. Wherever you can enter a value, there will be a default one in brackets, which is the current value. Press Return to select the default value.
Chapter 14. Basic Administration Configuration computers Enter here the computers from which it is allowed to configure the Telecommuting Module. The computers entered here are the only ones allowed to access the web GUI. Select between allowing a single computer or an entire network. Computers from which configuration is allowed: You can select either a single computer or a network.
Chapter 14. Basic Administration Enter the network address and netmask for the configuration computer network. If they are on the same network as the Telecommuting Module, these are all configuration settings needed. If the configuration computers are on a different network, the Telecommuting Module will ask for routing to that network. Static routing: The network allowed to configure from is not on a network local to this unit. You must configure a static route to it.
Chapter 14. Basic Administration Is this configuration correct (yes/no/abort)? yes will make the Telecommuting Module reboot using the new settings. no will make the Telecommuting Module go through the Basic configuration questions again and allow you to change settings. abort will make the Basic configuration script end without changing any settings. Save/Load configuration Here, you can save your configuration to a file or load a configuration from a file.
Chapter 14. Basic Administration This will remove all email logs that are waiting to be sent. Do you want to proceed (yes/no)? yes will remove all log messages from the email queue. These messages are not saved to file or similar before removed. If you log locally as well as via email, the local log will not be affected by this. Note that this will only remove messages already queued up for sending.
Chapter 14.
Chapter 15. Command Line Reference This is a reference for the Command Line Interface (CLI), which can be accessed via the serial console or SSH (see the chapter titled Basic Administration). Command Reference Here is a list of the commands available in the Command Line Interface (CLI). Commands are presented like this: command [--flag] parameter1|parameter2 [parameter3 ...]. An example is: ping ip-address --flag means that the flag can modify the command in some way.
Chapter 15. Command Line Reference traceroute Usage: traceroute ip-address|dns-name Check the route for a packet to a remote host. To use DNS names, a DNS server must be configured for the Telecommuting Module. Modifying Tables add-row Usage: add-row table [field=value ...] With this command, you add a row to a table and enter values into the listed fields for that row. Note that this command cannot be used on tables with a fixed number of rows.
Chapter 15. Command Line Reference The --single-line flag formats the output to make each command a single line. Otherwise, long commands will be split over multiple lines to make them easier to read and edit manually. list-tables Usage: list-tables pattern List all tables matching the given pattern. The wildcard character "*" can be used in the pattern.
Chapter 15. Command Line Reference confirm-testrun Usage: confirm-testrun With this command, you confirm the ongoing test run, making the preliminary configuration permanent. continue-testrun Usage: continue-testrun With this command, you enter an unlimited test mode. This can only be done when a test run is in progress. When in the unlimited test mode, you can make the preliminary configuration permanent using the confirm-testrun command, or abort the test run using the abort-testrun command.
Chapter 15. Command Line Reference Field Name cert name Field Type OptPrivCert Name Explanation An X.509 certificate. The reference name for this certificate. config.allow_config Corresponding setting in web GUI: Configuration Computers on page Access Control Table type: Dynamic A list of networks allowed to connect to the Ingate via HTTP or HTTPs for administration purposes.
Chapter 15. Command Line Reference config.authentication Corresponding setting in web GUI: User Authentication For Web Interface Access on page Access Control Table type: Single row Select how administrator logins via HTTP and HTTPs should be authenticated. Field Name auth_type Field Type config_auth_sel Explanation The authentication method to use for administrators. config.
Chapter 15. Command Line Reference Table type: Single row The IP address and port which should allow SSH connections to the administrator interface. Field Name ip port Field Type OptOwnIpReference PortNumber Explanation An IP address of this unit. A port number of the IP address. failover.iface_ref_hosts Corresponding setting in web GUI: Reference Hosts on page Reference Hosts Table type: Dynamic A list of reference hosts for the failover team.
Chapter 15. Command Line Reference Field Name enabled Field Type OnOffToggle Explanation Turns the setting on or off. fent.fent_keepalive Corresponding setting in web GUI: NAT keepalive method, NAT timeout for UDP, NAT timeout for TCP on page Remote SIP Connectivity Table type: Single row Type of keepalive to use for fented clients.
Chapter 15. Command Line Reference Field Name enabled port1 Field Type OnOffToggle OptPortNumber port2 OptPortNumber server1 server2 OptOwnIpReference OptOwnIpReference Explanation Turn the STUN server on or off. One port of the STUN server, used by both IP addresses. Another port of the STUN server, used by both IP addresses. One IP address of the STUN server. Another IP address of the STUN server. firewall.
Chapter 15. Command Line Reference The log class for DHCP packets received by the Ingate. Field Name logclass Field Type LogclassReference Explanation A log class. firewall.network_groups Corresponding setting in web GUI: Networks and Computers on page Networks and Computers Table type: Dynamic In this table all groups of computers/IP addresses are defined, to be used when configuring the rest of the Ingate.
Chapter 15. Command Line Reference Field Name policy Field Type ping_policy_sel Explanation Select the policy. firewall.policy_logclass Corresponding setting in web GUI: Log class for non-SIP packets on page Logging Configuration Table type: Single row The log class for packets that are processed according to the default policy of the Ingate. Field Name logclass Field Type LogclassReference Explanation A log class. firewall.
Chapter 15. Command Line Reference Time classes are defined to make time-limited firewall rules and relays possible. Field Name from_day from_time name Field Type weekday_sel Time_HH_MM GroupName to_day to_time weekday_sel Time_HH_MM Explanation The day when the time class starts. The time when the time class starts. A name of the time class. It is used when referring to it from other tables. The day when the time class ends. The time when the time class end. idsips.
Chapter 15. Command Line Reference idsips.rate_limited_ips Corresponding setting in web GUI: Rate Limiting on page SIP IDS/IPS Table type: Dynamic Table for user specified IDS/IPS rate limit rules. Field Name Field Type blacklist_durationOptNonNegativeInteger Explanation The blacklist interval (in seconds). enabled hits Turns this rule on or off. The number of hits inside the given window. OnOffToggleOn hits_number logclass IDSIPSLogclassReference How traffic matching this rule should be logged.
Chapter 15. Command Line Reference Field Name logclass Field Type VPNLogclassReference Explanation A log class. ipsec.ike_logclass Corresponding setting in web GUI: Log class for IKE and NAT-T packets on pages IPsec Settings and Logging Configuration Table type: Single row The log class for IKE and NAT-T packets. Field Name logclass Field Type VPNLogclassReference Explanation A log class. ipsec.
Chapter 15. Command Line Reference Table type: Dynamic A list of IPsec peers for the Ingate. Field Name auth_type enabled isakmp_sa_life local_addr Field Type AuthtypeSel OptOnOffToggleOn IsakmpSALife OptOwnIpReference name GroupName radius OptOnOffToggle remote_addr secret subgroup IpsecPeerAddr AuthData SubGroup Explanation The authentication type for this peer. Activate this peer. ISAKMP key lifetime. The Ingate’s IP address to which this peer must connect. A name of the peer.
Chapter 15. Command Line Reference Field Name cert Field Type OptCertReference ip port OptOwnIpReference PortNumber Explanation A certificate to use for this IP/port combination. An IP address of this unit. A port number of the IP address. ipsec.tunneled_nets Corresponding setting in web GUI: IPsec Tunnels on page IPsec Tunnels Table type: Dynamic Definitions of which networks can use each IPsec connection.
Chapter 15. Command Line Reference Field Name ca Field Type CaReference Explanation A CA certificate. ipsec.x509_cert Corresponding setting in web GUI: Local X.509 Certificate on page IPsec Certificates Table type: Single row The X.509 certificate to use for IPsec connections. Field Name cert Field Type OptCertReference Explanation A certificate of this unit. misc.
Chapter 15. Command Line Reference Table type: Single row Settings for the DynDNS service. Field Name backup enabled ip mx offline password service user wildcard Field Type OnOffToggle Explanation The SMTP server entered here is a backup server. OnOffToggle Activate update via DynDNS. OptDepOwnIpReference The local IP address to be referred to for the host names listed here. OptDomainName The SMTP server for the domain(s). OnOffToggle Use offline URL redirection. DyndnsPassword The DynDNS password.
Chapter 15. Command Line Reference misc.unitname Corresponding setting in web GUI: Name of this Telecommuting Module on page Basic Configuration Table type: Single row The name of this Ingate unit. Field Name unitname Field Type OptString Explanation The user-defined name. misc.use_ntp Corresponding setting in web GUI: Change Date and Time With NTP on page Date and Time Table type: Single row Activate NTP for the Ingate system clock.
Chapter 15. Command Line Reference Field Name server Field Type OptDnsReachableHost Explanation A server name or IP address. monitor.hardware_logclass Corresponding setting in web GUI: Log class for hardware errors on page Logging Configuration Table type: Single row The log class for hardware errors. Field Name logclass Field Type LogclassReference Explanation A log class. monitor.
Chapter 15. Command Line Reference Table type: Single row The log class for RADIUS errors. Field Name logclass Field Type LogclassReference Explanation A log class. monitor.sip_level_alarms Corresponding setting in web GUI: SIP Sessions Trap Levels, SIP User Registrations Trap Levels on page SNMP Table type: Single row When to create alarm messages for used SIP User Registration and Traversal licenses.
Chapter 15. Command Line Reference monitor.snmp_contact_person Corresponding setting in web GUI: Contact person on page SNMP Table type: Single row The contact person for this Ingate. Field Name Field Type snmp_contact_person OptDepString Explanation The name of the contact. monitor.snmp_management_stations Corresponding setting in web GUI: Servers allowed to contact the Telecommuting Module via SNMP on page SNMP Table type: Single row The servers allowed to send SNMP requests to the Ingate.
Chapter 15. Command Line Reference Field Name community Field Type NonWhiteName server version DnsReachableHost snmptrapversion_sel Explanation The SNMP community to use when sending traps. The server to receive traps. The SNMP version to use when sending traps. monitor.snmp_trap_sending Corresponding setting in web GUI: Trap sending function on page SNMP Table type: Single row Turn SNMP trap sending on or off. Field Name enabled Field Type OnOffToggle Explanation Turns the setting on or off.
Chapter 15. Command Line Reference Authentication for SNMP requests v3. Field Name authentication password privacy user Field Type snmpv3_auth_sel SnmpPassword snmpv3_privacy_sel NonWhiteName Explanation Authentication algorithm used for this user. The password for this user. Encryption algorithm used for this user. A user allowed to make SNMP requests. monitor.
Chapter 15. Command Line Reference Field Name address interface Field Type DnsIpAddress InterfaceSel name Name Explanation The IP address to use. The interface to which the network is connected. A name for this IP address. It is used to refer to the IP address. network.interfaces Corresponding setting in web GUI: General, Obtain IP Address Dynamically, Speed and Duplex on pages Interface (Network Interface 1 and 2) Table type: Fixed Interface settings.
Chapter 15. Command Line Reference Field Name Field Type lcp_echo_interval OptPositiveSysInteger Explanation Keep alive packet interval (seconds). logclass FirewallLogclassReferenceThe log class to use for PPPoE negotiations. password service user OptPassword OptNonWhiteString OptNonWhiteString The PPPoE password. The PPPoE service. The name of the PPPoE user. network.
Chapter 15. Command Line Reference password.admin_users Corresponding setting in web GUI: Other Accounts on page User Administration Table type: Dynamic A list of the users allowed to access the Ingate web administrator interface. Field Name password type user Field Type AdminPassword AdminTypeSel AdminUser Explanation The password for this administrator user. The administrator type. The name of this administrator user. pptp.
Chapter 15. Command Line Reference Field Name client_netgroup dns1 Field Type Explanation PPTPNetgroupReference The range of IP addresses for PPTP clients. OptDnsIpAddress The DNS server which PPTP clients should use. dns2 OptDnsIpAddress A second DNS server which PPTP clients should use. lcp_echo_interval OptPositiveSysInteger Keep alive packet interval (seconds). local_addr wins1 PPTPOwnIpReference OptDnsIpAddress wins2 OptDnsIpAddress The local gateway for PPTP clients.
Chapter 15. Command Line Reference qos.bandwidths Corresponding setting in web GUI: General, Bandwidths For SIP Media, Bandwidths on pages QoS Interfaces and QoS and SIP Table type: Fixed QoS bandwidth settings per interface.
Chapter 15. Command Line Reference Field Name server_netgroup service sip tos Field Type OptNetgroupReference OptServicesReference sip_sel opttos_sel Explanation The destination network for the traffic. The service matching the traffic. The traffic type. The TOS field of the packets. qos.egress_default_queueing Corresponding setting in web GUI: Unclassified Traffic on page QoS Interfaces Table type: Fixed Assign priority and bandwidth for traffic not listen in the ’db.qos.egress_queueing’ table.
Chapter 15. Command Line Reference qos.ingress_queueing Corresponding setting in web GUI: Classification on page QoS Interfaces Table type: Dynamic Assign priority and bandwidth for different types of traffic. Field Name cname Field Type QoSClassReference interface limit queue rate InterfaceSel OptPercentFloat pqueue_sel OptPercentFloat Explanation The traffic for which bandwidth is assigned or limited. The interface for the outgoing traffic. Bandwidth limit (kbit/s). Priority queue for the traffic.
Chapter 15. Command Line Reference sip.accelerated_tls Corresponding setting in web GUI: Accept TCP Marked As TLS on page Interoperability Table type: Single row Accept TCP marked as TLS. Field Name enabled Field Type OnOffToggle Explanation Turns the setting on or off. sip.active Corresponding setting in web GUI: SIP Module on page Basic Settings Table type: Single row Turns the SIP module on and off. Field Name enabled Field Type OnOffToggle Explanation Turns the setting on or off. sip.
Chapter 15. Command Line Reference sip.auth_methods Corresponding setting in web GUI: SIP Methods on page SIP Methods Table type: Dynamic Allow and authenticate SIP requests based on which SIP method is used. Field Name allow auth Field Type OnOffToggle OnOffToggle method SipMethod traffic_to sip_auth_dir_sel Explanation Allow this type of SIP request. Require authentication for this type of SIP request. The SIP method for which the settings are made. The direction of the SIP request. sip.
Chapter 15. Command Line Reference List domain names/IP addresses that should not be rewritten when forwarded by the Ingate. Field Name ip Field Type DnsIpAddress Explanation The domain name. sip.emergency Corresponding setting in web GUI: Emergency Number on page Dial Plan Table type: Single row PSTN emergency number. Field Name emergency Field Type NoCommaString Explanation The emergency number. sip.
Chapter 15. Command Line Reference sip.fix_file_transfer_port Corresponding setting in web GUI: Open Port 6891 For File Transfer on page Interoperability Table type: Single row Always open port 6891 for file transfer. Field Name enabled Field Type OnOffToggle Explanation Turns the setting on or off. sip.force_modify Corresponding setting in web GUI: Force Translation on page Interoperability Table type: Dynamic List domain names/IP addresses that should always be rewritten when forwarded by the Ingate.
Chapter 15. Command Line Reference Interoperability, Filtering and Authentication and Accounting Table type: Single row Miscellaneous SIP settings. Field Name sip_policy Field Type sip_function_sel sipauth_allow_rfc2069 OnOffToggle sipauth_enabled OnOffToggle sipauth_realm OptString Explanation The default policy for SIP requests. Exceptions are made in the ’db.sip.relay_rules’ table. Turn on or off support for authentication according to RFC 2069. Turn SIP Authentication on or off.
Chapter 15. Command Line Reference sip.large_udp Corresponding setting in web GUI: Allow Large UDP Packets on page Interoperability Table type: Single row Select to allow larger UDP packets than the standard allows, instead of switching to TCP signaling. Field Name enabled Field Type OnOffToggle Explanation Turns the setting on or off. sip.lcs_companion Corresponding setting in web GUI: MEDIAtor on page MEDIAtor Table type: Single row Settings for the MEDIAtor.
Chapter 15. Command Line Reference sip.loose_refer_to Corresponding setting in web GUI: Relaxed Refer-To on page Interoperability Table type: Single row Accept Refer-To headers with ’?’ but no angle brackets. Field Name enabled Field Type OnOffToggle Explanation Turns the setting on or off. sip.loose_user_name_check Corresponding setting in web GUI: Loose Username Check on page Interoperability Table type: Single row Only use the username, not the domain, when authenticating.
Chapter 15. Command Line Reference Field Name Field Type allow_transcodingOnOffToggle allowed_suites interface Explanation Allow transcoding of signaling for this interface/VLAN. OptMediaEncryptionSuiteReference The crypto group allowed via this interface/VLAN. SipMcryptoSurroundingReference The interface/VLAN for which encryption settings are made. sip.
Chapter 15. Command Line Reference Field Name ports_upper Field Type PortNumber Explanation The highest port number in the range. sip.media_restriction Corresponding setting in web GUI: Limitation of sender of media streams on page Sessions and Media Table type: Single row Limit where SIP media can be sent from. Field Name medialock Field Type medialock_sel Explanation Media sender limitation. sip.
Chapter 15. Command Line Reference sip.mimetypes Corresponding setting in web GUI: Content Types on page Filtering Table type: Dynamic A list of content types to allow or reject in SIP packets. Field Name allowed Field Type OnOffToggle mimetype MimeType Explanation Allow or reject packets with this content type. A content type in a SIP packet. sip.monitor_server Corresponding setting in web GUI: SIP Servers To Monitor on page Basic Settings Table type: Dynamic Monitored SIP servers.
Chapter 15. Command Line Reference Table type: Single row SIP blacklist interval. If no value is entered, blacklisting is not used. Field Name timeout Field Type OptionTimeout Explanation Blacklist interval (seconds). sip.outbound_proxy Corresponding setting in web GUI: Outbound Proxy on page Routing Table type: Dynamic Where to send SIP requests. Multiple outbound proxies can be used based on the domain in the From header of the request.
Chapter 15. Command Line Reference Field Name ip Field Type OptDnsReachableHost Explanation An IP address. sip.radius_acct Corresponding setting in web GUI: RADIUS Accounting on page Authentication and Accounting Table type: Single row RADIUS accounting in the Telecommuting Module. Field Name enabled Field Type OnOffToggle Explanation Turns the setting on or off. sip.
Chapter 15. Command Line Reference Field Name number Field Type Integer Explanation Priority of this rule. A lower number is a higher priority. sip.remove_via Corresponding setting in web GUI: Remove Via Headers on page Interoperability Table type: Dynamic Remove Via headers from requests send to the listed servers. Field Name ip Field Type DnsReachableHost Explanation The server for which to remove Via headers. sip.
Chapter 15. Command Line Reference Table type: Single row Make the unit remove the Record-Route and Contact headers in 180 responses to SIP requests. Field Name enabled Field Type OnOffToggle Explanation Turns the setting on or off. sip.
Chapter 15. Command Line Reference sip.session_limits Corresponding setting in web GUI: Allowed number of concurrent sessions, Session timer, Allowed number of media streams per SIP session on page Sessions and Media Table type: Single row Limitations for SIP sessions. Field Name Field Type max_sipsessions OptNonNegativeInteger max_streams_per_req MaxStreamsPerSession session_timeout SessionTimeout Explanation The allowed number of concurrent sessions. If left blank, no limit is set.
Chapter 15. Command Line Reference sip.sip_license_logclass Corresponding setting in web GUI: Log class for SIP license messages on pages Basic Settings and Logging Configuration Table type: Single row The log class for SIP license messages. Field Name logclass Field Type SIPLogclassReference Explanation A log class. sip.
Chapter 15. Command Line Reference Field Name logclass Field Type SIPLogclassReference Explanation A log class. sip.st_type Corresponding setting in web GUI: Telecommuting Module Type on page Telecommuting Module Type Table type: Single row Sets the SIParator type. Field Name st_type Field Type st_type_sel Explanation The SIParator type. sip.strip_ice_attributes Corresponding setting in web GUI: Strip ICE Attributes on page Interoperability Table type: Single row Remove ICE attributes from SDP.
Chapter 15. Command Line Reference Field Name enabled Field Type OnOffToggle Explanation Turns the setting on or off. sip.tls_cacerts Corresponding setting in web GUI: TLS CA Certificates on page Signaling Encryption Table type: Dynamic List of CA certificates for TLS connections. Field Name ca Field Type CaReference Explanation A CA certificate. sip.
Chapter 15. Command Line Reference Check that the remote certificate matches the domain. Field Name Field Type check_x509_server_subject OnOffToggle Explanation Turn the setting on or off. sip.transaction_config Corresponding setting in web GUI: Requests on page Sessions and Media Table type: Single row Timeouts for SIP requests. Field Name Field Type default_timeout PositiveSysInteger inv_rt max_timeout ninv_rt timer_a Explanation Default timeout for INVITE requests (seconds).
Chapter 15. Command Line Reference sip.ua_register Corresponding setting in web GUI: Registration Parameters on page SIP Accounts Table type: Single row Field Name Field Type Explanation sip.use_cancel_body_in_ack Corresponding setting in web GUI: Use CANCEL Body In ACK on page Interoperability Table type: Single row Use packet body of CANCEL in corresponding ACK. Field Name enabled Field Type OnOffToggle Explanation Turns the setting on or off. sip.
Chapter 15. Command Line Reference Field Name Field Type clients_lack_refer OnOffButton Explanation For clients that cannot handle REFER. clients_lack_replace OnOffButton For clients that cannot handle Replaces. use_from_uri use_user_agent For requests with listed From URIs. For requests from listed User-Agents. OnOffButton OnOffButton sipswitch.
Chapter 15. Command Line Reference Use the Dial Plan. Field Name enabled Field Type fallback_sel Explanation Use the Dial Plan. sipswitch.dial_plan_methods Corresponding setting in web GUI: Methods in Dial Plan on page Dial Plan Table type: Dynamic A list of methods which should be routed using the Dial Plan. Field Name method Field Type NonemptyString Explanation A SIP method. Cannot be any of ACK, CANCEL, PRACK, BYE NOTIFY, UPDATE, or INFO. sipswitch.
Chapter 15. Command Line Reference Field Name transport Field Type OptSipTransportSel Explanation The SIP transport to use when the request is forwarded. sipswitch.incoming_unauth Corresponding setting in web GUI: Allow Calls From Unauthenticated Users on page Routing Table type: Dynamic A list of SIP users allowed to call local users for which the ’restrict_incoming’ function in ’db.sipswitch.user_routing’ is enabled. Field Name url Field Type SipWildcardUrl Explanation A matching From header.
Chapter 15. Command Line Reference Field Name name Field Type NonemptyString prefix OptString regexp regexpwithAt tail rest_func_sel Explanation The name of this Request-URI match. This name is used to refer to the Request-URI in other tables. The start of the Request-URI username part. The prefix is stripped when the request is forwarded. Regular expression to match the Request-URI. The rest of the Request-URI username part (after the prefix and head). sipswitch.
Chapter 15. Command Line Reference Field Name password type user Field Type SipUserPassword account_type_sel SipUserName Explanation The password for the user. The account type for the user. The name of this SIP user. sipswitch.voicemail Corresponding setting in web GUI: Voice Mail Server on page Routing Table type: Dynamic A list of Request-URIs to use for sending calls to voice mail servers. Field Name number request_uri Field Type Integer NoCommaString Explanation The priority of this row.
Chapter 15. Command Line Reference Table type: Single row Settings for VoIP Survival. Field Name areacode cachettl enabled maxnrlen Field Type OptDigitString OptPositiveSysInteger OnOffToggle OptPositiveSysInteger registration_time OptPositiveSysInteger timeout OptPositiveSysInteger Explanation The local phone area code. Time to store subscriber data (days). Turns the setting on and off. The maximum number of digits in local phone numbers (not including area code).
Chapter 15. Command Line Reference Selection off ro debug bk rw vpn sip vpnreneg Explanation The user is disabled. The user can view any configuration and make log searches, but cannot change any configuration. The user can take packet captures, download support reports, and view internal dump pages. The user can download the configuration to file, and upload a configuration file to the Ingate. The user is also allowed to apply configurations. The user can make any changes to the configuration.
Chapter 15. Command Line Reference CaReference A reference to the ’name’ field of ’db.cert.cas’. In other words, a CA certificate. CertReference A reference to one of the Ingate’s private certificates. CryptoDefReference DepUsableVlanInterface DnsDynIpAddress A datatype for DNS/ipaddr values. The address may be dynamically assigned. DnsDynIpNetwork_Interface DnsDynIpOtherHost A DNS name or IP address that does not belong to this unit, but is on a directly connected network.
Chapter 15. Command Line Reference DyndnsPassword A password for a DynDNS user. DyndnsServiceSel A selection of DynDNS services. Selection dyndns statdns custom Explanation Dynamic DNS. Static DNS. Custom DNS. EnumReference A reference to the ’name’ field of ’db.sipswitch.enum_root’. In other words, an ENUM root. EspCryptoReference FirewallLogclassReference A reference to the ’name’ field of ’db.monitor.logclasses’. In other words, a log class. FwdToList A list of SIP addresses separated by comma.
Chapter 15. Command Line Reference InterfaceSel Select one of the installed physical interfaces. This behaves as if it were a reference to the ’interface’ column on ’db.network.interfaces’. InviteRetransmitCount An integer between 1 and 16. IpsRuleName Datatype used for rate limited IPS rule names. IpsecAuthSel Selection Explanation IpsecEncSel Selection Explanation IpsecNetLocalSel A selection of which local IP addresses can use the IPsec connection.
Chapter 15. Command Line Reference Selection Explanation IsakmpSALife An integer between 60 and 172800. LogclassReference A reference to the ’name’ field of ’db.monitor.logclasses’. In other words, a log class. MaxMessageSizeInteger An integer between 1024 and 67108864. MaxReg An integer between 1 and 100. MaxStreamsPerSession An integer between 1 and 10. MimeType A MIME type. The format is ’type/name’. The ’*’ wildcard is accepted to use as a type/name. Name Datatype used for names.
Chapter 15. Command Line Reference NonemptyString A string. OnOffButton An On-Off-toggle displayed as a check-box in the web server. The only reason this is a separate datatype, is to fool the web server into displaying it as a check-box, as there is currently no way to specify this in the OEM package. OnOffToggle Datatype with only allowed values being "on" and "off". Case is ignored, as is leading and trailing whitespace. The cooked value is a bool: True for "on" and False for "off". Default "off".
Chapter 15. Command Line Reference Selection audio video text application Explanation An audio type codec. A video type codec. A text type codec. An application type codec. OptComment An optional comment field for user consumption only. OptDSCPInteger An optional integer between 0 and 63. OptDepOwnIpReference An optional reference to the ’name’ field of ’db.network.interfaces’ ’db.network.alias_addresses’. In other words, one of the machine’s own IP addresses. or OptDepString An optional string.
Chapter 15. Command Line Reference OptForwardToReference A reference to the ’name’ field of ’db.sipswitch.forward_to’. In other words, a destination for the SIP request. OptIcmpRangeList An optional list of ICMP numbers. OptIpsecNetReference A reference to the ’name’ field of ’db.ipsec.ipsec_nets’. In other words, an IPsec network. OptIpsecPeerReference A reference to the ’name’ field of ’db.ipsec.peers’. In other words, an IPsec peer. OptMediaEncryptionSuiteReference Refers to the ’name’ field in ’db.
Chapter 15. Command Line Reference OptPassword Datatype for optional passwords. OptPercent An optional integer from nothing to everything in percent (0-100). OptPercentFloat An optional float from nothing to everything in percent (0-100). Values are normalized to integers if possible. OptPortNumber A optional port number in the range 1-65535. Zero not normally allowed. OptPortRangeList An optional list of TCP or UDP ports.
Chapter 15. Command Line Reference Selection tcp udp tls Explanation Use TCP as transport. Use UDP as transport. Use TLS as transport. OptSipUserDomain An optional domain name or IP address. The ’*’ wildcard can be used, meaning any SIP domain. ’*local’ means any SIP domain for which this Ingate acts as registrar. OptString An optional string. Unlike most other optional types, the cooked value when no value is given isn’t None. It is the empty string.
Chapter 15. Command Line Reference PPTPOwnIpReference An optional reference to the ’name’ field of ’db.network.interfaces’ or ’db.network.alias_addresses’. In other words, one of the machine’s own IP addresses. The reference is not optional if ’db.pptp.pptp_enable’ is on. Percent An integer from nothing to everything in percent (0-100). PfsGroupSel Selection Explanation PortNumber A port number in the range 1-65535. Zero not normally allowed.
Chapter 15. Command Line Reference SIPRadiusSel A selection of SIP user databases. Selection local radius Explanation A local database. A RADIUS database. SessionTimeout An integer between 90 and 86400. SipLocalUserReference SipMcryptoSurroundingReference A reference to an interface or defined surrounding. For DMZ SIParators, the reference is made to a surrounding; the ’surrounding_netgroup’ field in ’db.sip.surroundings’.
Chapter 15. Command Line Reference SipWildcardUrl SIP URL with wildcards. ? represents any single character while * represents a string of characters of any length. * is only allowed first, last and just before or after @. SnmpPassword A password for a SNMP v3 user. SubGroup A reference to another group in the same table. The default is to reference the column ’name’, but a subclass may set the class attribute REFERRED_COLUMN to specify another column. REFERRED_TABLE must not be touched.
Chapter 15. Command Line Reference Selection reject forward parallel sequence Explanation Reject the request. Forward the request to listed users, not to the original user. Forward the request to the original user and all listed users. Forward the request to the original user, then to listed users in sequence. random Forward the request to a randomly selected user among the listed and original users. If there is no response a new user is selected to forward the request to.
Chapter 15. Command Line Reference Selection busy25 Explanation When busy or after 25 seconds. add_expire_header_sel A selection of when to perform certain actions based on the SIP request. Selection always never if_in_request Explanation Always perform this action. Never perform this action. Only perform this action when the request matched certain criteria. autoneg_sel Selection auto 100half 100full 10half 10full Explanation Automatic negotiation. Use 100 Mbit/s, half duplex.
Chapter 15. Command Line Reference Selection recurse Explanation Use the information in the messages locally. config_auth_sel A selection of authentication types for configuring the unit. Selection local radius any Explanation A local database. A RADIUS database. Use the local database as well as the RADIUS database. dp_action_sel A selection of forwarding actions. Selection fwd a+fwd enum/a+allow deny enum/a+fwd Explanation Forward the request to the selected destination.
Chapter 15. Command Line Reference Selection registrations both Explanation Lower REGISTER expire. Use both short registrations and OPTIONS. function_sel A selection of policies for traffic through the Ingate. Selection discard reject accept Explanation Drop the packets silently. Drop the packets and send an ICMP message back. Allow the packets. fwtype_sel A selection of the firewall types in the Ingate. Selection dynamic static ftp pptp rtsp tftp Explanation Dynamic session management.
Chapter 15. Command Line Reference Selection empty md mt mr Explanation The TOS field is not set. The TOS field is set to Minimize Delay. The TOS field is set to Maximize Throughput. The TOS field is set to Maximize Reliability. ping_policy_sel A selection of the ping policies that can be used by the Ingate. Selection local never always Explanation Only reply to ping from units on the same interface. Never reply to ping. Reply to ping on all IP addresses.
Chapter 15. Command Line Reference regexpwithAt A regular expression, which requires exactly one @. rest_func_sel A selection of SIP URI tails. Selection telchar digit nothing alpha alnum anychar xdigit Explanation 0-9, +, -, #, * 0-9. No tail. a-z, A-Z. a-z, A-Z, 0-9. Any character. 0-9, a-f, A-F (hexadecimal numbers). rfc2782priority An integer between 0 and 65535. rfc2782weight An integer between 0 and 65535. ring_tone_type_sel A selection of ring tone type.
Chapter 15. Command Line Reference Selection registrar dialplan Explanation Use the local registrar, including the ’db.sip.sip_alias’ table. Use the ’db.sipswitch.dial_plan’ table. sip_auth_dir_sel Selection in out both Explanation Requests for local domains. Requests for other domains. All requests. sip_filter_action_sel Selection process reject Explanation Allow the request. Reject the request. sip_function_sel A selection of which SIP requests to process, based on the Request-URI domain.
Chapter 15. Command Line Reference Selection sip sips Explanation Use ’SIP’ in the Request-URI. Use ’SIPS’ in the Request-URI. snmptrapversion_sel A selection of SNMP versions. Selection v1 v2c Explanation Version 1. Version 2c. snmpv3_auth_sel A selection of authentication algorithms. - sha-1 -- SHA-1. Selection md5 Explanation MD5. snmpv3_privacy_sel A selection of encryption algorithms. Selection des none Explanation DES encryption. No encryption.
Chapter 15. Command Line Reference Selection Cron Local0 Local1 Local2 Local3 Local4 Local5 Local6 Local7 Explanation Cron. Local0. Local1. Local2. Local3. Local4. Local5. Local6. Local7. sysloglevel_sel A selection of syslog levels. Selection Emerg Alert Crit Err Warning Notice Info Debug Explanation Emergency. Alert. Critical. Error. Warning. Notice. Informational. Debug messages. tls_client_methods A selection of encrypted TCP methods, seen from the client end.
Chapter 15. Command Line Reference Selection Explanation SSLv2,SSLv3,TLSv1:SSLv3,TLSv1 SSLv3 or TLSv1. SSLv2,SSLv3,TLSv1:TLSv1 TLSv1, backwards-compatible. SSLv3:SSLv3 TLSv1:TLSv1 SSLv3. TLSv1. tlsconf_sel A selection of transport methods. Selection no_tls allow_tls only_tls Explanation UDP or TCP. UDP, TCP, or TLS. Only TLS. trusted_domain_transport_sel A selection of transports for SIP signaling. Selection any tcp tls Explanation TCP or TLS. TCP. TLS. uri_encoding_sel URI encoding options.
Chapter 15. Command Line Reference Selection monday tuesday wednesday thursday friday saturday sunday Explanation Monday Tuesday Wednesday Thursday Friday Saturday Sunday window_number A positive integer with standard value 60. CLI command examples In this section, you can find some examples of how to use the CLI commands to create and change your configuration. The CLI commands can be entered directly via the serial console or an ssh connection to the Telecommuting Module configuration interface.
Chapter 15. Command Line Reference add-row firewall.forwarding_rules (id 4) client=LAN comment="" enabled=on fromtunnel=- function=accept logclass=Local number=3 server=internet service=udp timeclass=24/7 totunnel=- Apply a configuration You can use CLI commands to apply the changed settings.
Part V. Appendices In the appendices, you find more thorough information about Internet and computer security, such as descriptions of Internet services and lists of Internet protocols.
Appendix A. More About SIP The SIP Protocol SIP (Session Initiation Protocol), defined in RFC 3261 (with various extensions), handles creation, modification and termination of various media stream sessions over an IP network. It is for example used for Internet telephone calls and distribution of video streams. SIP also supports user mobility by allowing registration of a user and proxying or redirecting requests to the user’s current location.
Appendix A. More About SIP • Small connection overhead Establishing a connection using H.323 takes about three times the data and turnarounds compared to when using SIP. Apart from this, there are some more disadvantages with H.323. As it uses many protocols, more ports need to be opened in a firewall to enable H.323 signaling through. SIP is a single protocol, which means that only one port has to be opened for SIP signaling. For both protocols, however, more ports must be opened for the data traffic.
Appendix A. More About SIP You can do this by using the Ingate Startup Tool, which can be downloaded from http://www.ingate.com/Startup_Tool.php. Below you find the configuration that should be made manually if you do not use the Tool. Go to the Basic Settings page under SIP Services and switch the SIP module on. Go to the Routing page under SIP Traffic. In the DNS Override For SIP Requests table, add a row where you enter your SIP domain as the Domain, and enter your PBX/registrar IP address and port.
Appendix A. More About SIP Configuring the PBX The PBX must be configured to accept registrations for your SIP domain. How you do this depends on the PBX you are using. Some PBX:s accept all domains. Configuring the DNS Server To make other SIP users find your SIP domain, you need to configure your DNS (or rather, the DNS managing the domain). One way of doing this is to add an A record for the domain, and point it to the Telecommuting Module.
Appendix A. More About SIP SIP Sessions Establishing a SIP session You start a call (a session) by sending a request to the address of the person you want to communicate with. The format of the address is , where user can be a user name or a telephone number, and host can be a domain name (e.g. example.com) or a numerical IP address (e.g. 172.15.253.12). This means that it usually looks a lot like a standard email address.
Appendix A. More About SIP 8. The Telecommuting Module checks if there is a matching row in the Dial Plan table. 9. The Telecommuting Module checks if the SIP packet Request-URI contains one of its Local SIP Domains. If so, and no match was found in the above list, the Telecommuting Module returns a SIP packet with error code 404 (Not Found) to the sender.
Appendix A. More About SIP The Telecommuting Module always rewrites the Contact when a SIP request is forwarded through. To prevent this rewriting, the URI Encoding and Preserve Username For All Requests settings can be used. Via The Via header is used to keep track of which route the SIP request was sent. The response is sent back the same route. The Via header is always rewritten by the Telecommuting Module when the SIP signaling crosses a NAT border (when the IP addresses change).
Appendix A.
Appendix B. Troubleshooting Troubleshooting the Telecommuting Module largely consists of checking the hardware (the Telecommuting Module, the network connectors, ...) and checking the Telecommuting Module log. The log is usually an excellent tool in finding out why the Telecommuting Module does not do what you wanted it to do. Below is some general advice to help you troubleshoot, almost regardless of which problem you have.
Appendix B. Troubleshooting SIP troubleshooting Before going into the different error descriptions below, check that the SIP module is turned on and the configuration applied. SIP users can’t register on the Telecommuting Module • Check that the SIP domain that the users try to register on is listed in the Local SIP Domains table. • If you do not use RADIUS authentication, check that the SIP user which tries to register is listed in the Local SIP User Database table.
Appendix B. Troubleshooting operators require the phone number to start with a "+". Contact your operator to find out the details about the dial scheme. A call is established, but there is no voice • If you use a DMZ Telecommuting Module Type, check on the Surroundings page that you have separated the clients into correct networks.
Appendix B. Troubleshooting Log Messages Here is a presentation of many common log messages that can be found in the Telecommuting Module log. In many messages, information about IP addresses, usernames and other changing parameters will be displayed in the log messages. In the listing, such information will be presented contained in angle brackets.
Appendix B. Troubleshooting Starting SIP TCP server at port 5060 This message will be shown when the SIP module is started. This can happen when you apply settings where the SIP module just has been activated, or when you boot the Telecommuting Module or after you have pressed the Restart the SIP module button on the Restart page. It means that the Telecommuting Module is now ready to receive SIP signaling over TCP.
Appendix B. Troubleshooting Configuration server logins These log messages can appear when the Configuration server logins box has been checked on the Display Log page. [] () logged on to the configuration server using local password The user logged on to the web user interface. You can also see the IP address the user came from and which privileges this user has in the web interface.
Appendix C. Lists of Reserved Ports, ICMP Types and Codes, and Internet Protocols The following lists discuss the most important ports and the server services that belong to them, and the different types of ICMP messages. Client programs usually use ports between 1024 and 65535. There are also lists over Internet protocols, reserved IP addresses and a mapping between netmasks and IP address intervals. List of the most important reserved ports This is a list of important ports.
Appendix C.
Appendix C.
Appendix C.
Appendix C.
Appendix C.
Appendix C.
Appendix C. Lists of Reserved Ports, ICMP Types and Codes, and Internet Protocols ICMP type 32 33 34 35 36 Name Code Mobile Host Redirect IPv6 Where-Are-You IPv6 I-Am-Here Mobile Registration Request Mobile Registration Reply Description Internet protocols and their numbers The following table lists common Internet protocols and their protocol numbers. All these protocols run on IP. The list is extracted from http://www.iana.org/, Protocol Numbers.
Appendix C. Lists of Reserved Ports, ICMP Types and Codes, and Internet Protocols Protocol number 47 48 50 51 53 54 61 63 64 65 66 68 69 70 75 80 84 85 86 87 88 91 92 93 94 95 97 98 99 100 115 255 Keyword GRE MHRP ESP AH SWIPE NHRP SAT-EXPAK KRYPTOLAN RVD SAT-MON VISA PVP ISO-IP TTP NSFNET-IGP DGP TCF EIGRP LARP MTP AX.
Appendix C. Lists of Reserved Ports, ICMP Types and Codes, and Internet Protocols The second table shows the IP address interval for each class. 1-set bits 0 1 2 3 4 5 6 7 8 9 10 11 12 13 14 15 16 17 18 19 20 21 22 23 24 25 26 27 28 29 30 31 32 Mask 0.0.0.0 128.0.0.0 192.0.0.0 224.0.0.0 240.0.0.0 248.0.0.0 252.0.0.0 254.0.0.0 255.0.0.0 255.128.0.0 255.192.0.0 255.224.0.0 255.240.0.0 255.248.0.0 255.252.0.0 255.254.0.0 255.255.0.0 255.255.128.0 255.255.192.0 255.255.224.0 255.255.240.0 255.255.248.0 255.
Appendix C. Lists of Reserved Ports, ICMP Types and Codes, and Internet Protocols (130.234.250.64-130.234.250.95).
Appendix C.
Appendix D. Definitions of terms AFS, Andrew File System AFS is a more secure way of distributing file systems over a network. If files are mounted over the Internet, AFS is fairly secure. Normally, AFS uses Kerberos for security management. ARP ARP, Address Resolution Protocol, is a protocol for mapping an IP address to a physical machine address in the local network. A thorough description of ARP can be found in RFC 826.
Appendix D. Definitions of terms information at boot, and gets appropriate configuration parameters from a DHCP server. A thorough description of DHCP can be found in RFC 2131. DMZ A DMZ is a computer network that is accessible from several other computer networks that have no direct contact with each other. Often, one of these networks is the Internet and the other is a local, internal network.
Appendix D. Definitions of terms Domain A domain is a country, organization, or subdivision. All countries have one top domain for the country, except for the United States, which is divided into a commercial domain (.com), a non-profit organizational domain (.org), a university domain (.edu), a military domain (.mil), a governmental domain (.gov), and a network domain (.net). All domains are hierarchical and each domain is responsible for the domains directly under it.
Appendix D. Definitions of terms server. You can also establish an area of files that are accessible to others. Anyone can log in as user anonymous and enter his email address as a password. They can then access all files in this area, but nothing else. A computer with an FTP server and a freely available area is usually called an FTP site. Gateway Gateway is an old name for a Router.
Appendix D. Definitions of terms Peter and Christy cannot know if all of their postcards will arrive, and Christy doesn’t know what order the postcards were sent in. For more information about IP addresses, see IP address. Kerberos Kerberos is a system to secure connections between several computers over networks. The Kerberos system uses a Kerberos server to manage security. Connections that go through Kerberos are often encrypted. Masquerading See NAT. Name server See DNS.
Appendix D. Definitions of terms rec.motorcycles.harley is an example of a group name. rec is the main group, Recreational, which includes hobbies, recreation and the arts. A subgroup of rec is motorcycles, which is solely about motorcycles. A subgroup of rec.motorcycles is harley, which is only about Harley Davidson motorcycles. Another example is sci.geo.geology. Anyone can post articles to News; remember that several million people may be reading what you write.
Appendix D. Definitions of terms Open Windows Open Windows is a window system that is used by several work stations. A similar window system is the X Window System, which Open Windows is based on. The X Window System and Open Windows use ports 6000 and upward for traffic to the work stations. It is a good idea to block ports 6000-6010 for incoming traffic from an unsecure outside network. Packet When something is sent over a computer network, for example, a file or an email, it is divided up into sections.
Appendix D. Definitions of terms PPP PPP is short for Point-to-Point Protocol. This is usually used to send IP packets over modem connections. See also IP. Protocols Protocols are sets of rules for how programs communicate with each other. For example, a web server can use the protocols HTTP and HTTPS. Proxy Proxies are devices through which web pages, FTP files, and so on can be retrieved for a local network.
Appendix D. Definitions of terms Server A server can be a program that performs a service on a network or a computer that runs one or more server programs. One example is a computer that stores files centrally, which makes it a kind of server, usually called a file server. The program that manages traffic so that people from the outside can access an organization’s web pages is a server program.
Appendix D. Definitions of terms Syslog Syslog is a service for logging data. In UNIX, regular programs do not log any information; they send all data to a syslog server that saves data in a log file. One example is a web server that sends data over the computers that connects to the server and sends error messages for web pages that it could not locate. Messages to a syslog server can also be sent over the network. Syslog uses the UDP protocol. A syslog server listens to port 514 for syslog messages.
Appendix D. Definitions of terms X Window System A window system that is used by several work stations. A similar window system is Open Windows. The X Window System and Open Windows uses port numbers starting at 6000 and upward for traffic to the work stations. It is a good idea to block ports 6000-6010 from incoming traffic from an insecure outside network.
Appendix D.
Appendix E. License Conditions 3Com VCX IP Telecommuting Module contains third party software that is subject to the following license agreements. To fulfill the license conditions, we must either attach the source code with the software, or send a written offer, valid at least three years, to give a copy of the source code to anyone who wants it. According to 3b) of the license, we are entitled to charge for the distribution of the source code.
Appendix E. License Conditions 1. Redistributions of source code must retain the above copyright notice, this list of conditions and the following disclaimer. 2. Redistributions in binary form must reproduce the above copyright notice, this list of conditions and the following disclaimer in the documentation and/or other materials provided with the distribution. 3. The names of the authors may not be used to endorse or promote products derived from this software without specific prior written permission.
Appendix E. License Conditions CARNEGIE MELLON UNIVERSITY DISCLAIMS ALL WARRANTIES WITH REGARD TO THIS SOFTWARE, INCLUDING ALL IMPLIED WARRANTIES OF MERCHANTABILITY AND FITNESS, IN NO EVENT SHALL CARNEGIE MELLON UNIVERSITY BE LIABLE FOR ANY SPECIAL, INDIRECT OR CONSEQUENTIAL DAMAGES OR ANY DAMAGES WHATSOEVER RESULTING FROM LOSS OF USE, DATA OR PROFITS, WHETHER IN AN ACTION OF CONTRACT, NEGLIGENCE OR OTHER TORTIOUS ACTION, ARISING OUT OF OR IN CONNECTION WITH THE USE OR PERFORMANCE OF THIS SOFTWARE.
Appendix E. License Conditions • Neither the name of the Cisco Systems, Inc. nor the names of its contributors may be used to endorse or promote products derived from this software without specific prior written permission. THIS SOFTWARE IS PROVIDED BY THE COPYRIGHT HOLDERS AND CONTRIBUTORS "AS IS" AND ANY EXPRESS OR IMPLIED WARRANTIES, INCLUDING, BUT NOT LIMITED TO, THE IMPLIED WARRANTIES OF MERCHANTABILITY AND FITNESS FOR A PARTICULAR PURPOSE ARE DISCLAIMED.
Appendix E. License Conditions The DHCP license Terms Copyright (c) 1995 RadioMail Corporation. Copyright (c) 2004-2007 by Internet Systems Consortium, Inc. ("ISC") Copyright (c) 1995-2003 by Internet Software Consortium Permission to use, copy, modify, and distribute this software for any purpose with or without fee is hereby granted, provided that the above copyright notice and this permission notice appear in all copies.
Appendix E. License Conditions ANY DIRECT, INDIRECT, INCIDENTAL, SPECIAL, EXEMPLARY, OR CONSEQUENTIAL DAMAGES (INCLUDING, BUT NOT LIMITED TO, PROCUREMENT OF SUBSTITUTE GOODS OR SERVICES; LOSS OF USE, DATA, OR PROFITS; OR BUSINESS INTERRUPTION) HOWEVER CAUSED AND ON ANY THEORY OF LIABILITY, WHETHER IN CONTRACT, STRICT LIABILITY, OR TORT (INCLUDING NEGLIGENCE OR OTHERWISE) ARISING IN ANY WAY OUT OF THE USE OF THIS SOFTWARE, EVEN IF ADVISED OF THE POSSIBILITY OF SUCH DAMAGE.
Appendix E. License Conditions Modules under this license openswan-kernel 2.4.9 Software developed by Google, Inc Terms By Frank Cusack . Copyright (c) 2002 Google, Inc. All rights reserved. Permission to use, copy, modify, and distribute this software and its documentation is hereby granted, provided that the above copyright notice appears in all copies. This software is provided without any warranty, express or implied. Modules under this license ppp 2.4.
Appendix E. License Conditions We protect your rights with two steps: (1) copyright the software, and (2) offer you this license which gives you legal permission to copy, distribute and/or modify the software. Also, for each author’s protection and ours, we want to make certain that everyone understands that there is no warranty for this free software.
Appendix E. License Conditions b) You must cause any work that you distribute or publish, that in whole or in part contains or is derived from the Program or any part thereof, to be licensed as a whole at no charge to all third parties under the terms of this License.
Appendix E. License Conditions used to control compilation and installation of the executable. However, as a special exception, the source code distributed need not include anything that is normally distributed (in either source or binary form) with the major components (compiler, kernel, and so on) of the operating system on which the executable runs, unless that component itself accompanies the executable.
Appendix E. License Conditions of that system; it is up to the author/donor to decide if he or she is willing to distribute software through any other system and a licensee cannot impose that choice. This section is intended to make thoroughly clear what is believed to be a consequence of the rest of this License. 8.
Appendix E. License Conditions THE USE OR INABILITY TO USE THE PROGRAM (INCLUDING BUT NOT LIMITED TO LOSS OF DATA OR DATA BEING RENDERED INACCURATE OR LOSSES SUSTAINED BY YOU OR THIRD PARTIES OR A FAILURE OF THE PROGRAM TO OPERATE WITH ANY OTHER PROGRAMS), EVEN IF SUCH HOLDER OR OTHER PARTY HAS BEEN ADVISED OF THE POSSIBILITY OF SUCH DAMAGES. END OF TERMS AND CONDITIONS Modules under this license bash 2.05b busybox 1.8.3 coreutils 4.5.3 cpio 2.5 diffutils 2.8.1 dmiwriter 2.8 e2fsprogs 1.32 ed 0.
Appendix E. License Conditions PERFORMANCE OF THIS SOFTWARE, EVEN IF IBM IS APPRISED OF THE POSSIBILITY OF SUCH DAMAGES. Modules under this license DHCP 3.0.6 Software developed by Ingate Systems Terms Copyright(c) 2005 Ingate Systems AB All rights reserved.
Appendix E. License Conditions Copyright (c) 1998, 1999 , GIE DYADE, , IMAG, , IMAG-LSR. Ce travail a été fait au sein du GIE DYADE (Groupement d’Intérêt Économique ayant pour membres BULL S.A. et l’INRIA).
Appendix E. License Conditions 1. Redistributions of source code must retain the above copyright notice, this list of conditions and the following disclaimer. 2. Redistributions in binary form must reproduce the above copyright notice, this list of conditions and the following disclaimer in the documentation and/or other materials provided with the distribution. 3.
Appendix E. License Conditions share and change free software--to make sure the software is free for all its users. This license, the Library General Public License, applies to some specially designated Free Software Foundation software, and to any other libraries whose authors decide to use it. You can use it for your libraries, too. When we speak of free software, we are referring to freedom of use, not price.
Appendix E. License Conditions However, unrestricted linking of non-free programs would deprive the users of those programs of all benefit from the free status of the libraries themselves. This Library General Public License is intended to permit developers of non-free programs to use free libraries, while preserving your freedom as a user of such programs to change the free libraries that are incorporated in them.
Appendix E. License Conditions intact all the notices that refer to this License and to the absence of any warranty; and distribute a copy of this License along with the Library. You may charge a fee for the physical act of transferring a copy, and you may at your option offer warranty protection in exchange for a fee. 2.
Appendix E. License Conditions GNU General Public License has appeared, then you can specify that version instead if you wish.) Do not make any other change in these notices. Once this change is made in a given copy, it is irreversible for that copy, so the ordinary GNU General Public License applies to all subsequent copies and derivative works made from that copy. This option is useful when you wish to copy part of the code of the Library into a program that is not a library. 4.
Appendix E. License Conditions distribute that work under terms of your choice, provided that the terms permit modification of the work for the customer’s own use and reverse engineering for debugging such modifications. You must give prominent notice with each copy of the work that the Library is used in it and that the Library and its use are covered by this License. You must supply a copy of this License.
Appendix E. License Conditions a. Accompany the combined library with a copy of the same work based on the Library, uncombined with any other library facilities. This must be distributed under the terms of the Sections above. b. Give prominent notice with the combined library of the fact that part of it is a work based on the Library, and explaining where to find the accompanying uncombined form of the same work. 8.
Appendix E. License Conditions This section is intended to make thoroughly clear what is believed to be a consequence of the rest of this License. 12.
Appendix E. License Conditions THE LIBRARY TO OPERATE WITH ANY OTHER SOFTWARE), EVEN IF SUCH HOLDER OR OTHER PARTY HAS BEEN ADVISED OF THE POSSIBILITY OF SUCH DAMAGES. END OF TERMS AND CONDITIONS Modules under this license coreutils 4.5.3 gmp 4.1.2 libtermcap 2.0.8 cpio 2.5 grep 2.5.1 pptpd 1.3.4 e2fsprogs 1.32 iputils 20020927 procps 2.0.11 GNU Lesser General Public License (LGPL) v 2.1 Version 2.1, February 1999 Copyright (C) 1991, 1999 Free Software Foundation, Inc.
Appendix E. License Conditions changes to the library and recompiling it. And you must show them these terms so they know their rights. We protect your rights with a two-step method: (1) we copyright the library, and (2) we offer you this license, which gives you legal permission to copy, distribute and/or modify the library. To protect each distributor, we want to make it very clear that there is no warranty for the free library.
Appendix E. License Conditions the library". The former contains code derived from the library, whereas the latter must be combined with the library in order to run. GNU LESSER GENERAL PUBLIC LICENSE This License Agreement applies to any software library or other program which contains a notice placed by the copyright holder or other authorized party saying it may be distributed under the terms of this Lesser General Public License (also called "this License"). Each licensee is addressed as "you".
Appendix E. License Conditions b) You must cause the files modified to carry prominent notices stating that you changed the files and the date of any change. c) You must cause the whole of the work to be licensed at no charge to all third parties under the terms of this License.
Appendix E. License Conditions which must be distributed under the terms of Sections 1 and 2 above on a medium customarily used for software interchange. If distribution of object code is made by offering access to copy from a designated place, then offering equivalent access to copy the source code from the same place satisfies the requirement to distribute the source code, even though third parties are not compelled to copy the source along with the object code. 5.
Appendix E. License Conditions code and/or source code, so that the user can modify the Library and then relink to produce a modified executable containing the modified Library. (It is understood that the user who changes the contents of definitions files in the Library will not necessarily be able to recompile the application to use the modified definitions.) b) Use a suitable shared library mechanism for linking with the Library.
Appendix E. License Conditions under this License. However, parties who have received copies, or rights, from you under this License will not have their licenses terminated so long as such parties remain in full compliance. 9. You are not required to accept this License, since you have not signed it. However, nothing else grants you permission to modify or distribute the Library or its derivative works. These actions are prohibited by law if you do not accept this License.
Appendix E. License Conditions 13. The Free Software Foundation may publish revised and/or new versions of the Lesser General Public License from time to time. Such new versions will be similar in spirit to the present version, but may differ in detail to address new problems or concerns. Each version is given a distinguishing version number.
Appendix E. License Conditions Software in the GNU C distribution Terms This file contains the copying permission notices for various files in the GNU C Library distribution that have copyright owners other than the Free Software Foundation. These notices all require that a copy of the notice be included in the accompanying documentation and be distributed with binary distributions of the code, so be sure to include this file along with any binary distributions derived from the GNU C Library.
Appendix E. License Conditions THE SOFTWARE IS PROVIDED "AS IS" AND DIGITAL EQUIPMENT CORP. DISCLAIMS ALL WARRANTIES WITH REGARD TO THIS SOFTWARE, INCLUDING ALL IMPLIED WARRANTIES OF MERCHANTABILITY AND FITNESS.
Appendix E. License Conditions Software Distribution Coordinator School of Computer Science Carnegie Mellon University Pittsburgh PA 15213-3890 or Software.Distribution@CS.CMU.EDU any improvements or extensions that they make and grant Carnegie Mellon the rights to redistribute these changes. The file if_ppp.h is under the following CMU license: Redistribution and use in source and binary forms, with or without modification, are permitted provided that the following conditions are met: 1.
Appendix E. License Conditions • The name of Intel Corporation may not be used to endorse or promote products derived from this software without specific prior written permission. THIS SOFTWARE IS PROVIDED BY THE COPYRIGHT HOLDERS AND CONTRIBUTORS "AS IS" AND ANY EXPRESS OR IMPLIED WARRANTIES, INCLUDING, BUT NOT LIMITED TO, THE IMPLIED WARRANTIES OF MERCHANTABILITY AND FITNESS FOR A PARTICULAR PURPOSE ARE DISCLAIMED.
Appendix E. License Conditions BILITY, OR TORT (INCLUDING NEGLIGENCE OR OTHERWISE) ARISING IN ANY WAY OUT OF THE USE OF THIS SOFTWARE, EVEN IF ADVISED OF THE POSSIBILITY OF SUCH DAMAGE. If these license terms cause you a real problem, contact the author. Modules under this license glibc 2.3.3 More software in the GNU C distribution Terms The include/err.h and src/err.c files contain this license: Copyright (c) 2000 Dug Song
Appendix E. License Conditions src/strsep.c contains the same notice, but with no copyright claim of Dug Song. src/strlcat.c and src/strlcpy.c uses this license: Copyright (c) 1998 Todd C. Miller All rights reserved. Redistribution and use in source and binary forms, with or without modification, are permitted provided that the following conditions are met: 1.
Appendix E. License Conditions DIRECT, INCIDENTAL, SPECIAL, EXEMPLARY, OR CONSEQUENTIAL DAMAGES (INCLUDING, BUT NOT LIMITED TO, PROCUREMENT OF SUBSTITUTE GOODS OR SERVICES; LOSS OF USE, DATA, OR PROFITS; OR BUSINESS INTERRUPTION) HOWEVER CAUSED AND ON ANY THEORY OF LIABILITY, WHETHER IN CONTRACT, STRICT LIABILITY, OR TORT (INCLUDING NEGLIGENCE OR OTHERWISE) ARISING IN ANY WAY OUT OF THE USE OF THIS SOFTWARE, EVEN IF ADVISED OF THE POSSIBILITY OF SUCH DAMAGE. src/fw-pktfilter.
Appendix E. License Conditions License exceptions for libstdc++ Terms libstdc++ comes with the following so called "runtime exception" to GPLv2: As a special exception, you may use this file as part of a free software library without restriction.
Appendix E. License Conditions BILITY, OR TORT (INCLUDING NEGLIGENCE OR OTHERWISE) ARISING IN ANY WAY OUT OF THE USE OF THIS SOFTWARE, EVEN IF ADVISED OF THE POSSIBILITY OF SUCH DAMAGE. (Note: The above license is copied from the BSD license at: http://www.opensource.org/licenses/bsd-license.html, substituting the appropriate references in the template.) Modules under this license lilo 22.7.3 Software developed by Paul Mackerras Terms Copyright (c) 1984, 1989-2002 Paul Mackerras. All rights reserved.
Appendix E. License Conditions Software developed by Pedro Roque Marques Terms Copyright (c) 1995 Pedro Roque Marques. All rights reserved. Redistribution and use in source and binary forms, with or without modification, are permitted provided that the following conditions are met: 1. Redistributions of source code must retain the above copyright notice, this list of conditions and the following disclaimer. 2.
Appendix E. License Conditions e2fsprogs 1.32 License for Net-SNMP Terms Various copyrights apply to this package, listed in various separate parts below. Please make sure that you read all the parts.
Appendix E. License Conditions THIS SOFTWARE IS PROVIDED BY THE COPYRIGHT HOLDERS AND CONTRIBUTORS "AS IS" AND ANY EXPRESS OR IMPLIED WARRANTIES, INCLUDING, BUT NOT LIMITED TO, THE IMPLIED WARRANTIES OF MERCHANTABILITY AND FITNESS FOR A PARTICULAR PURPOSE ARE DISCLAIMED.
Appendix E. License Conditions Sun, Sun Microsystems, the Sun logo and Solaris are trademarks or registered trademarks of Sun Microsystems, Inc. in the U.S. and other countries. Redistribution and use in source and binary forms, with or without modification, are permitted provided that the following conditions are met: • Redistributions of source code must retain the above copyright notice, this list of conditions and the following disclaimer.
Appendix E. License Conditions INDIRECT, INCIDENTAL, SPECIAL, EXEMPLARY, OR CONSEQUENTIAL DAMAGES (INCLUDING, BUT NOT LIMITED TO, PROCUREMENT OF SUBSTITUTE GOODS OR SERVICES; LOSS OF USE, DATA, OR PROFITS; OR BUSINESS INTERRUPTION) HOWEVER CAUSED AND ON ANY THEORY OF LIABILITY, WHETHER IN CONTRACT, STRICT LIABILITY, OR TORT (INCLUDING NEGLIGENCE OR OTHERWISE) ARISING IN ANY WAY OUT OF THE USE OF THIS SOFTWARE, EVEN IF ADVISED OF THE POSSIBILITY OF SUCH DAMAGE.
Appendix E. License Conditions • Redistributions in binary form must reproduce the above copyright notice, this list of conditions and the following disclaimer in the documentation and/or other materials provided with the distribution. • The name of Fabasoft R&D Software GmbH & Co KG or any of its subsidiaries, brand or product names may not be used to endorse or promote products derived from this software without specific prior written permission.
Appendix E. License Conditions that. OpenSSH contains no GPL code. 1. Copyright (c) 1995 Tatu Ylonen , Espoo, Finland All rights reserved As far as I am concerned, the code I have written for this software can be used freely for any purpose. Any derived versions of this software must be clearly marked as such, and if the derived work is incompatible with the protocol description in the RFC file, it must be called by a name other than "ssh" or "Secure Shell".
Appendix E. License Conditions CABLE LAW. EXCEPT WHEN OTHERWISE STATED IN WRITING THE COPYRIGHT HOLDERS AND/OR OTHER PARTIES PROVIDE THE PROGRAM "AS IS" WITHOUT WARRANTY OF ANY KIND, EITHER EXPRESSED OR IMPLIED, INCLUDING, BUT NOT LIMITED TO, THE IMPLIED WARRANTIES OF MERCHANTABILITY AND FITNESS FOR A PARTICULAR PURPOSE. THE ENTIRE RISK AS TO THE QUALITY AND PERFORMANCE OF THE PROGRAM IS WITH YOU. SHOULD THE PROGRAM PROVE DEFECTIVE, YOU ASSUME THE COST OF ALL NECESSARY SERVICING, REPAIR OR CORRECTION.
Appendix E. License Conditions Optimised ANSI C code for the Rijndael cipher (now AES) @author Vincent Rijmen @author Antoon Bosselaers @author Paulo Barreto This code is hereby placed in the public domain.
Appendix E. License Conditions WHETHER IN CONTRACT, STRICT LIABILITY, OR TORT (INCLUDING NEGLIGENCE OR OTHERWISE) ARISING IN ANY WAY OUT OF THE USE OF THIS SOFTWARE, EVEN IF ADVISED OF THE POSSIBILITY OF SUCH DAMAGE. 6.
Appendix E. License Conditions OR IMPLIED WARRANTIES, INCLUDING, BUT NOT LIMITED TO, THE IMPLIED WARRANTIES OF MERCHANTABILITY AND FITNESS FOR A PARTICULAR PURPOSE ARE DISCLAIMED.
Appendix E. License Conditions list of conditions and the following disclaimer in the documentation and/or other materials provided with the distribution. c. Neither the name of the University nor the names of its contributors may be used to endorse or promote products derived from this software without specific prior written permission.
Appendix E. License Conditions to do so, subject to the following conditions: The above copyright notice and this permission notice shall be included in all copies or substantial portions of the Software. THE SOFTWARE IS PROVIDED "AS IS", WITHOUT WARRANTY OF ANY KIND, EXPRESS OR IMPLIED, INCLUDING BUT NOT LIMITED TO THE WARRANTIES OF MERCHANTABILITY, FITNESS FOR A PARTICULAR PURPOSE AND NONINFRINGEMENT.
Appendix E. License Conditions 5. Products derived from this software may not be called "OpenSSL" nor may "OpenSSL" appear in their names without prior written permission of the OpenSSL Project. 6. Redistributions of any form whatsoever must retain the following acknowledgment: "This product includes software developed by the OpenSSL Project for use in the OpenSSL Toolkit (http://www.openssl.
Appendix E. License Conditions Modules under this license openswan 2.4.13 The Python license A. HISTORY OF THE SOFTWARE Python was created in the early 1990s by Guido van Rossum at Stichting Mathematisch Centrum (CWI, see http://www.cwi.nl/) in the Netherlands as a successor of a language called ABC. Guido remains Python’s principal author, although it includes many contributions from others.
Appendix E. License Conditions Release 2.3.3 2.3.4 2.3.5 2.3.6 Footnotes: Derived from 2.3.2 2.3.3 2.3.4 2.3.5 Year Owner 2002-2003 2004 2004-2005 2006 PSF PSF PSF PSF GPL- compatible? (1) yes yes yes yes (1) GPL-compatible doesn’t mean that we’re distributing Python under the GPL. All Python licenses, unlike the GPL, let you distribute a modified version without making your changes open source.
Appendix E. License Conditions 5. PSF SHALL NOT BE LIABLE TO LICENSEE OR ANY OTHER USERS OF PYTHON 2.3 FOR ANY INCIDENTAL, SPECIAL, OR CONSEQUENTIAL DAMAGES OR LOSS AS A RESULT OF MODIFYING, DISTRIBUTING, OR OTHERWISE USING PYTHON 2.3, OR ANY DERIVATIVE THEREOF, EVEN IF ADVISED OF THE POSSIBILITY THEREOF. 6. This License Agreement will automatically terminate upon a material breach of its terms and conditions. 7.
Appendix E. License Conditions sion to use BeOpen trademarks or trade names in a trademark sense to endorse or promote products or services of Licensee, or any third party. As an exception, the "BeOpen Python" logos available at http://www.pythonlabs.com/logos.html may be used according to the permissions granted on that web page. 7. By copying, installing or otherwise using the software, Licensee agrees to be bound by the terms and conditions of this License Agreement. CNRI LICENSE AGREEMENT FOR PYTHON 1.
Appendix E. License Conditions extent such U.S. federal law does not apply, by the law of the Commonwealth of Virginia, excluding Virginia’s conflict of law provisions. Notwithstanding the foregoing, with regard to derivative works based on Python 1.6.
Appendix E.
Appendix E. License Conditions 94043 Modules under this license iputils 20020927 Software developed by RSA Data Security, Inc Terms Copyright (C) 1991-2, RSA Data Security, Inc. Created 1991. All rights reserved. License to copy and use this software is granted provided that it is identified as the "RSA Data Security, Inc. MD5 Message-Digest Algorithm" in all material mentioning or referencing this software or this function.
Appendix E. License Conditions Modules under this license ppp 2.4.2_20030503 License for SSL Terms Copyright (C) 1995-1998 Eric Young () All rights reserved. This package is an SSL implementation written by Eric Young (). The implementation was written so as to conform with Netscapes SSL. This library is free for commercial and non-commercial use as long as the following conditions are aheared to.
Appendix E. License Conditions MENT OF SUBSTITUTE GOODS OR SERVICES; LOSS OF USE, DATA, OR PROFITS; OR BUSINESS INTERRUPTION) HOWEVER CAUSED AND ON ANY THEORY OF LIABILITY, WHETHER IN CONTRACT, STRICT LIABILITY, OR TORT (INCLUDING NEGLIGENCE OR OTHERWISE) ARISING IN ANY WAY OUT OF THE USE OF THIS SOFTWARE, EVEN IF ADVISED OF THE POSSIBILITY OF SUCH DAMAGE. The licence and distribution terms for any publically available version or derivative of this code cannot be changed. i.e.
Appendix E. License Conditions Modules under this license ppp 2.4.2_20030503 More software developed by Sun Microsystems, Inc Terms Copyright (c) 2001 by Sun Microsystems, Inc. All rights reserved.
Appendix E. License Conditions Mountain View, California 94043 Modules under this license openssl 0.9.7a rpc License for termcap COPYRIGHTS AND OTHER DELUSIONS The BSD ancestor of this file had a standard Regents of the University of California copyright with dates from 1980 to 1993. Some information has been merged in from a terminfo file SCO distributes.
Appendix E. License Conditions ARISING OUT OF OR IN CONNECTION WITH THE USE OR PERFORMANCE OF THE SOFTWARE. Modules under this license DHCP 3.0.6 Software developed by Andrew Tridgell Terms Copyright (C) Andrew Tridgell 1999 Redistribution and use in source and binary forms are permitted provided that the above copyright notice and this paragraph are duplicated in all such forms AND provided that this software or any derived work is only used as part of the PPP daemon (pppd) and related utilities.
Appendix E. License Conditions Vovida Software License v 1.0 The Vovida Software License, Version 1.0 Copyright (c) 2000 Vovida Networks, Inc. All rights reserved. Redistribution and use in source and binary forms, with or without modification, are permitted provided that the following conditions are met: 1. Redistributions of source code must retain the above copyright notice, this list of conditions and the following disclaimer. 2.
Appendix E. License Conditions Used in ntp by permission of the author. If copyright is annoying to you, read no further. Instead, look up the reference, write me an equivalent to this and send it back to me. Modules under this license ntp 4.1.2 License for zlib Terms (C) 1995-2002 Jean-loup Gailly and Mark Adler This software is provided ’as-is’, without any express or implied warranty. In no event will the authors be held liable for any damages arising from the use of this software.
Appendix E. License Conditions Copyright (c) 1989 The Regents of the University of California. All rights reserved. This code is derived from software contributed to Berkeley by Paul Vixie. vixie-cron 3.0.
Appendix E. License Conditions Copyright (c) 1987, 1989 Regents of the University of California. All rights reserved. This code is derived from software contributed to Berkeley by Arthur David Olson of the National Cancer Institute. ntp 4.1.2 Copyright (c) 1990, 1993 The Regents of the University of California. All rights reserved. This code is derived from software contributed to Berkeley by Chris Torek. arpwatch 2.1a13 libdnet 1.11 ntp 4.1.
Appendix E. License Conditions WAY OUT OF THE USE OF THIS SOFTWARE, EVEN IF ADVISED OF THE POSSIBILITY OF SUCH DAMAGE. There are several licenses with the same terms, but different copyright notices. For each copyright notice, the modules under that license are listed. Below are the terms common for all these licenses. Copyright (c) 2002 Google, Inc. All rights reserved. ppp 2.4.2_20030503 Copyright (c) 1995 Eric Rosenquist. All rights reserved. ppp 2.4.
Appendix E. License Conditions readlink 1.18 Terms Redistribution and use in source and binary forms, with or without modification, are permitted provided that the following conditions are met: 1. Redistributions of source code must retain the above copyright notice, this list of conditions and the following disclaimer. 2.
Appendix E.
Appendix F. Obtaining Support for Your 3Com Products 3Com offers product registration, case management, and repair services through eSupport.3com.com. You must have a user name and password to access these services, which are described in this appendix. Register Your Product to Gain Service Benefits To take advantage of warranty and other service benefits, you must first register your product at: http://www.3com.
Appendix F. Obtaining Support for Your 3Com Products Access Software Downloads You are entitled to bug fix / maintenance releases for the version of software that you initially purchased with your 3Com product. To obtain access to this software, you need to register your product and then use the Serial Number as your login. Restricted Software is available at: http://www.3com.
Appendix F. Obtaining Support for Your 3Com Products Country Australia Hong Kong Telephone Number 1 800 678 515 800 933 486 Country Pakistan Philippines India +61 2 9424 5179 or P.R. of China 000800 650 1111 Indonesia 001 803 61009 Singapore Japan 00531 616 439 or 03 S.
Appendix F.
Index accounts for administration, 108 administration, 107 AFS, 347 alarm, 137 e-mail errors, 150 hardware errors, 150 RADIUS errors, 150 SNMP errors, 150 Andrew File System, 347 apply configuration, 21, 103 ARP, 347 authentication of administrator, 78 SIP, 192 via RADIUS, 82, 193 backup, 22, 104 Basic configuration SIP, 159 via serial console, 230 billing, 195 broadcast, 347 cache, 354 capture log, 217 certificates, 95 signed, 96 change password, 107, 235 via serial console, 230 clear log, 137 CLI, 2
flags, 144 FTP, 349 functions in 3Com VCX IP Telecommuting Module, 1 gateway, 122, 350 GNU, 359 GPL, 365 H.
NTP, 115, 352 Open Windows, 353 P-Asserted-Identity, 194 packet, 353 log selection, 138 password, 17 change, 107, 235 pcap log, 217 permanent apply, 21 permanent configuration, 5, 21 physical device name, 124 ping, 353 from the Telecommuting Module, 220 ping policy, 76 port interval for media streams, 161 ports, 335, 353 PPP, 354 PPPoE, 132 logging, 132 preliminary configuration, 5, 21 protocol numbers, 342 protocols, 342, 354 log selection, 139 proxy, 354 RADIUS, 82 accounting, 195 authentication, 82
status, 216 SLIP, 355 SLIRP, 355 SMTP, 355 sniffing, 217 SNMP, 86, 355 MIBs, 91 SNMP requests logging, 150 sockets, 355 SRV entry, 324 SSH, 355 SSL, 355 standalone type, 101 configuration of DNS server, 226 configuration of SIP clients, 226 standardnätsluss, 122 static routing, 127, 355 STUN server, 182 subgroup networks, 120 surroundings, 133 syslog, 154, 356 syslog server, 156 table look, 111 TCP, 356 Telecommuting Module functions, 1 Telecommuting Module name, 75 Telecommuting Module Type configurat