User Guide
Copyright Information The only warranties for Hewlett-Packard products and services are set forth in the express statements accompanying such products and services. Nothing herein should be construed as constituting an additional warranty. HP shall not be liable for technical or editorial errors or omissions contained herein. HP assumes no responsibility for the use or reliability of its software on equipment that is not furnished by HP.
Table of Contents Finding HP TouchSmart PC Information ........................................................................................... vi Welcome ......................................................................................................................1 Features .......................................................................................................................................1 Cables and accessories.................................................................
Connecting a Printer ....................................................................................................................22 Connecting a printer that has a parallel port..............................................................................22 Power Settings ............................................................................................................................23 Adjusting Screen Display ...............................................................................
HP TouchSmart Notes ..................................................................................................................41 Handwritten or typed notes......................................................................................................41 Voice notes............................................................................................................................41 Deleting notes ...........................................................................................
Finding HP TouchSmart PC Information Type of information Where to find Set up your HP TouchSmart PC. Setup poster How-to videos about using HP TouchSmart features. On the HP TouchSmart home page, tap the Tutorials tile to open it, and then tap a tutorial to view it. Or, visit www.hp.com/supportvideos (English only) Hardware features. User Guide (this guide) Connect to the Internet. HP TouchSmart and other software. Connect a television signal. Recover factory settings.
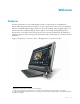
Welcome Features The HP TouchSmart PC is a touch-enabled high-performance computer built into a high-definition* 50.8-cm (20-in) diagonal widescreen display.** The slim computer offers features such as an adjustable webcam, a CD/DVD and Blu-ray player and burner, Bluetooth capability, ambient lighting, USB ports, a media card reader, a BrightView display, Wireless 802.11n networking, and high-quality speakers. The interactive screen makes wall mounting a good choice for the HP TouchSmart PC.
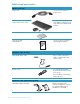
Cables and accessories What’s in the box Power cord Use to connect computer to power source. Keyboard and mouse (wireless option shown with receiver) Use to control some functions and software, instead of using touch. Batteries installed (select models). Cleaning cloth Use to clean the touch screen. Setup poster and documentation Use to set up your computer and navigate its features.
Cables not included but that may be required Ethernet (LAN) cable Use to connect to a wired network. Coaxial cable Use to connect to an Internet connection with a cable modem, or to connect the TV signal source to the computer. Connector type may vary. S-Video cable Use to connect the TV signal source to the computer from a set-top box. Audio/video composite cable Use to connect the TV signal from a set-top box.
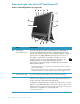
Front and right side of the HP TouchSmart PC Features and configurations vary by model E D C D E F B G A H L A K J I Item Description LCD display optimized for touch State-of-the-art 50.8-cm (20-in) diagonal widescreen high-definition display with HP BrightView technology.* HP BrightView technology improves the contrast and clarity of your display. In addition, it boasts a high resolution of 1600 x 900 and a fast response time of 5 ms.
Item Description (continued) D Microphone array Use the built-in digital microphone array to record sound for your webcam videos, and to use instant messenger or chat software to have video chats online. The microphone is designed to provide a clean sound by filtering out ambient noise in your environment. It is designed to record from a distance of up to one-half meter (2 feet) away from the computer.
Left side of the HP TouchSmart PC Features and configurations vary by model A B C D E Item Function A Volume and mute controls Adjust the sound level up or down, or mute the sound. B Ambient Light button (select models only) The HP TouchSmart Ambient Light casts a glow from the computer base. Ambient Light is turned off by default. Turn the Ambient Light on or off by pressing the Ambient Light button.
Back of the HP TouchSmart PC Features and configurations vary by model C D E B F A G K J I H Item Function A Security lock slot Insert a security lock (sold separately), which enables you to secure your computer from theft and unwanted changes. B Gigabit Ethernet LAN (10/100/1G) Connect to the Internet through your wired network. C USB 2.0 ports (3) Connect USB devices (USB 2.0) such as printers, external hard disk drives, digital cameras, and MP3 players.
K Item Function (continued) S-Video In (TV tuner models only) Capture analog video from a video camera, or connect to a set-top box for TV input. Activity LED indicator lights B A C D G E F The following are the activity indicator light-emitting diodes (LEDs) on your HP TouchSmart PC: LED What it does A Webcam Indicates webcam activity. B Power Indicates the power state: blue indicates power on, and amber indicates Sleep mode. C Optical disc drive Indicates optical disc drive is in use.
Connecting the Power Source Route the power cord through the opening in the computer stand and plug the power cord directly into the back of the computer. Plug the power cord into an AC power source through a surge protector/uninterruptible power supply (UPS). Cable Management The HP TouchSmart PC includes an easy-to-use cable-management feature; all cables connected at the back of the computer are routed through the opening in the computer stand.
Computer Stand The HP TouchSmart PC is shipped with the computer stand secured against the back of the computer. To assure that the computer is in a stable position on your desktop, pull the computer stand open. Then, if you want to change the angle of the HP TouchSmart PC, hold each side of the computer and tilt it back to an angle of between 5 degrees and 40 degrees from the vertical. 5° min.
Computer Swivel The computer allows a usable range of motion with the swivel feature. Wireless Keyboard and Mouse Select models only Your wireless keyboard and mouse are easy to set up. Just remove the battery tabs from both the keyboard and the mouse. Also, make sure the Power switch on the bottom of the mouse is in the On position (the keyboard does not have a Power switch). Then, turn on the computer.
Synchronizing the wireless keyboard or mouse The wireless keyboard and mouse are pre-synchronized, for your convenience, to work with your HP TouchSmart PC. The keyboard and mouse should work immediately after you pull the battery tabs to activate the preinstalled batteries, and then turn on the mouse (A). You may need to manually synchronize the wireless keyboard or mouse if they are not functioning.
Ambient Light Select models only The HP TouchSmart Ambient Light casts a cool white glow from the base of the computer. By default, the Ambient Light is turned off when you turn on the computer. Press the Ambient Light button on the left side of the computer to turn the Ambient Light on. Adding Hardware and Software HP TouchSmart PCs may not be compatible with all of the software you install or all of the hardware you add. Make sure your hardware and software are compatible with the operating system.
Connecting to the Internet Your HP TouchSmart PC is designed to support a wireless (select models only) or wired LAN that connects your computer to other devices, such as printers and other PCs. The network connection to the Internet is usually through a broadband modem (digital subscriber line [DSL] or cable), which requires a separate subscription. For a wireless LAN, the HP TouchSmart PC includes a built-in wireless LAN antenna, which you can use to access your wireless home network.
Wired home network First-time wired network installation requires that you: 1 Purchase high-speed Internet service from an Internet service provider (ISP). 2 Purchase a broadband modem (DSL or cable). This may be provided by the ISP. 3 Purchase and install a wired router (sold separately), if one is required. NOTE: Broadband modem and router installation procedures vary, depending on the manufacturer. Follow the manufacturer’s instructions.
Bluetooth Devices Select models only Some models of the HP TouchSmart PC are Bluetooth-enabled, so that you can connect all kinds of Bluetooth-enabled wireless devices. Bluetooth devices create a personal area network (PAN), which connects other Bluetooth devices, such as computers, phones, printers, headsets, speakers, and cameras. In a PAN, each device communicates directly with the other devices, and the devices must be relatively close together.
Connecting the TV signal source to the computer Select models only WARNING: Please read “Additional Safety Information” in the Limited Warranty and Support Guide before installing and connecting your HP TouchSmart PC to the electrical power system. To connect a TV signal to the computer, your computer needs a TV tuner, which is included with select models only. You also may need to purchase some cables separately.
Using a set-top box with Windows Media Center (optional step) Sold separately Refer to your set-top box documentation for more details. 1 Connect an S-Video cable to the S-Video In connector (A), located at the back of the computer behind the connector cover. Connect the other end of the cable to your set-top box. A B You may need a composite video to S-Video adapter (sold separately) to connect the set-top box Video Out to the S-Video In connector (A). .
The IR emitter cable is a remote control sensing device that connects to the computer and covers the remote sensor on a set-top box. When you are selecting TV channels in Windows Media Center, it enables the remote control to work with your set-top box. C D A E B 1 Connect the IR emitter cable (A) to the IR Out connector (D) on the back of the computer.
Sound Options Your HP TouchSmart PC supports the following speaker options: Built-in analog stereo speakers Analog 2.0 or 2.1 powered speakers Digital 3.1, 4.1, or 5.1 powered speakers Audio receiver Headphones NOTES: The HP TouchSmart PC supports powered speaker systems only. Powered speakers require a separate power supply.
To enable digital speakers or an audio receiver, use the SoundMAX software that came with the computer: 1 Tap the SoundMAX icon on the taskbar. 2 Tap the Volume button. 3 In the SPDIF area, select the Default button. 4 Configure the sound to your preferences by using the SoundMAX Listening Experience, Recording Experience, and Advanced buttons. NOTE: To switch back to the internal speakers after the digital speakers are enabled, select the Default button in the Internal Speakers area.
Configuring sound for Windows Media Center After you have installed, connected, and configured the speakers, configure audio output for Windows Media Center: 1 Tap the Start button. 2 Tap Windows Media Center. 3 Follow the directions for setting up sound, and tap Finish when done. Headphones Use your headphones by connecting them to the headphones connector on the left side of the computer. When the headphones connector is being used, the internal speakers and Line Out are muted.
Power Settings Basic power settings help conserve energy or enhance computer performance. You can also customize power settings for your computer hardware. For example, you can set your computer to go to sleep after a specified period of inactivity. If the computer is in Sleep mode, it “wakes up,” or re-loads faster than when in Hibernate mode, but your data is less safe. If, for example, a power outage occurs in Sleep mode, unsaved data would be lost.
To turn off the monitor from the keyboard: Press the Fn key and simultaneously press the F9 key to turn off the monitor if you are leaving for some time. The computer continues to run; this is a power-saving feature. Press Fn + F9 again to turn the monitor on again. Installing a Security Lock A security lock (sold separately) enables you to secure your computer from theft and unwanted changes. A security lock is a key lock device that has a wire cable attached.
Cleaning the HP TouchSmart PC Screen Before cleaning the touch screen, you must disable it by turning off the computer. If the computer is not turned off, the touch screen is enabled, and you could lose data while cleaning it. For optimal touch performance, the HP TouchSmart PC screen requires periodic cleaning to remove any particles on the sides and surface of the screen. The touch screen has a glass surface that can be cleaned by using the cleaning cloth that came with your HP TouchSmart PC.
The following graphic shows correct body and monitor positioning: The following graphic shows incorrect usage: Recycling Your Old Computer Hardware Disposing of electronic waste responsibly has been an HP priority for more than 20 years. If this computer is a replacement for an older PC you no longer need, go to www.hp.com/go/recycle to find out how HP can help you dispose of your old computer with minimum impact on the planet. The recycling option is not available in all countries/regions.
Software Overview What Is HP TouchSmart Software? The HP TouchSmart software suite comes preinstalled on your new computer. HP TouchSmart is designed to maximize the touch features on your new computer. You can personalize HP TouchSmart for quick access to your favorite online programs, the Web, and RSS feeds. From the HP TouchSmart homepage, quickly view your photos, watch videos, play music, or search the Internet with a few taps. View the TouchSmart tutorials at www.hp.
Action Description (continued) Go to the Windows desktop Tap the Windows 7 icon in the upper-left corner to minimize HP TouchSmart and go to the Microsoft Windows desktop. Scroll browsing To quickly scroll left and right or up and down, you can touch and drag your finger across the screen in the direction you want to scroll. There must be enough items for scrolling to work. Tile View browsing Drag your finger across the tiles to browse through them, and then tap a tile to open it.
CAUTION: Because the HP TouchSmart touch screen uses a sensitive touch technology, to avoid damaging the touch screen, do not apply pressure on the front of the display bezel or around the screen borders. CAUTION: To achieve the best touch sensitivity, keep the screen clean of foreign objects. Avoid excessive dust accumulation on all sides of the screen.
Except for the Music tile, applications close as they are dragged to the lower tile row. You can play and control music at any time by using the music icons that appear at the top right of the screen. Creating new tiles 1 Open the HP TouchSmart homepage by clicking the HP TouchSmart icon. 2 Tap the Personalize button. 3 Select Create a new tile. 4 Select HP TouchSmart Program, tap Windows Program or Websites, and then tap Next.
Hiding tiles To temporarily hide a tile: 1 From the HP TouchSmart homepage, tap the Personalize button. 2 In the list of tiles, tap a tile that is enabled. 3 Tap Hide tile in HP TouchSmart in the Visibility field. 4 Tap Done to save your changes and return to the HP TouchSmart homepage. The tile you disabled is now hidden from view. Deleting tiles 1 From the HP TouchSmart homepage, tap the Personalize button. 2 Select Delete, and then tap Yes. 3 Tap Done. Only the shortcut is deleted from the Tile View.
RSS Feeds Not available in all countries/regions RSS is a more efficient way of getting information from Web sites and blogs. Instead of searching for updated news and information, you receive updates in the form of a live feed, called an RSS (really simple syndication) feed. Some RSS feeds distribute other types of digital content, including pictures, audio files, videos, or updates to view when you choose. HP TouchSmart includes an RSS Feed Reader where you view feeds from Web sites.
Photo library You can view any photos you have on your hard drive with HP TouchSmart Photos. To get photos from your camera: 1 Remove the memory card from your camera, and insert it into the memory card reader on the lowerright side of the computer. (Alternatively, use the USB cable that came with the camera, and connect the cable to the camera and then to a USB port in the computer.) The HP TouchSmart view minimizes automatically and a Microsoft dialog appears. 2 Tap Open folder to view files.
Hiding photos You can hide some of your photos so they do not show up in HP TouchSmart Photo. 1 From your Windows desktop, browse to the photo or folder you do not want to show in the Photos tile in HP TouchSmart Photo. 2 Right-click the photo, and click Properties. 3 Click the General tab, and Attributes, click Hidden. You can still see hidden folders in Windows if you want, by following these steps: 1 Click the Start button. 2 Click Control Panel, and then click Appearance and Personalization.
Moving music files into HP TouchSmart Music First, put music files on your hard drive in your Music folder: 1 Click the Start button, and click Music. 2 Navigate to the library where you want your music stored—either the Music folder or the iTunes folder within the Music folder—and open the library. 3 Put music into the Music folder or the iTunes folder within the Music folder in several ways: Buy or download free music from the Internet.
5 Press Finish when the album is identified, and wait while the album information downloads (cover art, date of production, and more). You can also create your own art: 1 Find a piece of art on the Internet and download it to your hard drive. You might find the artwork of the original CD cover, and choose that. 2 Open your Music folder and find the album that does not have artwork. 3 Drag and drop, or cut and paste, the art to the blank CD icon in your Music folder.
Music Store Not available in all countries/regions. Internet connection required. The Music Store option within the Music tile gives you free access to millions of songs. If you do not have a subscription to Rhapsody, you can still hear 30 seconds of any song in its catalogs. With a (free) subscription to Rhapsody (select locations only), you can search for music by What’s New, Genres, Channel Guide (radio stations), Playlists, or your own custom playlists.
Webcam and microphone A built-in webcam and microphone array are located at the top of your computer. Use them to capture videos and have video chats and conference calls using instant messaging software (download the instant messaging software of your choice; it is not included with HP TouchSmart). The webcam (A) and microphones (B) are at the top center of the computer. To adjust the viewing angle of the webcam shot, tilt the screen, or use the webcam adjustment lever (C) just behind the webcam.
Making a video 1 To access the webcam, tap the Video tile to start. 2 At the bottom of the window, tap the Webcam button. 3 A viewing box opens on the screen and displays what the webcam sees; tilt the screen or move yourself to get a better view. 4 If you need time to set up, tap the 3 Second Delay check box. Tap it again if you want to turn off the feature. 5 Tap Record. 6 When the video is finished, tap Stop Recording. To review the video, tap the Play video.
Uploading videos to YouTube The YouTube Web site is not available in all countries/regions. You must create an account with YouTube before you can upload your videos to YouTube (select models only). You can set up an account with YouTube from HP TouchSmart Video. 1 Open HP TouchSmart, and select the Video tile. 2 Select Dates or Folders. 3 Tap the video you want to upload to YouTube. 4 Tap Upload to YouTube.
HP TouchSmart Movie Themes With the Movie Themes option on the Video tile, you can make your movies have the same look and feel as some of your favorite films. Tap the tile to open it, and view your options, such as a classic black and white look, or a science fiction look and feel. HP TouchSmart Calendar HP TouchSmart Calendar is a calendar where you manage your (and your family’s) schedule. You can view and print scheduled events.
Deleting notes To delete a note: 1 Open HP TouchSmart, and select the Notes tile. 2 Press and drag the note to delete into the Recycle Bin in the bottom right corner of the window. 3 Tap the Recycle Bin icon to open it, tap to select the items you want to delete, and then tap the Delete Selected button. 4 Tap Done. To restore a note (you can do this only if you have not deleted the file from the Recycle Bin): 1 Open the Recycle Bin. 2 Select the note you want to restore (by tapping it).
HP TouchSmart Recipe Box Not available in all countries/regions. Internet connection required. The Recipe Box tile is an interactive way to have your computer dictate recipe ingredients and procedures while you cook. As you do the preparation and cooking, the computer talks you through it. If you need more time, you tell it to stop, and then when you are ready, it continues from where it left off. The computer needs to be fairly close to the kitchen for the interactive feature to work well.
HP TouchSmart Netflix Not available in all countries/regions An Internet connection and a Netflix account is required. With Netflix you can instantly watch movies (even some new releases) and TV episodes streamed from Netflix to your computer. Tap the tile to open it and follow the directions. Live TV Select models only. TV tuner required. With Live TV you can watch local TV and cable content. The tile contains an electronic programming guide so you can easily find TV programs.
With this program: CyberLink Power2Go CyberLink YouCam CyberLink LabelPrint CyberLink PowerDirector HP Advisor You can: (continued) Record data and music files. Record a copy of an existing music or data CD for use on your computer. Create customized music CDs from CDs in your collection, or from .wav, .mp3, or .wma files. You can play these CDs on your home or car stereo. Copy and share data files. Create archive CDs or DVDs from files on your computer. Copy video files.
46 User Guide (Features may vary by model)
Remote Control Using the remote control Select models only The remote control works with Windows Media Center and other software. This remote control helps you navigate on the computer just as a TV remote control helps you navigate cable TV options or control the playback of a movie in a DVD player.
Remote control buttons 1 On/Off — Puts the computer into and out of a power-reduced Sleep mode. It does not turn the computer off. 2 Visualization — Displays visual imagery synchronized to the sound of the music tracks. 3 Music — (Windows Media Center only) Opens the Music Library window in Windows Media Center. 4 Radio — (Windows Media Center only) Opens the FM Radio window in Windows Media Center. 5 Guide — (Windows Media Center only) Opens the Television Program Guide.
21 A/V source button — For HP TouchSmart600 PC game console models only. 22 Picture — (Windows Media Center only) Opens the Pictures Library window. 23 Video — (Windows Media Center only) Opens the Videos Library window. 24 Live TV — (Windows Media Center only) Displays the full-screen view of live TV. Moves a TV program forward to the end of the pause buffer and resumes playing live TV. 25 OK — Selects the desired action or window option and acts as the Enter key.
50 User Guide (Features may vary by model)
Software Troubleshooting and System Recovery Software Troubleshooting Your computer uses the operating system and installed software programs during normal operation. If your computer works improperly or stops because of the software, you may be able to repair it. Some software repairs are as simple as restarting your computer, and others require performing a system recovery from files on your hard disk drive.
Microsoft System Restore Microsoft Windows 7 includes a feature that enables you to restore your computer configuration to a configuration that was in use before the current software problem existed. The feature does this by creating a restore point where it records the computer settings at that time and date. When a new program is installed, the operating system automatically creates a restore point before it adds the new software. You can also set restore points manually.
To uninstall a program: 1 Close all software programs and folders. 2 Uninstall the damaged program: a Click the Start button, and then click Control Panel. b Under Programs, click Uninstall a program. c Select the program you want to remove, and then click Uninstall. d Click Yes if you want to continue with the uninstall process. To reinstall a program using the Recovery Manager: 1 Click the Start button, click All Programs, click Recovery Manager, and then click Recovery Manager.
System Recovery System recovery completely erases and reformats the hard disk drive, deleting all data files you have created. System recovery reinstalls the operating system, programs, and drivers. However, you must reinstall any software that was not installed on the computer at the factory. This includes software that came on CDs included in the computer accessory box, and software programs you installed after purchase.
System recovery options You should attempt a system recovery in the following order: 1 Through the hard disk drive, from the Windows 7 Start menu. 2 Through the hard disk drive, by pressing the F11 key on the keyboard during system startup. 3 Through recovery discs that you create. 4 Through recovery discs purchased from HP Support. To purchase recovery discs, go to www.hp.com/support and visit the Software & Driver downloads page for your computer model.
6 If you are prompted to back up your files, and you have not done so, select Back up your files first (recommended) button, and then tap Next. Otherwise, select Recover without backing up your files button, and then tap Next. System recovery begins. After system recovery is complete, tap Finish to restart the computer. 7 Complete the registration process, and wait until you see the desktop. 8 Turn off the computer, reconnect all peripheral devices, and turn the computer back on.
Additional Troubleshooting For additional troubleshooting solutions, refer to the following: HP Support Assistant HP Support Assistant helps you maintain your PC performance and resolve problems faster with automated updates, onboard diagnostics, and guided assistance. To open HP Support Assistant, tap the Start button, All Programs, HP, and then tap HP Support Assistant.
58 User Guide (Features may vary by model)
Index Numerics 32-bit system 13 64-bit system 13 A AC adapter 9 adapter, composite video-to-S-Video 18 album art 35 Ambient Light feature 6, 13 audio Line In connector 6 Line Out connector 7 troubleshooting 20 Windows Media Center 22 B backup 53 backup discs, creating 53 Bluetooth antenna features 4 using 16 Browser tile 31 button computer power/sleep 5 DVD control 5 HP TouchSmart 5 C cable management 9 Calendar tile 41 camera distance from 38 position 38 Canvas tile 34 carpal tunnel syndrome 25 CD burn
HP TouchSmart cleaning the touch screen 25 finding information vi navigating 27 opening 27 start button 5 updating the computer software 44 using the software 27 what is it 27 I Internet connection 14 IR emitter cable connecting to a set-top box 19 cable connecting to computer 19 port 7 IR receiver, remote control 5 iTunes 35 N NetFlix tile 44 network wired 7, 15 wireless 5, 14 network connection 14 Notes tile 41 deleting a note 42 voice notes 41 O onscreen keyboard 29 optical drive LED 8 K Kensington s
set-top box connecting to computer 19 remote emitter cable for 19 with Windows Media Center 18 sleep mode 14 slideshows, making 33 software reinstalling 52 repairing 51 updating 44 upgrading 13 software programs DVD Play 44 songs, deleting 36 SoundMAX connecting speakers 21 enabling digital speaker or audio receiver 21 microphones 22 speaker volume 21 speakers 5 adjusting volume 21 connecting 21 connecting digital or audio receiver 20 features 5 support information vi support tutorials vi, 31 S-Video adapte
Part number: 575631-001