
Upgrade and Service Guide


40,I'LVN$UUD\;32U7DSH/LEUDU\'RHV1RW5HSRUWRU5HIUHVK6WDWXV
If Disk Array XP256 Or Tape Library Does Not Report
or Refresh Status
$IWHU6$10DQDJHU'0LVVXFFHVVIXOO\LQVWDOOHGLWGLVFRYHUVLWVVXSSRUWHGGHYLFHVDQG
GLVSOD\GHYLFHLFRQVRQDJUDSKLFDOPDS7KHVHLFRQVUHSRUWVWDWXVE\WKHLUEDFNJURXQG
FRORU7KH+36XUH6WRUH('LVN$UUD\;3DQG+36XUH6WRUH(7DSH/LEUDULHVPRQLWRU
VWDWXVRXWRIEDQGDQGWKHUHIRUHUHTXLUHGDGGLWLRQDOFRQILJXUDWLRQ
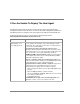
Symptom Cause/Solution
The Disk Array XP256 or
Tape Library icon does not
appear to be refreshing or
reporting status
information.
IP address for device not entered in Device IP discovery range
during initial installation of SAN Manager DM. Add the device’s IP
address to SAN Manager DM’s IP discovery range.
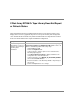
1. Start SAN Manager DM.
2. Click the Configuration tab.
3. In the Scope pane, click the expansion icons until the Device
Monitoring Agent appears.
4. Select Device Monitoring Agent to display its attributes and
configurable values in the Results Pane.
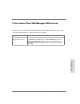
5. In the Results Pane, select DEVICE_IP_DISCOVERY_RANGE,
then click the Insert Row button.
6. Enter the IP address of the Disk Array XP256 or Tape Library in
the new row.
7. Click the Accept button to save changes.