
Installation Manual


24 Preparing a Fibre Channel Disk for use with SAN Manager LM
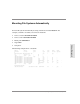
The partition information is displayed along with the enter partition ID tag prompt:
partition> 0
Part Tag Flag Cylinders Size Blocks
0 root wm 0 - 51 130.41MB (52/0/0) 267072
Enter partition id tag[root]:
7. Assign a partition id tag, or press Return to accept the default value.
8. When prompted with Enter partition permission flags[wm]:, press Return to
accept the default setting.
9. When prompted with Enter new starting cyl, enter the starting cylinder number.
Caution Do not enter a cylinder number that overlaps another partition. The exception
to this rule is slice 2, which always represents the entire disk.
10. When prompted with Enter partition size, enter the size of the desired partition in
blocks (b), cylinders (c), megabytes (mb), or gigabytes (gb), and press Return.
11. Repeat steps 6 through 10 for subsequent partitions.
12. If extra partitions are defined in the partition table, delete them by using the following
settings:
Enter partition id tag[swap]:
Enter partition permission flags[wu]:
Enter new starting cyl[103]: 0
Enter partition size[263680b, 103c, 128.75mb, 0.13gb]: 0
Caution Do not delete the information listed under slice 2.
To view the partition table, enter p at the partition prompt, and press Return. Note the
slice numbers that were used. This information, along with the disk name, will be
needed in the section Creating a UFS File System on page 26.
13. At the partition prompt, enter label and press Return.