
Installation Manual


Preparing a Fibre Channel Disk for use with SAN Manager LM 23
Storage Management
2. Enter the disk number and press Return.
If there is no valid partition table, the Format utility prompts you to label the disk:
Disk not labeled. Label it now? n
3. If you want to label the disk with the default partition table, enter y and press Return.
If you want to set up the partition label manually, enter n and press Return.
4. At the format prompt, enter p to select (define) a partition table, and press Return.
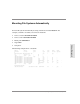
5. At the partition prompt, type p and press Return to display the current partition table:
partition> p
Current partition table (default):
Total disk cylinders available: 54193 + 2 (reserved cylinders)
Part Tag Flag Cylinders Size Blocks
0 root wm 0 - 102 128.75MB (103/0/0) 263680
1 swap wu 103 - 205 128.75MB (103/0/0) 263680
2 backup wu 0 - 54192 66.15GB (54193/0/0) 138734080
3 unassigned wm 0 0 (0/0/0) 0
4 unassigned wm 0 0 (0/0/0) 0
5 unassigned wm 0 0 (0/0/0) 0
6 usr wm 206 - 54192 65.90GB (53987/0/0) 138206720
7 unassigned wm 0 0 (0/0/0) 0
partition>
If you used the default partition table in Step 3, slices 0, 1, and 6 are created. Slice 2
represents the entire disk.
6. At the partition prompt, enter the partition number that you want to change, and press
Return.