
Installation Manual


Preparing a Fibre Channel Disk for use with SAN Manager LM 21
Storage Management
Preparing a Fibre Channel Disk for use with SAN
Manager LM
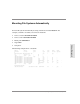
1. On a Windows NT SAN Manager LM node, run the administration application and assign
the desired devices to the Solaris node.
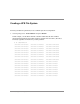
2. To verify that the assigned SAN Manager LM disks are available, enter ls /dev/rdsk to
list the available disk devices on the Solaris node.
The Solaris node creates eight slices (partitions) for every accessible device. The slice
names are listed as numbers 0 through 7, with slice number 2 representing the entire
device. For non-UPM devices, the node creates a single device (LUN) name with eight
slices. In contrast, when you assign a UPM device to a Solaris node, a separate device
name with eight slices is listed for each UPM partition on the device. This is called a
virtual LUN, because it is really a UPM partition on a disk, but Solaris views it as a
separate device.
Slice Name Conventions
The slice name c1t127d49s0 includes the following components:
• c1 refers to the controller the storage device is connected to.
• t127 refers to the target number for the LUN.
Note Target numbers under 127 represent targets that are on hubs, and target
numbers over 127 indicate targets that are on switches. If a slice has target
number 127, the device is partitioned with SAN Manager LM’s UPM format.
• d49 is the logical unit number of the device.
• s0 is the slice (partition) number of the device.
Your SAN storage is now ready to be formatted.