
- Hewlett-Packard Computer Drive User Manual

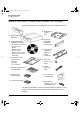
Table Of Contents
- Internal Drives—Installation Overview
- Contents
- Product Details
- Installing an “i” Model Drive (internal)
- Before You Start: Check the Contents of the Box
- Before You Start: Check System Prerequisites
- Step 1: Check the Drive’s SCSI ID
- Step 2: Set the Configuration Switches (UNIX Systems Only)
- Step 3: Prepare the Mounting Bay
- Step 4: Attach Mounting Rails
- Step 5: Install the Drive
- Step 6: Attach Power and SCSI Cables
- Step 7: Secure the Drive
- On Completion
- Installation Troubleshooting

iii
Contents
Internal Drives—Installation Overview inside front cover
1 Installing an “i” Model Drive (internal)
Before You Start: Check the Contents of the Box 1-2
Before You Start: Check System Prerequisites 1-3
SCSI Host Adapter 1-3
SCSI Ribbon Cable 1-3
Half-Height Bay 1-4
Mounting Rails 1-4
Backup Software 1-5
Step 1: Check the Drive’s SCSI ID 1-6
Installing and Using HP TapeAssure 1-8
Step 2: Set the Configuration Switches
(UNIX Systems Only) 1-10
Step 3: Prepare the Mounting Bay 1-11
Using the Conversion Kit 1-12
Step 4: Attach Mounting Rails 1-14
Step 5: Install the Drive 1-16
Step 6: Attach Power and SCSI Cables 1-17
Step 7: Secure the Drive 1-19
On Completion 1-20
Use Correct Media 1-20
Check Drive Operation 1-21
Insert the HP SureStore Tape CD-ROM 1-22
Register Your Tape Drive 1-25
Limited Warranty Statement for USA, Canada, Australia and New
Zealand 1-25
2 Installation Troubleshooting
Save Yourself a Call 2-2
Problems with Your Computer 2-2
Problems with Your Internal Tape Drive 2-3
Other Sources of Information 2-4
HP Tape Tools 2-4
HP SureStore Tape CD-ROM 2-4
HP Web Site 2-4
Dat-int.bk Page iii Wednesday, May 26, 1999 10:46 AM