
- Hewlett-Packard Computer Drive User Manual

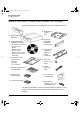
Table Of Contents
- Internal Drives—Installation Overview
- Contents
- Product Details
- Installing an “i” Model Drive (internal)
- Before You Start: Check the Contents of the Box
- Before You Start: Check System Prerequisites
- Step 1: Check the Drive’s SCSI ID
- Step 2: Set the Configuration Switches (UNIX Systems Only)
- Step 3: Prepare the Mounting Bay
- Step 4: Attach Mounting Rails
- Step 5: Install the Drive
- Step 6: Attach Power and SCSI Cables
- Step 7: Secure the Drive
- On Completion
- Installation Troubleshooting

Copyright © 1998-1999 by Hewlett-Packard
Limited.
The information contained in this document is
subject to change without notice.
This document contains proprietary information
which is protected by copyright. All rights are
reserved. No part of this document may be
photocopied, reproduced or translated to another
language without the prior written consent of
Hewlett-Packard Limited.
Hewlett-Packard shall not be liable for errors
contained herein or for incidental or consequential
damages (including lost profits) in connection with
the furnishing, performance, or use of this material
whether based on warranty, contract, or other legal
theory.
November 1999
Part Number: C1555-90909
Printed in the UK.
Windows is a U.S. registered trademark of
Microsoft Corp.
UNIX is a registered trademark of X/Open
Company in the U.S. and other countries.
Product Details
Write your tape drive details here so you can find them easily if you need them. You will find the model
number and serial number on the bottom of the drive.
Model (type of drive):
Model (number):
Serial (number):
Date purchased/installed:
SCSI ID:
Dat-int.bk Page ii Wednesday, May 26, 1999 10:46 AM