HP Smart Update Firmware DVD User Guide Part Number 447788-402 July 2010 (Eleventh Edition)
© Copyright 2007, 2010 Hewlett-Packard Development Company, L.P. The information contained herein is subject to change without notice. The only warranties for HP products and services are set forth in the express warranty statements accompanying such products and services. Nothing herein should be construed as constituting an additional warranty. HP shall not be liable for technical or editorial errors or omissions contained herein. Confidential computer software.
Contents Introduction .................................................................................................................................. 5 HP Smart Update Firmware DVD overview ...................................................................................................... 5 Minimum requirements .................................................................................................................................. 5 Supported firmware .........................................
Recovering from a failed option ROM upgrade ................................................................................... 37 Recovering from an installation failure .......................................................................................................... 38 Collecting trace directories ................................................................................................................ 38 Recovering from a discovery failure ..................................................
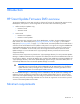
Introduction HP Smart Update Firmware DVD overview The HP Smart Update Firmware DVD provides a collection of firmware for supported HP ProLiant servers, BladeSystems, and options in an ISO image that can be used in either of the following modes: • • Offline mode (local updates only) o Interactive mode o Automatic mode Online mode o Interactive local updates o Interactive remote updates The Firmware DVD also contains firmware for the BladeSystem.
NOTE: HP Smart Update Manager requires a true Administrator login and not an elevated RUN AS Administrator. If you are unable to perform the net use * \\server\ADMIN$ for Microsoft Windows® target servers, you do not have sufficient privileges to run HP Smart Update Manager.
IMPORTANT: The HP Smart Update Manager does not support cross-platform deployments (for example, deployments from Linux systems to Windows® systems).
Obtaining the HP Smart Update Firmware DVD The Smart Update Firmware DVD can be downloaded at no cost from the HP Technical Support website (http://www.hp.com/support) and HP Insight Foundation Suite for ProLiant website (http://www.hp.com/go/foundation) and is available as part of the HP Insight Foundation suite for ProLiant kit. The HP Smart Update Manager utility is available from the Smart Update Firmware DVD.
Smart Update Firmware DVD contents Release sets and bundles A release set is an enhanced, solutions-oriented collection of ProLiant BladeSystem firmware released on a regular basis. The full collection is tested against HP software, drivers, and PSPs to drive standardization of components to HP customers. The release set can only be applied in interactive mode and by selecting the blade system bundle. HP recommends that you not deviate from the release set firmware contents.
based dependencies from derailing an installation and ensures firmware updates are handled in a manner that reduces any downtime required for the firmware update process. HP SUM does not require an agent for remote installations as it copies a small, secure SOAP server to the target server for the duration of the installation. After the installation is complete, the SOAP server and all remote files associated with the installation except installation log files are removed.
Deployment options Host types You can run the Smart Update Firmware DVD either online or offline. When performing an online deployment, you must boot the server from the operating system that is already installed and running.
— On Linux operating systems, enter /autorun NOTE: If you are using a USB drive key with multiple CD images, navigate to the appropriate CD subfolder to launch autorun for the Smart Update Firmware DVD. 2. Read the End-User License Agreement. To continue, click Agree. The Smart Update Firmware DVD interface appears. 3. Click the Firmware Update tab. 4. Click Install Firmware. The HP Smart Update Manager is initiated. 5. Select and install components.
1. Obtain SYSLINUX 3.5 or higher from The Syslinux Project website (http://syslinux.zytor.com/index.php) and download to a Linux workstation. 2. Install the SYSLINUX RPM obtained in step 1. 3. If a directory does not already exist, create one for the USB key mountpoint. For example, mkdir /usbkey. 4. Insert the USB key, and mount it. The device mountpoint can vary depending on whether other SCSI drives are also installed on the server. Therefore, the device mountpoint can be sdb1, sdc1, and so on.
4. Execute HP Smart Update Manager to have the new firmware components recognized. Deploying components not on Smart Update Firmware DVD If you have components that are not on the Smart Update Firmware DVD that you want to deploy, you can include other smart components to HP Smart Update Manager environment. To deploy software and firmware components that are not on the Smart Update Firmware DVD: 1. Obtain the components from the HP website (http://www.hp.com). 2.
can be re-enabled. Once the BitLocker Drive Encryption has been re-enabled, the plain text key is removed and BitLocker secures the drive again. NOTE: Temporarily disabling BitLocker Drive Encryption can compromise drive security and should only be attempted in a secure environment. If you are unable to provide a secure environment, HP recommends providing the boot password and leaving BitLocker Drive Encryption enabled throughout the firmware update process.
When the firmware update process is completed, the BitLocker Drive Encryption support can be reenabled by following steps 1 through 4 but clicking Enabled in step 5 instead. The following command can be used to re-enable BitLocker Drive Encryption after firmware deployment has completed. cscript manage-bde.wsf -protectors -enable c: TPM scenarios The following table discusses the TPM detection scenarios that you might encounter.
Setup Before proceeding with the configuration, ensure that your TFTP server and PXELinux configuration is setup and configured properly. To set up PXELinux: 1. Copy a Firmware DVD ISO image to the network file system, and note its location. NFS and Windows® file shares are supported. 2. For this example, the NFS and path to the ISO image used is 192.168.0.99:/path/to/fwdvd/image/FW900.iso. Test your network file system to ensure that is accessible before proceeding. 3.
Your final configuration must be similar to the following example: label sos MENU LABEL Automatic Firmware Update Version 9.10 kernel vmlinuz append initrd=initrd.img media=cdrom rw root=/dev/ram0 ramdisk_size=257144 init=/bin/init loglevel=3 ide=nodma ide=noraid pnpbios=off vga=791 splash=silent showopts TYPE=AUTOMATIC iso1=nfs://192.168.0.99/path/to/fwdvd/image/FW900.iso iso1mnt=/mnt/bootdevice label vsos MENU LABEL Interactive Firmware Update Version 9.10 kernel vmlinuz append initrd=initrd.
To deploy firmware and software components from Windows® PSPs and server blade bundles simultaneously, run the HP Smart Update Manager. On the Select Bundle Filter screen, select the bundle, and then select the ALLOW NON-BUNDLE PRODUCTS option. To proceed with the deployment process, click OK. The Select Items to be Installed screen appears with the appropriate firmware and software components. For more information on the PSPs, see the HP ProLiant Support Pack User Guide.
Smart Update Firmware DVD Automatic Deployment Mode Overview HP Smart Update DVD, in conjunction with Release Sets, provide a collection of firmware smart components that have been tested together in complex industry-like scenarios to ensure compatibility across varying firmware and software stacks. The tool is designed for users who do not have an installed operating system on their blades or who want an unattended, automated method of deploying firmware in an offline environment.
Updating the firmware on a server To update the firmware on a server, you have the following options: • Updating an individual server locally (on page 21) • Updating an individual server remotely (on page 21) • Updating multiple servers simultaneously (on page 22) • Updating multiple enclosures simultaneously (on page 24) Updating an individual server locally To update an individual server using Automatic Mode, use the c-Class SUV cable.
NOTE: Do not close the virtual media web page, or it might disconnect the ISO image. 9. Return to the iLO 2 webpage. 10. Click the Power Management tab. 11. Using the Momentary Press button, power up the server. NOTE: If the server is powered up, click the Momentary Press button to shut down the server, and then click the Momentary Press button again to power it back up. 12. Click OK when prompted to power up the server. 13.
10. You must either plug in the KVM dongle or use iLO Remote Console support to browse into the affected server to determine the cause of failure. Automatic Mode loads the error log into a vi editor window for review. HP recommends resolving the error before installing or restarting the operating system. Automatic Mode might not boot with some third-party external Fibre Channel storage attached.
Updating multiple enclosures simultaneously To update multiple enclosures simultaneously, you may use RIBCL scripts. RIBCL scripts RIBCL enables you to write XML scripts to configure and manage iLO 2 configuration settings, user accounts, directory settings, server settings, and HP Systems Insight Manager SSO settings. You can create your own scripts using RIBCL. IMPORTANT: To run RIBCL scripts, you must have the iLO Advanced license.
Sample scripts The sample script is used to control updating firmware on blades in an enclosure. This script connects virtual media to each iLO in the enclosure. The script can either invoke the RIBCL script directly or invoke a wrapper script containing an invocation of the RIBCL script. The "for" loop at the bottom of this file contains two lines, one of which has been commented out. Comment in or out the line for the desired mode of operation.
# If you want to use a pre-made/modified list, just comment out the if statement # and the "show server list" line as well.
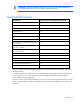
UID light status Meaning Blinking Either a remote console is active, or the Automatic Mode is flashing firmware. Off The firmware update was successful. On At least one of the needed firmware updates failed. The remote console to the server searches for the cause of the error. • If the UID light is off, the update process has completed, and you can install the server operating system or restore the server to its previous operating system.
Advanced topics Server virtualization detection and support HP Smart Update Manager, running in the context of a Windows® PSP, supports server virtualization that runs on a Windows® host. However, HP Smart Update Manager, running in the context of a Windows® PSP, does not run on a VMware host or on a guest operating system environment regardless of what host hypervisor you use.
Configuring IPv6 for Windows Server 2003 For information on setting up a Windows Server® 2003 operating system within an IPv6 network, see the online Microsoft® Technet article Step-by-Step Guide for Setting Up IPv6 in a Test Lab (http://www.microsoft.com/downloads/details.aspx?FamilyID=fd7e1354-3a3b-43fd-955f11edd39551d7&displaylang=en).
IPv6 addresses can be passed to HP Smart Update Manager in command line arguments or using the HP Smart Update Manager user interface. In the HP Smart Update Manager user interface, you can add a remote host on an IPv6 network by either entering the DNS name of the IPv6 target server or by selecting the IPv6 address button and entering the IPv6 address. HP Smart Update Manager supports both the short-name and full IPv6 notation.
Configuring IPv6 for Windows Server 2008 HP Smart Update Manager provides the most robust support for remote deployment when using Windows Vista® as a client to Windows Server® 2008-based servers. Using HP Smart Update Manager in this environment enables you to use all the capabilities of IPv6 including link-local, site-local, and global IP addresses for both local and remote target servers.
IPv6 addresses can be passed to HP Smart Update Manager in command line arguments or using the HP Smart Update Manager user interface. In the HP Smart Update Manager user interface, you can add a remote host on an IPv6 network by either entering the DNS name of the IPv6 target server or by selecting the IPv6 address button and entering the IPv6 address. HP Smart Update Manager supports both the short-name and full IPv6 notation.
Limitations of IPv6 for Windows Server 2003 and Windows Server 2008 Windows Server® 2003 requires site-local addresses to provide the necessary file-sharing capabilities needed by HP Smart Update Manager. This means that link-local and global IPv6 addresses are not supported as remote targets with HP Smart Update Manager. Windows Server® 2008 or Windows® environments do not have any known limitations to using HP Smart Update Manager.
IPv6 addresses can be passed to HP Smart Update Manager in command line arguments or using the HP Smart Update Manager user interface. In the HP Smart Update Manager user interface, you can add a remote host on an IPv6 network by either entering the DNS name of the IPv6 target server or by selecting the IPv6 address button and entering the IPv6 address. HP Smart Update Manager supports both the short-name and full IPv6 notation.
Limitations of IPv6 for Linux The only current limitation of HP Smart Update Manager in a Linux IPv6 environment is that all remote target Linux-based servers must have the iptables-ipv6 rpm file installed. You can find the file on the distribution media for both Red Hat Enterprise Linux and Novell SUSE Linux Enterprise Server operating systems. HP Smart Update Manager uses this file to open a port in the IPv6 firewall to communicate with the Linux system that runs HP Smart Update Manager.
Troubleshooting Recovering from a failed ROM upgrade Recovering from a failed system ROM upgrade Use redundant ROM or ROMPaq to recover from a system ROM upgrade failure. Redundant ROM recovery When you flash the system ROM, ROMPaq writes over the backup ROM and saves the current ROM as a backup, enabling you to switch easily to the alternate ROM version if the new ROM becomes corrupted for any reason.
6. Power up the server. The server generates one long beep and two short beeps to indicate that it is in disaster recovery mode. If the disk is not in the correct drive, then the system continues to beep until a valid ROMPaq disk is inserted. The ROMPaq disk flashes both system ROM images. If successful, a sequence of ascending audible beeps is generated. If unsuccessful, a sequence of descending audible beeps is generated, and you must repeat the disaster recovery process. 7. Power down the server. 8.
Recovering from an installation failure Collecting trace directories HP Smart Update Manager generates a set of debug trace logs located in the %TEMP%\hp_sum directory on Windows systems and \tmp\hp_sum on Linux systems. These files contain internal process and debug information, which can be useful in determining HP Smart Update Manager failures. NOTE: To break out to a Linux console while booted to the Smart Update Firmware DVD, press Ctrl Alt D B X. Each key (D, B, X) is hit in succession.
The following is an example of how the output trace in the OpMan.trace determines if a component was prevented from being shown on the Select Items to Install screen or being deployed from the silent console mode. In the example, the binary image files 0.bin and 1.bin (which represented iLO firmware files), components cp011301.exe and cp011500.exe, and the HP BladeSystem Firmware Update Bundle for Windows® represented by bundle file bp000648.xml were added to the installation set.
• For Linux, ensure that the target server can be contacted through SSH and that the scp command is available to securely send files to the target server. • Ensure the firewall ports on any routers in the network as documented in the Enabling ports in HP Smart Update Manager section of this document. • The Symantec End Point Protection product (SEP) blocks HP Smart Update Manager ability to communicate with remote targets if the Network Threat Analysis feature is enabled.
Recovering from a blocked program on Microsoft Windows Configuring Windows firewall settings The Windows® Security Alert appears when a program is blocked from accepting connections from the Internet or a network. To set the rules for the Windows® Firewall and Security Policy, click Unblock, and then set your firewall settings to the following: 1. Click Start>Control Panel>Administrative Tools>Windows Firewall with Advanced Security>Inbound Rules>Remote Administration (NP-IN). 2.
scanning software from denying service to the application. The SOAP server is deployed on the remote target using the initial ports described above (ports 138, 445, and 22) and then allocates another independent port as documented below for its communications back to the workstation where HP Smart Update Manager is running. During shutdown of HP Smart Update Manager, the SOAP server is shutdown and removed from the target server, leaving the log files.
Ports 60000-60007 Random ports are used in this range to pass messages back and forth between the local and remote systems via SSL. These ports are used on the system running HP Smart Update Manager to send data to the target server. Several internal processes within HP Smart Update Manager automatically use the port from 60000 when no other application uses it. If there is a port conflict, the manager uses the next available one.
system, the message causes the reboot not to occur automatically. For a successful reboot, you must select the Exit button. Recovering from Fatal Error - application will exit message Running in a directory path containing double-byte characters When running in a directory path containing double-byte characters, the HP Smart Update Manager encounters a fatal error while trying to initialize. The HP Smart Update Manager cannot be run in directories containing double-byte characters in the path name.
Troubleshooting HP Smart Update Manager in IPv6 Windows Server 2003 environment To validate that the IPv6 network is configured correctly for HP Smart Update Manager support, you must verify the following based on your operating system version. • Validate that the addresses are site-local. Site-local addresses normally start with "FEC0:". Global and link-local IPv6 addresses are not supported when the remote target is Windows Server® 2003. • Validate that you can ping the remote target server.
• Verify that you can connect to the admin$ share using the credentials within HP Smart Update Manager by issuing the following command at a console prompt: net use * \\.ipv6-literal.net\admin$ /user: net use * \\fec0::2.ipv6-literal.net\admin$ /user:administrator You might need to provide the password if you use a user name that is different from the one you used to log in to the local system. All network shares require the use of the .ipv6-literal.
For additional troubleshooting information, see the HP Smart Update Manager User Guide.
Technical support Reference documentation To download the ProLiant Firmware Maintenance and other CDs, see the SmartStart download website (http://www.hp.com/go/ssdownloads). For general information on management products, refer to the ProLiant Essentials website (http://www.hp.com/servers/proliantessentials).
Acronyms and abbreviations GUI graphical user interface HBA host bus adapter HDD hard drive HPSUM HP Smart Update Manager I/O input/output iLO Integrated Lights-Out iLO 2 Integrated Lights-Out 2 LO100 HP Lights-Out 100 NIC network interface controller POST Power-On Self Test PSP ProLiant Support Pack RBSU ROM-Based Setup Utility Acronyms and abbreviations 49
RIBCL Remote Insight Board Command Language RILOE II Remote Insight Lights-Out Edition II SAN storage area network SAS serial attached SCSI SCSI small computer system interface SOAP Simple Object Access Protocol SSH Secure Shell SSL Secure Sockets Layer VSM Virtual SAS Manager WMI Windows Management Instrumentation Acronyms and abbreviations 50
Index 1 host types 11 HP website 8, 14, 48 100 series servers 9 I A introduction 5 IPv6 network configurations 28 IPv6, troubleshooting 44, 45, 46 ISO image path, specifying 17 advanced topics 28 audience assumptions 5, 20 authorized reseller 48 B BladeSystem firmware 7 blocked HP Smart Update Manager, recovering from 41 booting over a network 16 C components, adding new 14 configuring firewall settings 40, 41 D deploying firmware and software simultaneously 18 deployment, offline 12 deployment, on
recovering from a failed system ROM upgrade 36, 38 redundant ROM 36 references 48 release sets and bundles 9 remote functionality, recovering 40 requirements, minimum 5 ROM recovery, redundant 36 ROM redundancy 36 ROM upgrade, recovering from failed option 37 ROM upgrade, recovering from failed system 36 ROM, array controller 37 ROM, Lights-Out management 37 ROM, storage 37 ROMPaq Disaster Recovery 36 S server virtualization detection and support 28 software and firmware deployment, simultaneous 18 support