
Installation Manual


4 Installing, verifying, and configuring the controller
Card installation varies by server type and model. The following procedures are a general guideline
for installing the card. For more information, see your server documentation.
WARNING! To reduce the risk of personal injury or damage to the equipment, consult the server
documentation safety information. Ensure that you are properly grounded before continuing the
installation procedure to not damage electronic components from electrostatic discharge (ESD).
For more information on ESD safety procedures, see Appendix A (page 35).
Review the installation procedures below before performing any installation.
Installing the controller hardware
WARNING! To reduce the risk of personal injury or damage to the equipment, consult the safety
information and user documentation provided with the server before attempting the installation.
Many servers are capable of providing energy levels that are considered hazardous and are
intended to be serviced only by qualified personnel who have been trained to deal with these
hazards. Do not remove enclosures or attempt to bypass any interlocks that may be provided for
the purpose of removing these hazardous conditions.
To install the card, follow these steps:
1. Remove or open the access panel.
WARNING! To reduce the risk of personal injury from hot surfaces, allow the drives and
the internal system components to cool before touching them.
2. Select an available x8 or larger PCIe slot.
3. Remove the slot cover. Save the retaining screw, if one is present.
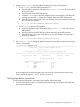
4. Install the cache module on the controller:
a. Install the cache module in the DIMM socket.
b. Verify that the ejector latches on the DIMM socket are firmly closed.
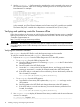
5. Slide the controller board along the slot alignment guide, if one is present, and then press the
board firmly into the slot so that the contacts on the board edge are properly seated in the
system board connector.
6. Secure the controller board in place with the retaining screw. If the slot alignment guide has
a latch (near the rear of the board), close the latch.
7. Close or replace the access panel, then secure it with thumbscrews, if any are present.
CAUTION: Do not operate the server for long periods with the access panel open or removed.
Operating the server in this manner results in improper airflow and improper cooling that can
lead to thermal damage.
Connecting and verifying external storage devices
Follow the procedures in this section to connect and verify external storage devices.
IMPORTANT: SATA disks are not supported when the Smart Array controller is in HBA mode.
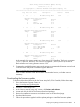
Connecting external storage devices
To connect external storage devices, follow these steps:
1. Power off the server, if necessary.
Installing the controller hardware 11