
User's Guide

NOTE: Beware of copying over into /etc/passwd if your HP-UX is running in Trusted System mode.
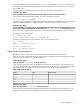
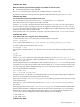
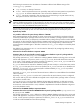
Table 3-3 Password File Users
shellhome directoryGIDUIDusername
<sid>adm
ora<SID>
sqd<SID>
sqa
sap<dbsid>db
Installation Step: IS090
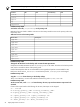
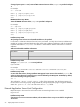
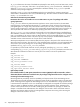
Look at the service file,
/etc/services
, on the primary side.
Replicate all services listed in Table 3-4 Services on the Primary Node that exist on the primary node onto
the backup node.
Table 3-4 Services on the Primary Node
Service portService name
sapdp<INR>
sapdp<INR>s
sapgw<INR>
sapgw<INR>s
sapms<SID>
orasrv
sapdb<INR>
saphostctrl
saphostctrls
Installation Step: IS100
Change the HP-UX kernel on the backup node to meet the SAP requirements.
Compare the Tunable Parameters section of /stand/system on all nodes. All values on the backup nodes
must reach or exceed the values of the primary node.
Install all HP-UX patches that are recommended for Serviceguard and patches recommended for SAP.
Build a new kernel with mk_kernel(1m) on each backup node if /stand/system was changed.
Installation Step: IS110
Copy the
<sid>adm
home directory to the backup node(s).
This is a local directory on each node. Default home directory path is /home/<sid>adm.
Installation Step: IS120
On the second node, in the
<sid>adm
home directory the start, stop and environment scripts need to be
renamed.
If some of the scripts listed in the following do not exist, these steps can be skipped.
su - <sid>adm
mv startsap_<primary>_<INR> startsap_<secondary>_<INR>
mv stopsap_<primary>_<INR> stopsap_<secondary>_<INR>
mv .sapenv_<primary>.csh .sapenv_<secondary>.csh
mv .sapenv_<primary>.sh .sapenv_<secondary>.sh
mv .dbenv_<primary>.csh .dbenv_<secondary>.csh
52 Step-by-Step Cluster Conversion